
Stiff sided diamond trellis basket crocheted from stash yarn for storage – can be made in any size!

I’ve had this idea in my head for a while. When I was making my Zigzag Scarf and Diamond Cowl patterns I noticed that this stitch results in a firm fabric. Dense and cosy for a scarf, but when worked with a slightly smaller hook it becomes stiff and therefore ideal for baskets!
When I got all this yarn from my Great Aunty Di this was one of the projects I thought I’d make. I had about 200g of dk yarn in several part used balls of grey, all very similar but I knew it would show that they were different if I tried to use them all in one item – unless I crocheted something with them all held together!
Update 21/08/2014: You can view my video of the stitch pattern here!
I used 3 strands at once and a 6mm hook. You really could use a mix of different colours and yarn weights if you prefer.
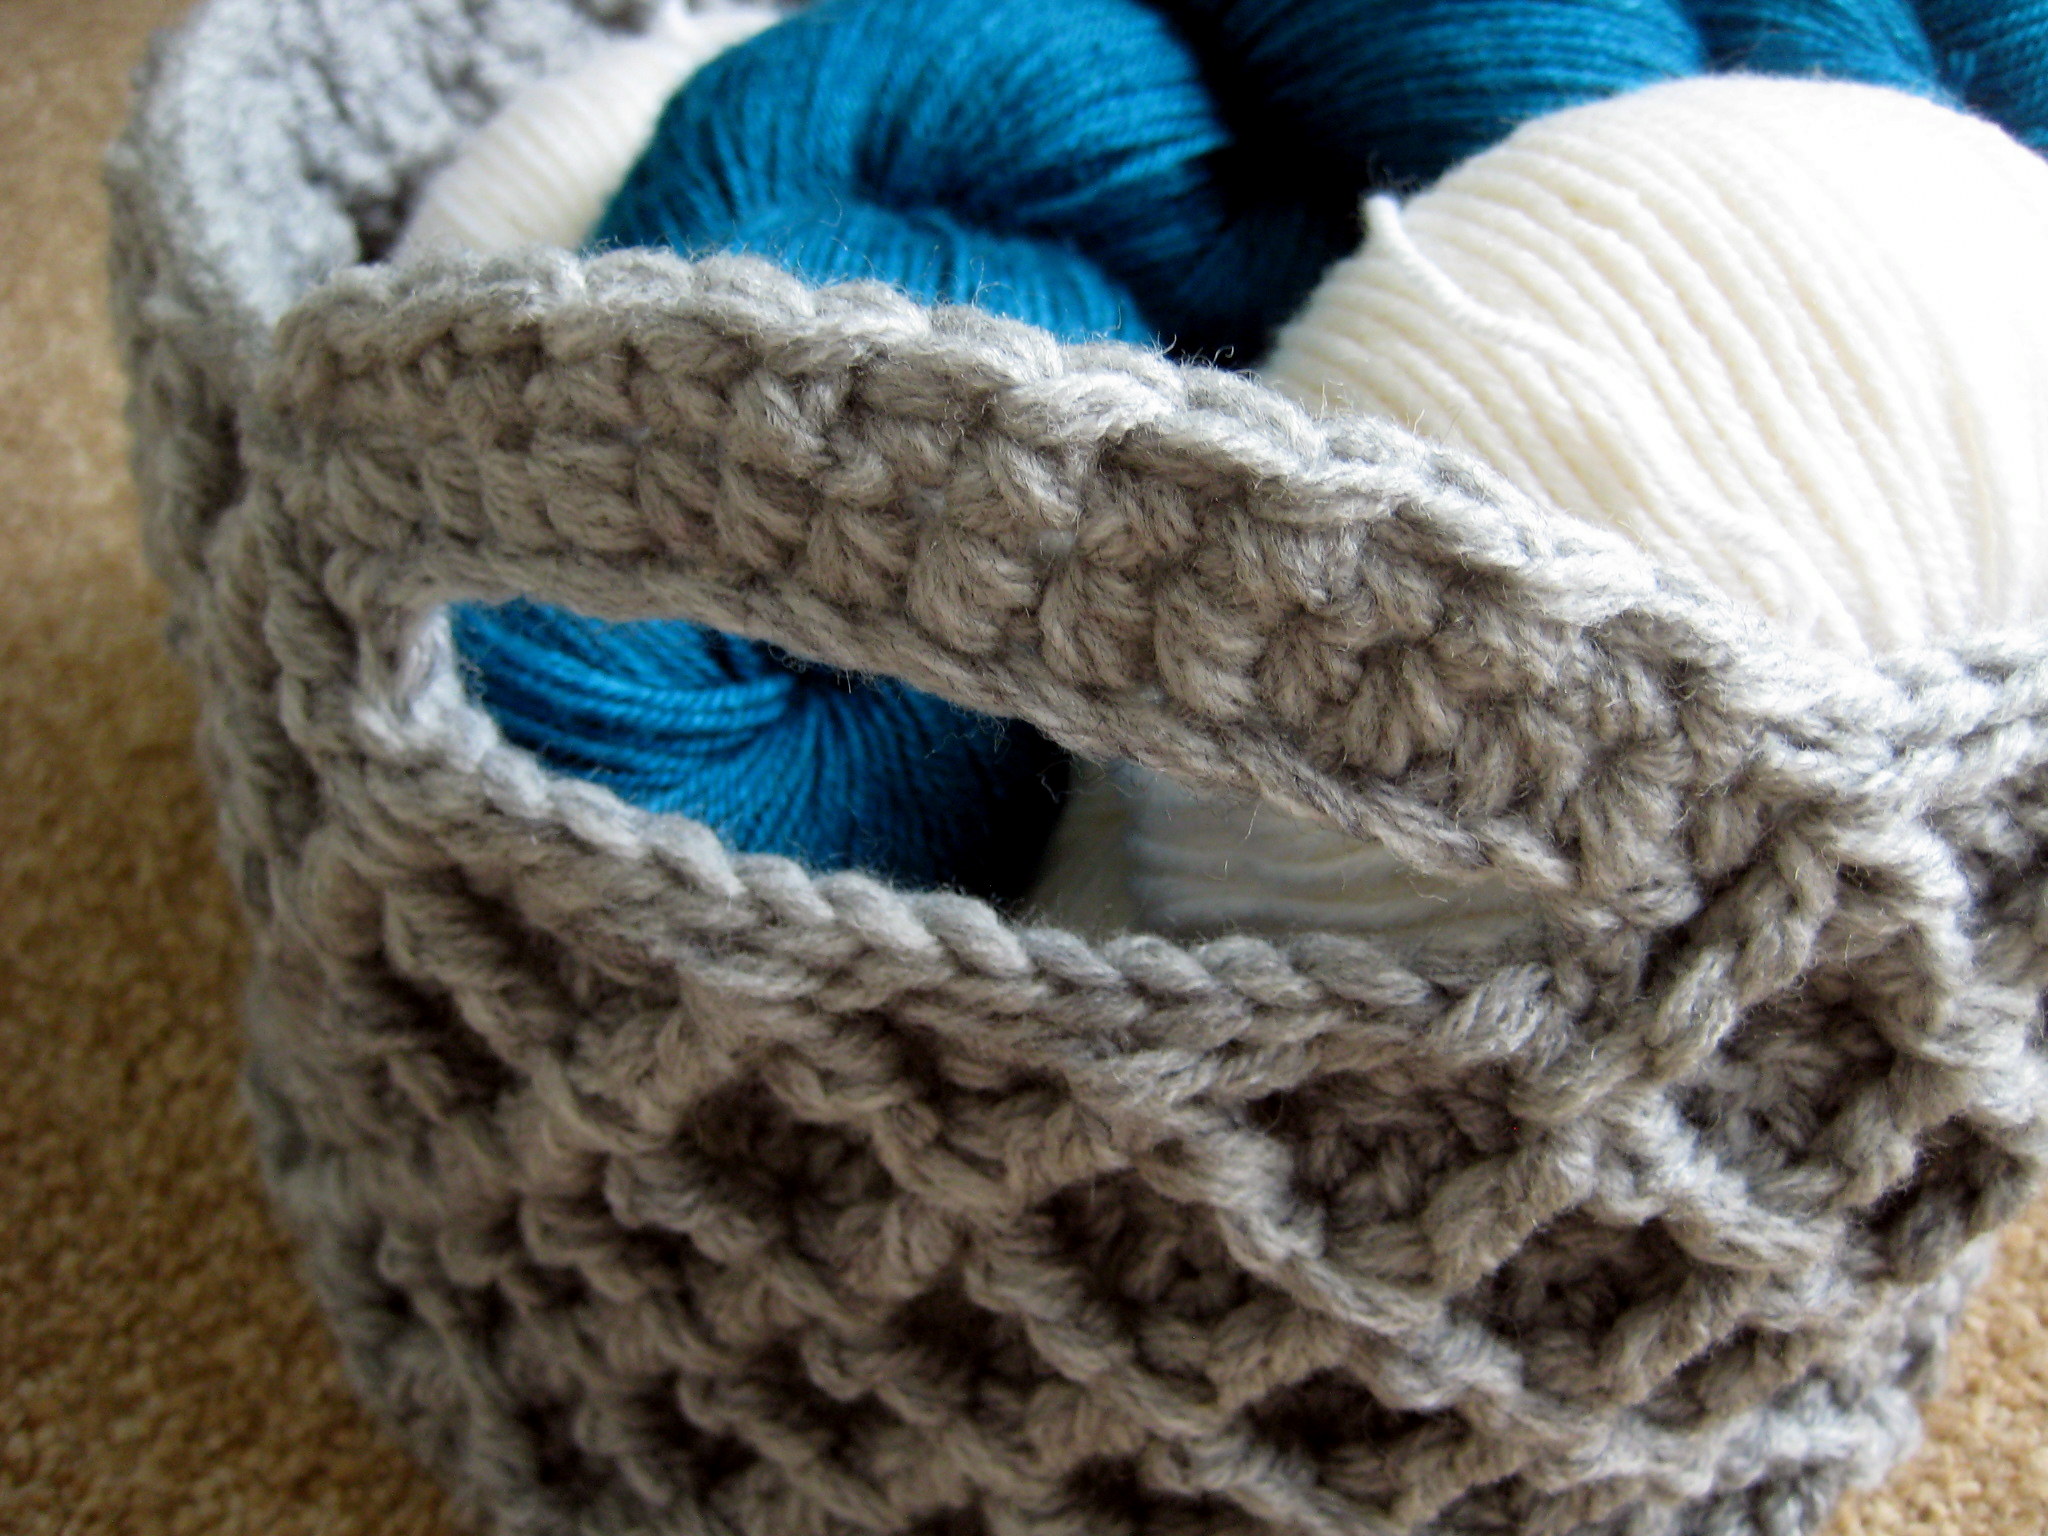
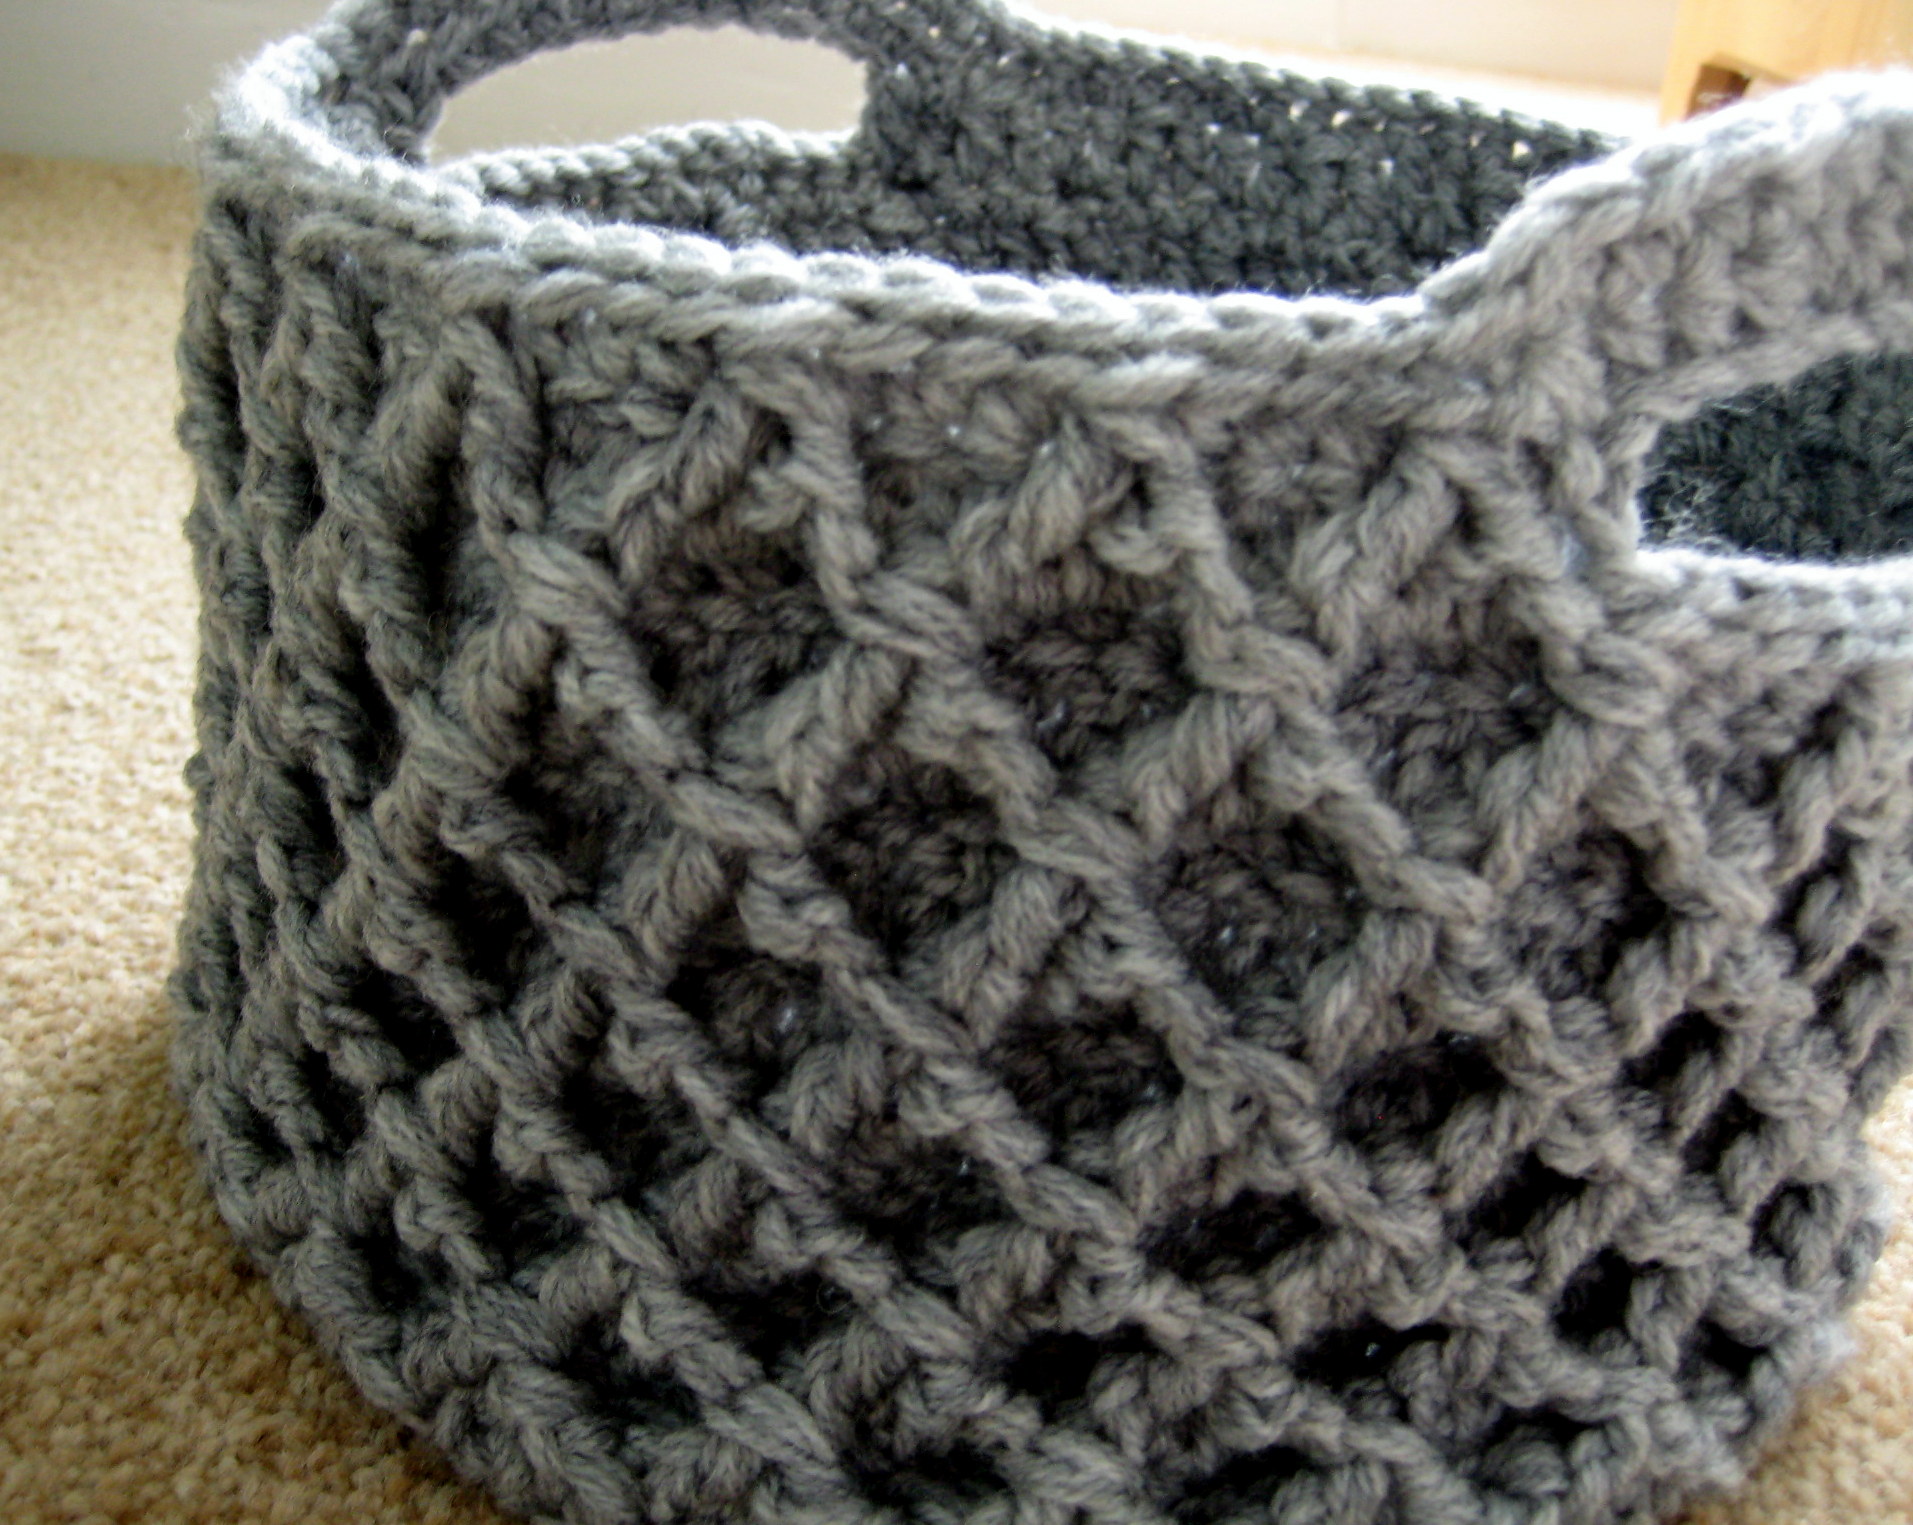
Handle detail of Diamond Trellis Crochet Basket – free pattern!
I designed the pattern so that it can size up or down depending on your needs and yarn supply. Just make more or less rounds for the base! To get the proportions right I used about a quarter of the weight of yarn I had (46g) for the base before moving on to the sides. So if you want to make a larger basket using stash yarn just weigh it first and use about a quarter for the base! Mine turned out to be 9 inches wide and 6.5 inches high (23x17cm).
Scroll down for pdf patterns! (US and UK notation)
Materials:
- 200g of either 3 strands of dk weight yarn or 2 strands of worsted weight yarn, held together.
- 6mm crochet hook.
Special stitch: Front post treble 2 together (fptrc2tog). This makes a V-shaped stitch in front of the work with the two arms of the V being worked around the posts of the stitches 2 rows below. All the V’s worked side by side make one half of the diamond pattern. Work the first fptrc2tog as follows:
- Yarn over hook twice, insert hook horizontally (from front to back to front again) behind the “post” of the 2nd dc in the row below, yarn over hook and draw up a loop (4 loops on hook). *Yarn over hook, draw through 2 loops, repeat from *, 2 loops left on hook (one arm of the V made).
- Yarn over hook twice, skip 3 dc posts, insert hook horizontally behind the next post. Yarn over hook and draw up a loop (5 loops on hook). *Yarn over hook, draw through 2 loops, repeat from *, 3 loops left on hook. Yarn over hook, draw through all three loops.
- There will be an “unworked” stitch left in the row below (behind the newly made fptrc2tog stitch).
The remaining fptrc2tog stitches of the first round using the stitch are worked the same way – with the first arm of the V worked around the same post as the last arm of the previous stitch. After the first round using this stitch the fptrc2tog stitch is worked around the top of the previous fptr2tog stitches rather than the dc posts.
Update 21/08/2014: You can view my video of this stitch here!
Pattern:
The basket is worked in the round from the base up.
Begin with a magic ring, Ch2
R1: 8hdc into magic ring, pull ring closed, sl-st to join, ch1 (8sts)
R2: (2hdc) in each st around, sl-st to join, ch1 (16sts)
R3: *(2hdc), hdc, repeat from *, sl-st to join, ch1 (24sts)
R4: *(2hdc), 2hdc, repeat from *, sl-st to join, ch1 (32sts)
R5: *(2hdc), 3hdc, repeat from *, sl-st to join, ch1 (40sts)
R6: *(2hdc), 4hdc, repeat from *, sl-st to join, ch1 (48sts)
R7: *(2hdc), 5hdc, repeat from *, sl-st to join, ch1 (56sts)
R8: *(2hdc), 6hdc, repeat from *, sl-st to join, ch1 (64sts)
R9: *(2hdc), 7hdc, repeat from *, sl-st to join, ch1 (72sts)
R10: *(2hdc), 8hdc, repeat from *, sl-st to join, ch1 (80sts)
R11: *(2hdc), 9hdc, repeat from *, sl-st to join, ch1 (88sts)
If you prefer a larger sized basket, you can continue in expansion pattern – just finish the base with a sl-st into the back loop only. My basket (pictured) had a base stopping at round 11.
R12: Turn and work this round into the front loop only. Ch2 (counts as dc), dc into each st around, join with a sl-st (88sts)
In round 13 the fptrc2tog stitches are worked around the dc posts of the row below.
R13: ch1 (counts as sc), turn, 2sc, fptrc2tog, *3sc, fptrc2tog, repeat from * around, join with a sl-st into first ch (22 fptrc2tog sts & 66sc sts – 88 sts total).
R14: ch2 (counts as dc), turn, dc into each st around, join with a sl-st (88sts)
In round 15 the fptrc2tog stitches are worked around the tops of the fptrc2tog sts 2 rows below. This forms the diamond pattern.
R15: ch1 (counts as sc), turn, fptrc2tog, *3sc, fptrc2tog, repeat from * around, 2sc, join with a sl-st into first ch (22 fptrc2tog sts & 66sts – 88sts total).
R16: Repeat round 14.
R17: Repeat round 13, working the fptrc2tog sts around the tops of the fptrc2tog sts 2 rows below.
Repeat rounds 14-17 until your basket is the desired height for handles – I took 6 more rounds (i.e. made mine 2.5 diamonds high to the handle). You will need to complete either a R15 or 17.
Handles: This step neatens up the edge of the basket under where the handles will be.
If you just completed a R15: do not turn.
If you just completed a R17: do not turn. Make 2 regular sl-sts – one in each of next 2 sc. You should end up with a fptrc2tog st as next st to be worked.
Now for both cases:
Working in the back loop only, sl-st 12 times, and then work a sl-st through both loops of the next st to secure (this should give a stretch of sl-sts from the top of one diamond point to another 3 points away).
Break yarn and skip 32 sts, re-join the yarn with a sl-st in the back loop of the next st (it will be a fptrc2tog st).
Working in the back loop only, sl-st 12 times, and then work a sl-st through both loops of the next st to secure (this should give a second stretch of sl-sts from the top of one diamond point to another 3 points away, directly opposite to the first stretch).
Do not break yarn – work the remaining handle rounds (HR) as follows:
HR1: Ch2, (counts as a dc), turn work. Ch 12, sk 12 sl-sts just made, dc in next st, dc in each of next 31 sts (until you reach the next stretch of sl-sts), ch12, sk 12 sl-sts, dc in next st, dc in each of next 30 sts, sl-st into top of turning chain to join. (64 dc’s and two ch-12 spaces- the handles)
The second round of the handle is worked in pattern as for main body of basket, but with alterations at the handle areas.
HR2: ch1 and turn. Sc, *fptrc2tog, 3sc, repeat 6 times, fptrc2tog, sc. (There should be one st left on the body of the basket before the ch.) hdc2tog over next 2 sts (1 on main basket and first ch of handle), 2hdc, (2hdc) in next ch, 4hdc, (2hdc) in next ch, 2hdc, hdc2tog (this will be in the final ch and 1st st back onto main body. Repeat from * join into first sc with a sl-st. (88 sts)
HR3: *working in the back loop only, sl st 30 times (i.e.until the next hdc2 tog in row below). Working through both loops, sc 14 times (across the handle top). Repeat from *, and finish with an invisible join into the next st (or a sl-st if you prefer).
Fasten off and weave in ends.
I do not recommend blocking this piece – we want the fibres to stay nice and stiff so that the basket has structure!
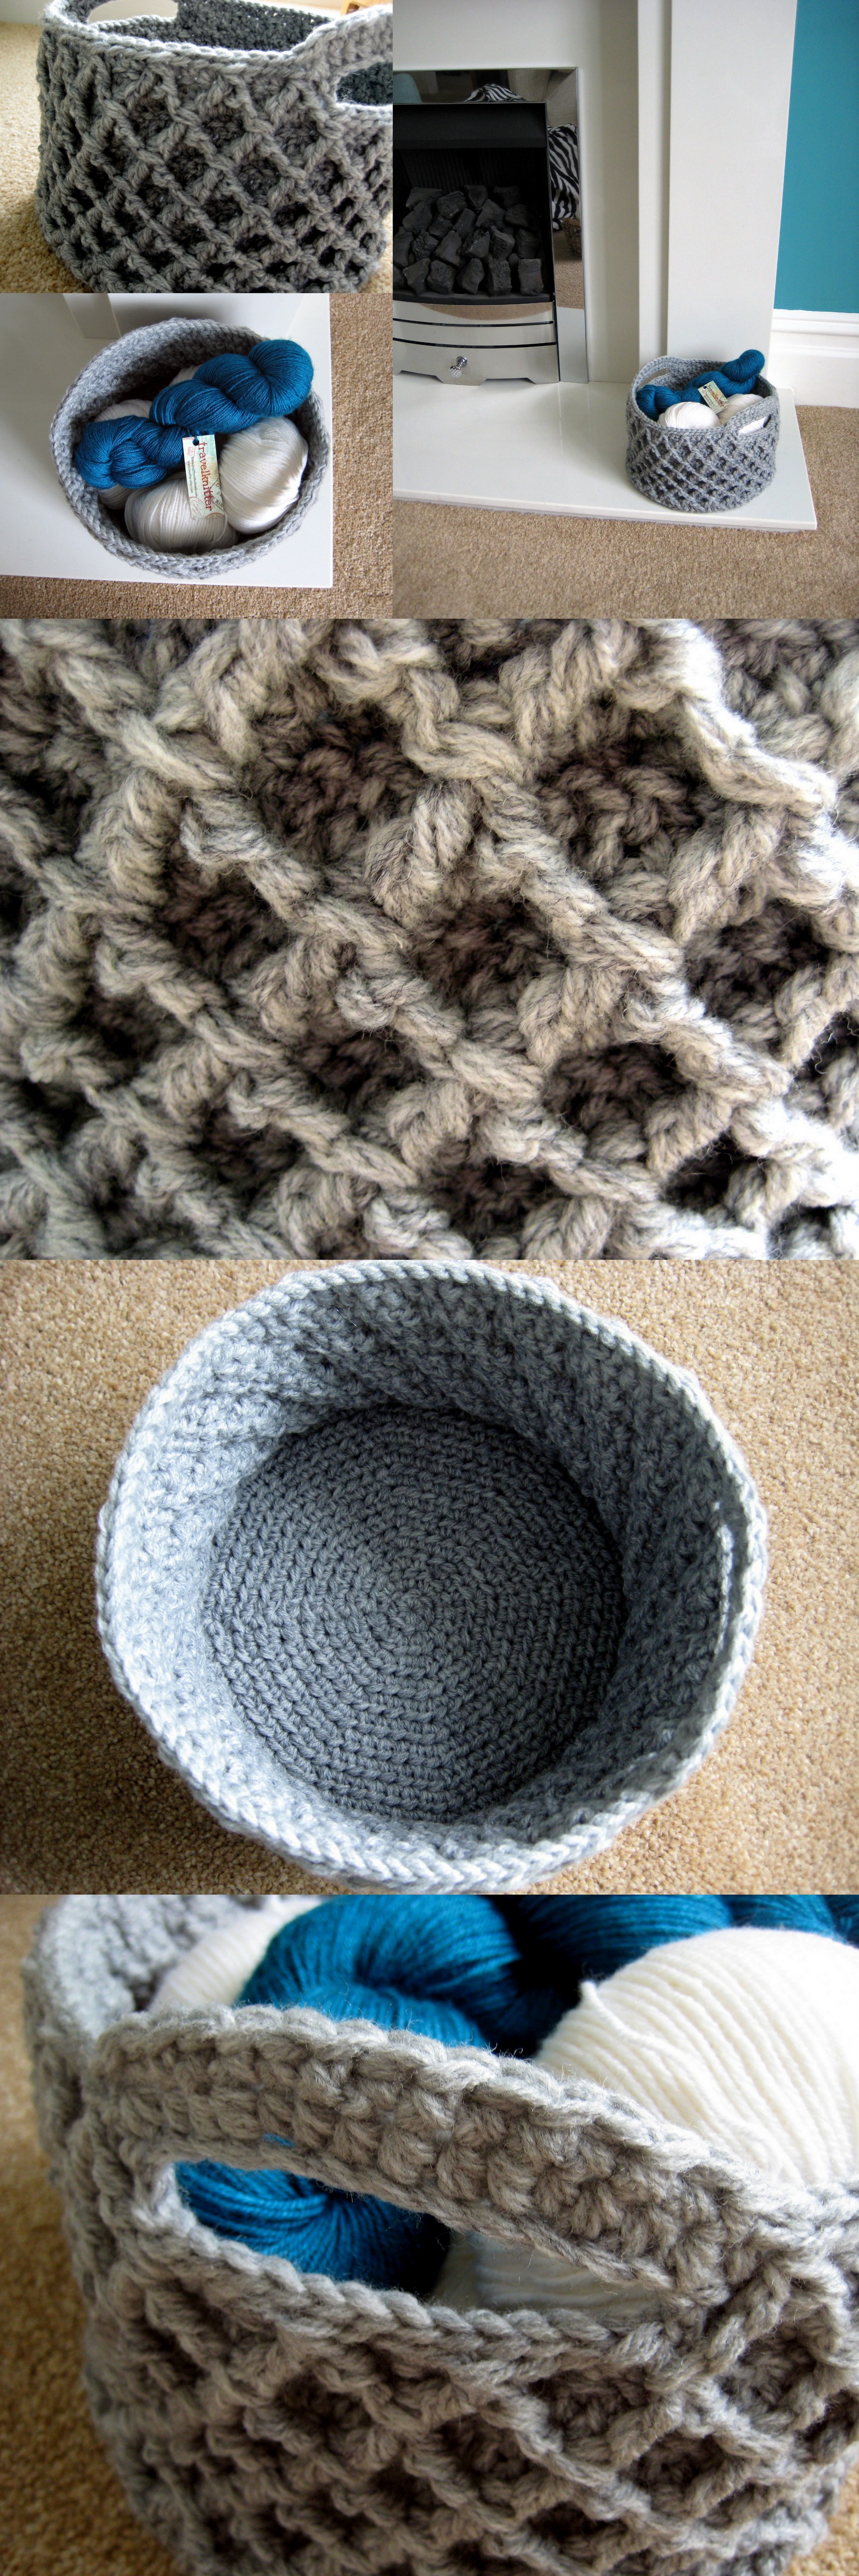
Diamond Trellis Basket -free crochet pattern which can be made in any size – and it is just nicely stiff too!
Free pattern for crochet basket – Diamond trellis stitch makes the sides stiff and it is made in one piece!
If you make this basket in a larger size then please do let me know how much yarn you take – I’m sure it will help others making this project.
What will you use yours for?
Updates 26/05/2014:
1. The original pattern contained a couple of errors (as you will see from the comments!) I have corrected for these and updated the pattern in both the blog post and pdf patterns.
2. Some users (but not all) are having some difficulty viewing the pdf patterns. They appear to be showing the text in white on a white background. I am looking into what could cause this; please accept my apologies in the meantime, and if anyone is more of a computer tech than I am and knows what causes this please let me know!
3. The lovely Marira has translated this pattern into German – you can get it for free here (you may need to register).
Update 31/10/2014:
The fabulous Marjolaine of Planete Laine has translated this pattern into French – you find it here!


What a pretty crochet basket! I love it! :). Thank you very much!
_______
Lee Ann
Crochet…Gotta Love It! Blog:
http://crochetgottaloveit.blogspot.com
YouTube Channel:
http://youtube.com/user/crochetgottaloveit
#crochetgottaloveit
#crochet
Thanks Lee Ann! :)
That’s a great design – thanks for sharing!
Thanks Chrissie! :)
I love it! Thanks for sharing the pattern. I’m going to add it to my list of things that I want to make :)
Thank you! I hope you enjoy making it. :)
OMG I absolutely LOVE this basket! I’ve pinned it, stumbled it, and I have scheduled it to post on my FB page at 4:30 pm EST today! https://www.facebook.com/4youwithlove Thanks for this amazing pattern……I can’t wait to make one myself!
Really pleased you like it Marilyn! :)
Thank you for sharing this pattern, I have seen quite a few basket posts but this one is a bit different. Adding to my to make list right now!
Great! It’s nice to have a mix of different baskets. :)
Awesome! I would line it and add a large snap or button under the handles and use it as a purse!
Hi Elizabeth! Good idea, I think that would work ok! I might make it a little taller so it can close ok. :)
There is an error in the pattern from R9. It should be as follows to reach the 96 stitches for what is listed as row 12
R9: *(2hdc), 7hdc, repeat from *, sl-st to join, ch1
R10: *(2hdc), 8hdc, repeat from *, sl-st to join, ch1
R11: *(2hdc), 9hdc, repeat from *, sl-st to join, ch1 (88)
R12: *(2hdc), 10hdc, repeat from *, sl-st to join, ch1 (96)
The rest of the round numbers should then be shifted one number.
Hi there crafty techie! There isn’t an error in row 9. But I had made a mistake with the stitch counts which I have now corrected. There should be 88 sts after the final increase round, unless of course you are adjusting for a larger basket. Sorry for the confusion! The PDF patterns will be updated early next week. Thanks for bringing this to my attention! :)
Ok cool thank you!
I’ve just had another look and there was an error in row 9 – sorry about that! I obviously was not having a good pattern writing day. :(
Hopefully all fixed now – please let me know if you spot any errors/confusing sections! :)
This truly is a very unique, pretty and sturdy design. I really love it. Thanks for sharing. I read about the errors and skim over the instructions at rnd 9. It still has the wrong total of stitches (its not 88) and when I tried to download the US pdf pattern. The only thing that showed up up my screen in another window was the image and none of the pattern. Will the instructions on the blog also be updated since I cannot seem to be able to download the pattern and could you check the pdf file, please. Thank you so very much, Esthermarie.
Hi there! The instructions on the blog are up to date and the same as the pdf (US version). Sorry you are having a problem viewing the pdf – I really don’t know why the text would not appear along with the image!
Thank you! What a wonderful, useful, beautiful creation!
Thanks! I’m glad you like it :)
Lovely basket! I tried downloading the .pdf in US terms, but there was nothing but a photo. Could you email a copy to me, please?
Hi Leslie! Sorry to hear you are having trouble with the download. I have checked things at my end and they seem fine, so I’m not sure what would cause that! Are you having problems with any of my other downloads?
Thanks for the beautiful basket pattern. It is printing as we speak. I found your blog through a Lion Brand Facebook posting. Love it!
Thanks Cathie! Glad you like it. :)
I misunderstood. I see the correction now. I cannot edit my comments because it has not been reviewed yet but I wanted to let you know, I did see my mistake and updated corrections. :-D However, there is still a problem with the downloading the pattern.
The US pdf pattern isn’t working for me either. I see the photo but the rest is blank. I highlighted the document to see if the words would come up and it’s as if the text is white on a white background.
Thanks for this – no idea why that is happening as it shows black on my screen, but I’ll look into it! Anyone else having trouble in the meantime can follow this tip, sorry it is a bit of a work around! :)
Love the basket! Cannot figure out the trellis pattern, but I will! It’s not the pattern’s fault, it’s me. Oh, and I downloaded the US pdf without a hitch. :)
I’m glad the pdf is working for you! :) See my reply to your next comment for help with the trellis pattern.
question, in row 13, do you work the first arm of the V above or below the 2nd arm of the previous V? Or does it matter? Thank you!
Hi Rhonda – I don’t think it matters too much but I worked mine below it! If you are still having trouble my response to Mandy’s comments above may help, or please get in touch again as I’m happy to help. :)
I am unable to crochet row13, can you please clarify it some
Hi Karen! Sorry you are having trouble. Please can you have a look at the section of the pattern where I explain how to do the fptrc2tog stitch and then get back to me a little more specifically letting me know which part you are struggling with? You may also find some of my replies to comments above and on Ravelry helpful. :)
Hi there! I am having a really hard time with Round 13. Any suggestions or tutorials you can point me to that will help me understand how to do this row? I just can’t seem to get it right :( I’m fairly new to crochet so it’s probably me and not the pattern :) Thank you!
I think my main problem is trying to figure out where the 3dc go after the fptrc2tog. Is it kind of behind the V that I just made?
Hi Mandy! The diamond trellis pattern repeat is worked over 4 stitches: (3dc, fpdtr2tog – UK terms) or (3sc, fptrc2tog – US terms). It uses 4 stitches from the row below. When you make a fpdtr2tog (UK terms) it leaves one st unworked directly behind it, and the next 3 dc’s (UK terms) are worked over the next 3 sts. So it may feel as if you just skipped a st in the row below, but you will end up with exactly the same number of stitches in each row up the sides (88 if you are making the exact same size as the example). The first of the dc’s (UK terms) after the fpdtr2tog does feel like it is being worked behind it a little because the “arms” of the upside down “V” spread forward and back of where your hook is. I hope that helps! :)
Hi Mandy – please see my response to your second comment and do get back to me if you need more help!
Thanks so much Esther! I will try the row again and hopefully what you just said will help out!!
Thanks for sharing your pattern. Going to give it a go on a very soggy Bank Holiday down here on the south coast in a vain attempt to bust my yarn stash :-)
Great! I’m glad you like it- and it will give you a nice place to store your stash! :)
Love the basket..really nice
Thanks! :)
In rnd15 the diamonds are looking a little off. Are we supposed to skip any DCs in between the diamond stitches? Also, the 3sc, are they the ones to the right of the diamond stitch just made? Thanks
Hi Charlotte! Please can you have a look at my response to Mandy above. If the diamonds are a little skewy it could be because you are forgetting to turn the work each round (for the sides). Hope that helps!
I made the basket with super chunky Lion brand Hometown USA. It took almost 5 skeins and I did adjust the pattern. I’d put up a pxt but don’t know how.
That sounds great! Thanks for sharing your yarn quantity. You can share your pic on the Ravelry project page or via Facebook! I’d like to see it. :)
I just made this în t – shirt
Yarn and I love it…Thank you for
Pattern
Ooh that sounds great! I may have to give that a try! :)
I did 24 stitches less and 3 rows of diamonds to handle.
I used 1 kg of t – shirt yarn.
Thanks for letting us know! Very useful for anyone else who wants to try it in t-shirt yarn! :)
For some reason I am not getting this figured out. I have tried row 13 about five times! I read all the previous comments and none of them are helping quiet right. When I go to make the second part of the V shape I am skipping the 3 dc posts, but when I do this all the way around the basket it makes the overall number of stitches way smaller! The only way I can think to describe this is that this ends up looking like a beret :) Is it supposed to be getting smaller with every round? I guess the part I am struggling with is getting the fptr2tog part to not decrease my number is stitches. Thanks for your help!
Hi Ellie
Sorry you are having some problems. A couple of people on Ravelry have had the same issue and it is because they were working the fptrc2tog st around 2 new dc’s. When you work the second fptrc2tog st are you working the first “arm” of the post around the same dc as you just used (which is correct) or the next unworked one along (incorrect!)? The other explanation may be that you are skipping sts – each repeat of (fptrc2tog, 3sc) uses 4 sts in the row below and equals 4 sts, so you should always have the same number of stitches in the side as you started with! Please let me know if these suggestions help! :)
Hi Enderlie This may help you and other who are having trouble with row 13. I tend to have trouble with patterns sometimes; visual aid help me a great deal to comprehend what I cannot grasp in print alone. It is a tutorial on how to do fptr2tog stitch only but maybe seeing how it is done might help. I read row 13 (but have not begun the project yet), it does not look as those you are suppose to skip anything but I as I said, I have not begun it yet. I saw your question and thought this might help you and other who also have posted inquiries about row 13.
I’ve watch many of the videos on this particular channel for knitting and crotchet tutorial. You may find it very useful for this and in the future. http://www.youtube.com/watch?v=yLD95Ku8Z-s
Thanks for posting this link! :)
Prehaps if you could post a video on how to do row 13,out would help those of us who cannot figure it out.Thank you.
Hi Karen
If you will let me know what it is that you are struggling with, I will do my best to help! Unfortunately I do not have the ability to post videos at the moment.
I’m still having trouble with Row 13, too. I think I’ve tried about 6 times and I even gave up for a little while until I saw other people were having troubles too. Would you be able to take snapshot pictures of you doing Row 13? Step by Step? That would be really helpful! Thanks!!
Hi everyone who is having trouble with the fptrc2tog st! I just came across this great video from the lovely Tamara over at Moogly: http://www.mooglyblog.com/basics-of-the-diamond-crochet-cowl-and-fptrc2tog/ The stitch is the same as used in my basket- but her demo works the first row including the fptrc2tog st around a row of sc 2rows below, and my version works it around the dc of the row directly below. However I think it will help you all out a lot to watch this! (Please excuse me not replying to any more comments for a week, I’m off on holiday!)
yay, finally got it, the video worked so much better, thank u so much :)
Oh good! I’m pleased that helped. :)
That video helped immensely!
Great! One day I will get a camera and do my own… until then, Moogly is awesome! :)
Reblogged this on Lalaville and commented:
Definitely gotta remember this one! Very cool looking :)
I wonder, if I use a smaller hook and a single strand do you think this will still come out fairly stiff?
Hi Carmen, yes it will be stiffer than a regular piece of crochet but it may not be stiff enough (it depends what your intended use is). The other thing is the gauge for the base might not be quite right – you may have to make it in sc rather than hdc to keep it flat. I would say make sure you use a smaller hook than your yarn thickness too- eg a 3mm hook for a worsted/aran weight yarn. Let me know how you get on and if it works out! :)
WOW! This looks amazing!! I just love the texture! Definitely going to make this – tonight!
Thanks for sharing. Tina
:-)
You’re welcome Tina! Sounds like a good evening :)
Aaaaaahhh!! Can someone help me with row 13. I think I get how to do the fpdtr2tog bit apart from the bit where it says ‘skip 3 tr posts…’ how can this leave only 1 unworked behind the Vif you skip 3 tr posts? and then where do I put the 3dc afterwards? It says next to V and that there should only be 1 unworked stich behind, but theres 3 in mine!!! What am I not getting??? Someone pls help… i’m ready to give up!
Hi Shelly. The skip 3 posts part is what you do in the completion of that one stitch. It is just telling you where to anchor the second post of the fptrc2tog st. The stitch counts as if it had been worked in one st only, and then you work the next 3 sts as normal- so you only use 4 sts total. I think the video linked to above will help you but let me know if not. :)
So where does the 3 dc go?
A-Ha!! I’ve just figured it out!! Where I was going wrong was I was working the first arm of the ‘V’ behind the actual post (the tr)and not the dc of the row below the tr. Once i’d worked it out I see the missing stitch behind the ‘V’ and worked the next 3dc in after this. The word ‘post’ is what’s confused me lol!! Apologies for being dumb!!
Whoops! But it is easily done, and I’m glad you are sorted! If you look through the comments you’ll see you aren’t the first to have trouble with this stitch. I have it on my to do list to do a tutorial on this stitch…
Love this pattern. A note though, be careful not to do the lattice stitches too tightly! I got several inches up the side before I realised my sides were all bow-legged. I’ve given up in frustration – for now.
Hi Sherri! I’m glad you like it and sorry to hear you are struggling. Try sizing up a hook for the rounds with the fptrc2tog sts!
Love this basket! I enjoyed it so much I made two and thought maybe it would work to make slippers with. I used worsted weight and an H hook and they look really cool. I need to write out the pattern I wrote. I wish I could post a pic but I don’t see anywhere to do that here. Thank you so much for this pattern!
They sound lovely! If you publish the pattern let me know I’d like to see it. :)
I have to test it again but there is a pic on my FB page: http://www.facebook.com/NoodlesKnitting
Ah they are so cool! :)
I just published them to Ravelry! I am so excited, it’s my first pattern. Thank you so much for inspiring me! http://www.ravelry.com/patterns/library/diamond-trellis-slipper-socks
Awesome! Adding to queue now… :)
Lee Ann, this basket is amazing! Thanks for sharing it with us. I am a complete newbie to this. Can you please recommend good online source where I can learn the basics so I can understand your instructions and make the basket myself? Thank you! :)
I’m glad you like this! If you are a beginner at crochet (or are just looking to learn something new) then I recommend Planet June, Crochet Geek, and Moogly.
Thank you, Esther! Lots to learn, but these sources are an excellent starting point. Can’t wait to start. :)
Pingback: Weekly Gathering: 8 Free Diamond-Inspired Patterns! | The Handmade Handmaiden
Hi, I love your basket and am almost finished making mine. But I have trouble with the handles (and since no one else seems to have trouble with those, I’m starting to feel somewhat frustrated with myself). In round HR1 you write to make 32 dc, then a sl-st into the turning chain. Wouldn’t that give you one too many stitches? Another question, is the first dc in that round on top of a fptrc2tog or right next to it?
Hi Elisabeth! No problem, I’m sure you are not the only one. I’m assuming you have completed the 2 stretches of 12 sl-sts in the back loops of the previous row before starting HR1 ok? Then you should find that you have just done a regular sl-st and ch2 (the first instruction in HR1) and turn into a fptrc2tog st. This counts as 1 st completed, which means you’re right – I added an extra dc in at the end of this round! Sorry. I will update these patterns now! You should end up with 32dc +12chs followed by another 32dc and 12chs at the end of this row. As long as you have that you’re sorted! Thanks for asking the questions! :)
Pingback: FO: Tea basket and mug case | Gossycrafts
I just stumbled on this pattern on Pinterest and I am in love! It is now in my Ravelry queue and I can’t wait to give it a shot. Please, PLEASE would you tell me what yarn you used for your basket? It is the perfect grey!!
I’m glad you like it Michele! I’d love to know too, but I got this yarn from a big bag of stash I inherited from my Great Aunty Di. It is definitely a few decades old and I’ve no idea what brand or anything. It was actually two different yarns, 2 strands of one and 1 of the other held together. Hopefully you can find your perfect grey by blending a few if you can’t find exactly what you want in the shops!
PS If you don’t recall the specific yarn, could you at least let me know whether you used wool or acrylic or some sort of blend? :-D
It felt like a wool/acrylic mix to me! A bit scratchy but good for this project. :)
*** I have solved the Round 13 problem!! ***
Here is what I did, at it looks great!
Round 13:
-Ch 1 (counts as sc) and turn, as the instructions say
-2 sc in the next 2 sts
-You do your first fptrc2tog in the second double you see from the row below
-Your “sc”s go into the three stitches right above the row you just made (you will have to back up a little bit). Skip the first stitch (because it is taken up by a fptrc) and sc in the next 3 you see
-To begin your second fptrc2tog, you will start by going into the post of the post you just completed (you’ll see it directly below the last sc you did and a little to the left)
-Continue in this manner
-At the very end, you will do your last fptrc2tog into the one you started your row with (skipping 3 as the instructions say)
-To join the round, you will have to back up a little bit to sl st into the ch you did in the previous row. It will then look complete
Hi Britti! Glad to see you have managed this round ok. If anyone else is still having problems understanding this pattern round, look out for my upcoming video on how to do this stitch!
Pingback: Diamond Trellis Stitch Video Tutorial | Make My Day Creative
Hi there! I am having trouble with row 4, I seem to be getting way more than 32 stitches, even though my previous rows are correct… Its driving me crazy!
Hi Pauline! It sounds like you are increasing too many times. Each round adds 8 sts to the total. On round 4 you increase (ie do 2sts into the next st) every 3rd stitch. If you are really struggling you could try putting a stitch marker in every 3rd st before you start the round and then make an increase every time you get to one!
Thank you! I don’t really crochet rounds, so I wasn’t sure how the increases worked. They make so much more sense now!
I’m glad that helped! I’m sure now you’ve started working in the round you’ll be unstoppable! :)
Pingback: Crochet Basket | crochetfastdiewarm.com
I have been looking for something just like this! Thanks so much for posting the pattern!
Great! :)
I love this SOOO much I had to make one eitw away. And I am rite now! ;-) it’s a xmas colors one. I will be making more. Thank you for sharing!!
Hi Annette! I’m glad you like it. :) what a cool idea for making a Christmas gift idea! Or just to keep for yourself ;)
It seems like the numbers for the stitches are still off tho. I only got to round 4 and noticed it. I made 24 stiches in round 3. If I make 2hdc (USversion) in each stitch it will double the stitch count for round 4 from 24 to 48 stiches, not 32. Etc etc… Why is this off or am I mis-understanding the instructions?
Hi Grace! The instructions are telling you to do (2hdc) in the first stitch and then an hdc in each of the next two stitches. So you will only ever add 8 stitches per round. It’s similar for the next round too- (2hdc) in one stitch then an hdc in each of the next 3sts. :)
ooooK That makes sense now. I was totally reading it wrong. Thank you.So excited to be able to make this. It’s beautiful AND functional!
No problem! Lots of people use different notation. So it isn’t always easy!
Pingback: Rectangular Diamond Trellis Basket | Make My Day Creative
lovely!
Thank you! :)
I used two strands of simply soft worsted weight yarn with a 4.25mm G/6 hook. Turned out nice. Thanks for the pattern.
Thanks for the info Jamie! I’m glad yours turned out well :)
I’ve already made one and I’m making another… I don’t know what’s wrong with me, but suddenly I’m having trouble. When you end row 11 and turn to do row 12, you are on the outside of the work doing DCs. When you turn again to do row 13 you are on the inside for fpt2tog and sc- what’s my problem!? Help! Thanks :)
Hi Jamie! It sounds like maybe you have started working in the back loop only rather than the front loop only?
Well… I did the base and slipped into the back loop only, chain one, turn, chain 2 and started my DC in the front loop. But I’m working around the outside. When I turn again, I’ll be on the inside. Should I not turn after row 11 and before 12? Doing DC on the inside and fancy work on the outside? I don’t know why this is a problem for me! I’m sorry!
So I have trouble making the bottom of my basket flat. I blocked it before I did the sides to see if that would fix my problem and it helped a bit. How do get yours so flat?
Hi Laura! When you say yours is not laying flat, do you mean that it is concave (like the top of a hat) or sort of frilly when placed on a flat surface? If it’s concave it means that the increases are not quite enough for the height of your stitch – either switch to a smaller hook, work in sc instead of hdc (you may need to work more rounds as the base will come out smaller), or begin with more than 8 sts into the magic ring in round 1 but follow the same increase pattern (if you do this, make sure your final round uses a multiple of eight sts – for example, begin with 10hdc, and finish the base after 8 rounds – you will have 80sts for the remaining rounds rather than the written 88sts). If your base is frilly the the increases are too many for the height of your stitch – use a larger hook, or try using dc instead of hdc, or begin with less sts into the magic ring. I hope that helps!
Mine concaves. If I do single or try more stitches it still concaves. Maybe I crochet to tightly.
Well if that’s the case then at least your basket will be stiff! Try starting with 12 stitches and expanding out with 12 each round?