
Summer Sprigs Lace Shawl Free Crochet pattern
I have wanted to try crocheting with some lace weight yarn for a while, and since it is nearly summer and I found a single ball of Rowan fine lace yarn in the sale bin I thought I’d go for it.
I didn’t think working in lace weight would really be much different to working with dk and heavier yarns, but I did learn a few things. Firstly, I needed to work in daylight because the stitches are so small! Secondly, it is definitely worth getting a nice hook with a handle on it. I already had a plain metal hook (thanks to my mother -in-law) which I got quite far using but then found I was getting a lot of pain in my arms and wrists. So much so that I had to put this project on hold for a while! I didn’t want to change hooks in case it caused uneven gauge, so I went for this unstylish but practical solution: rubber bands around the handle!
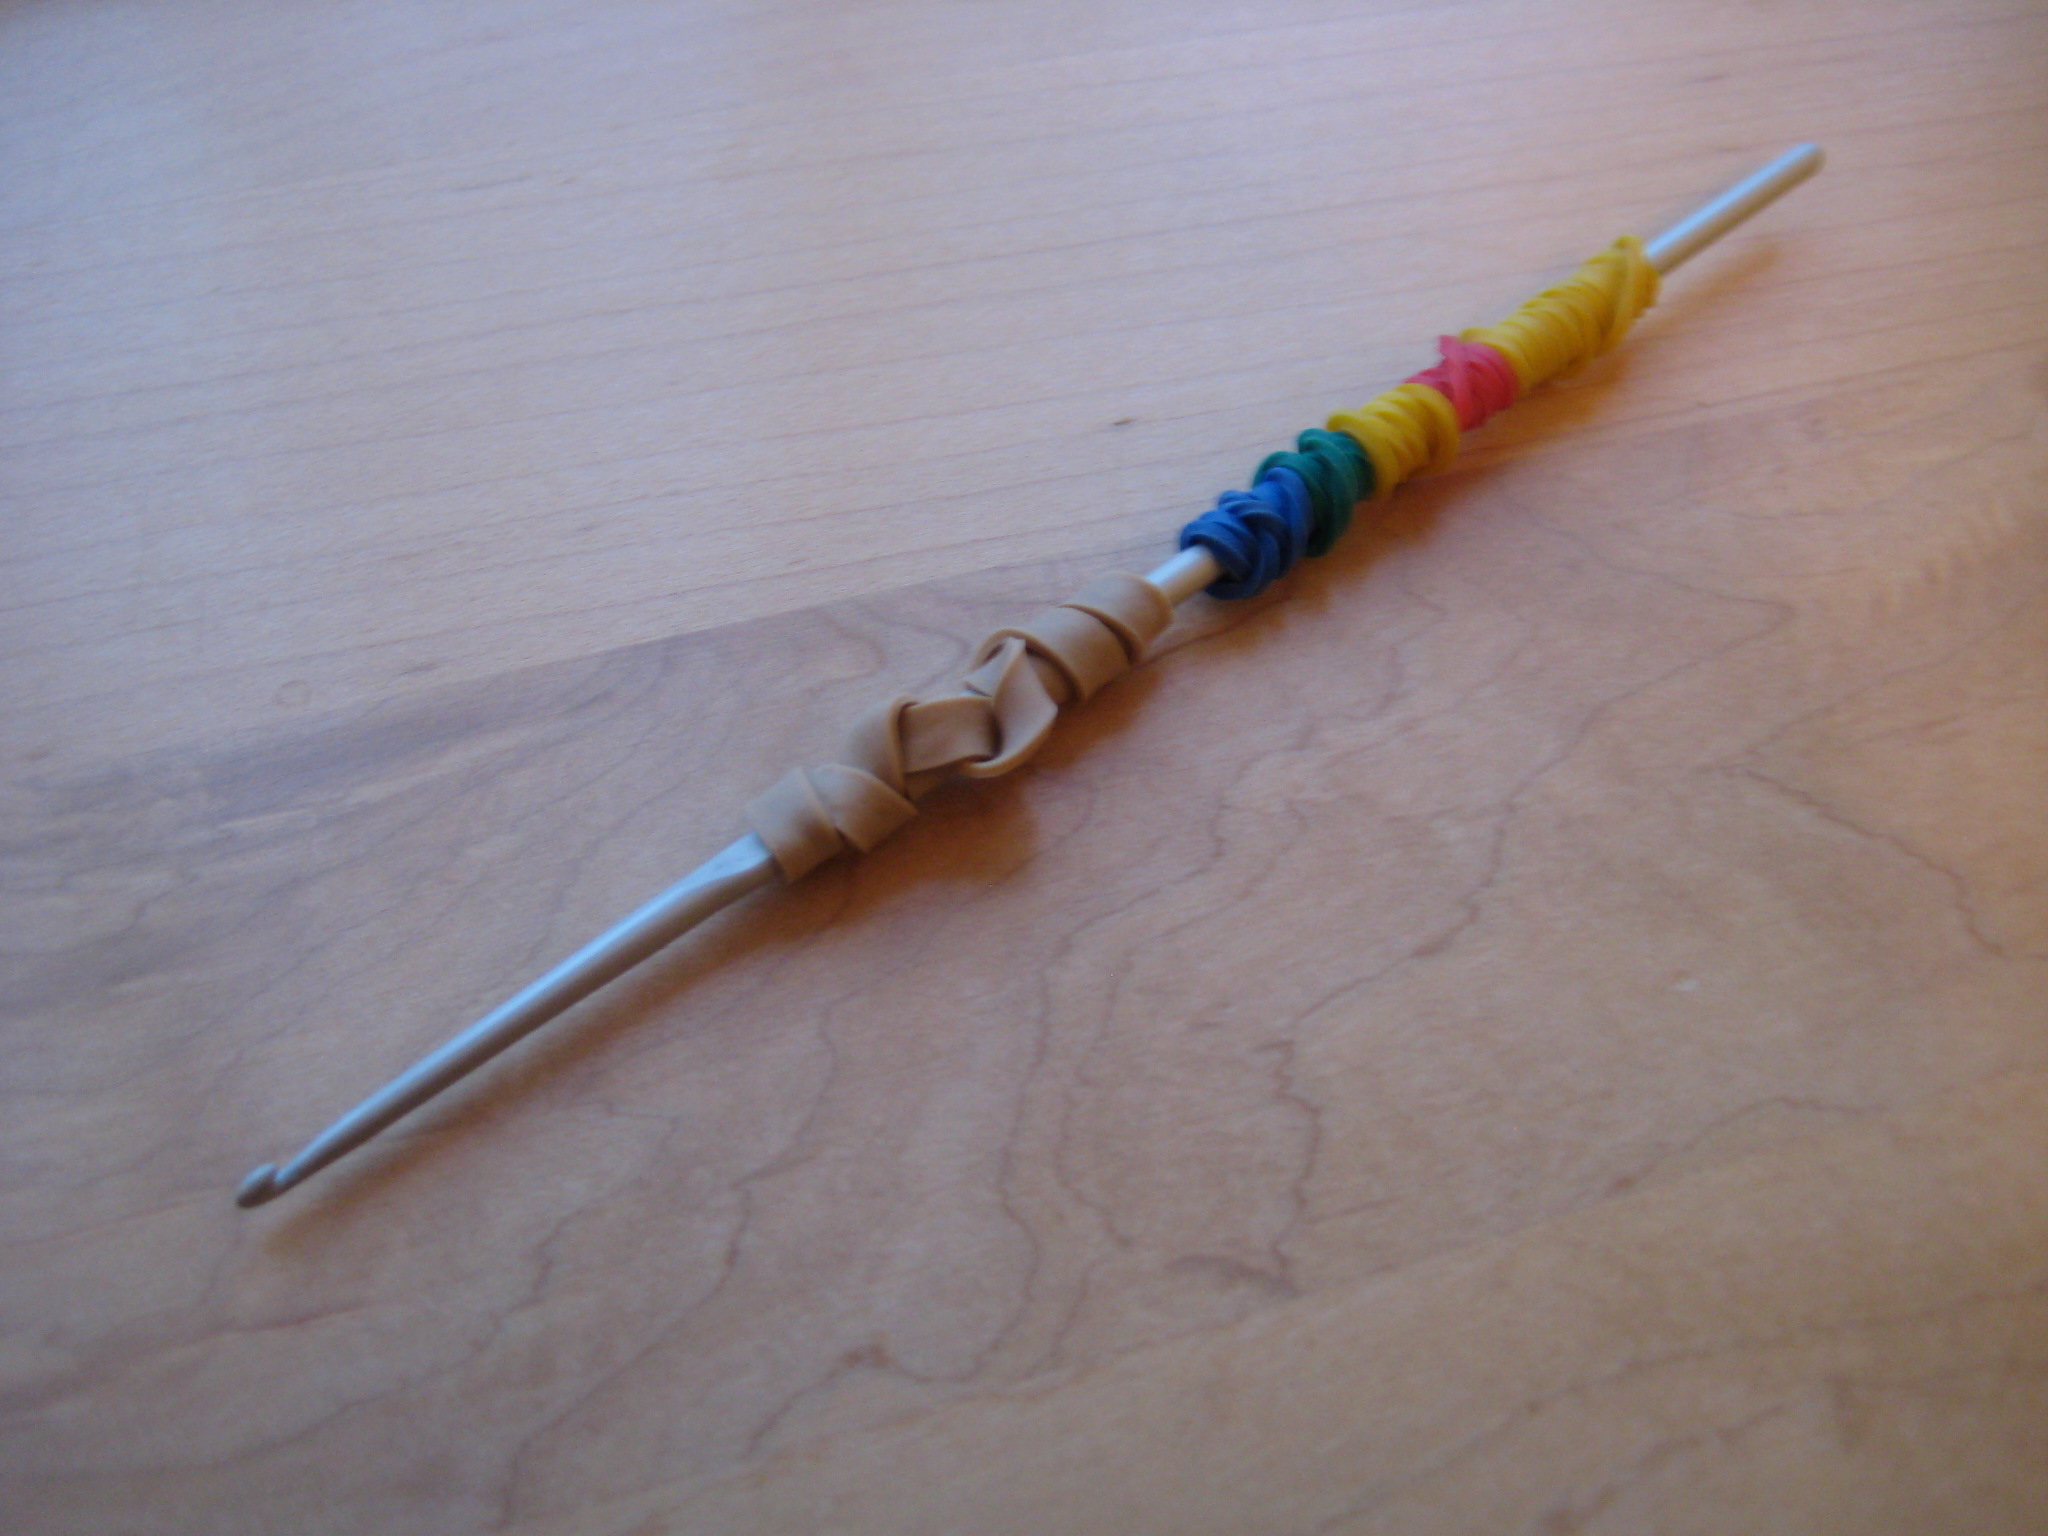
Handle solution!
This helped a lot!
Can you believe I managed to make this whole scarf out of a single ball of yarn? It was a bit touch and go at the end (I literally had a tail of 8 inches when finished, gulp!) so if you decide to make it I would suggest you pick a yarn where you can buy and extra ball if needed.
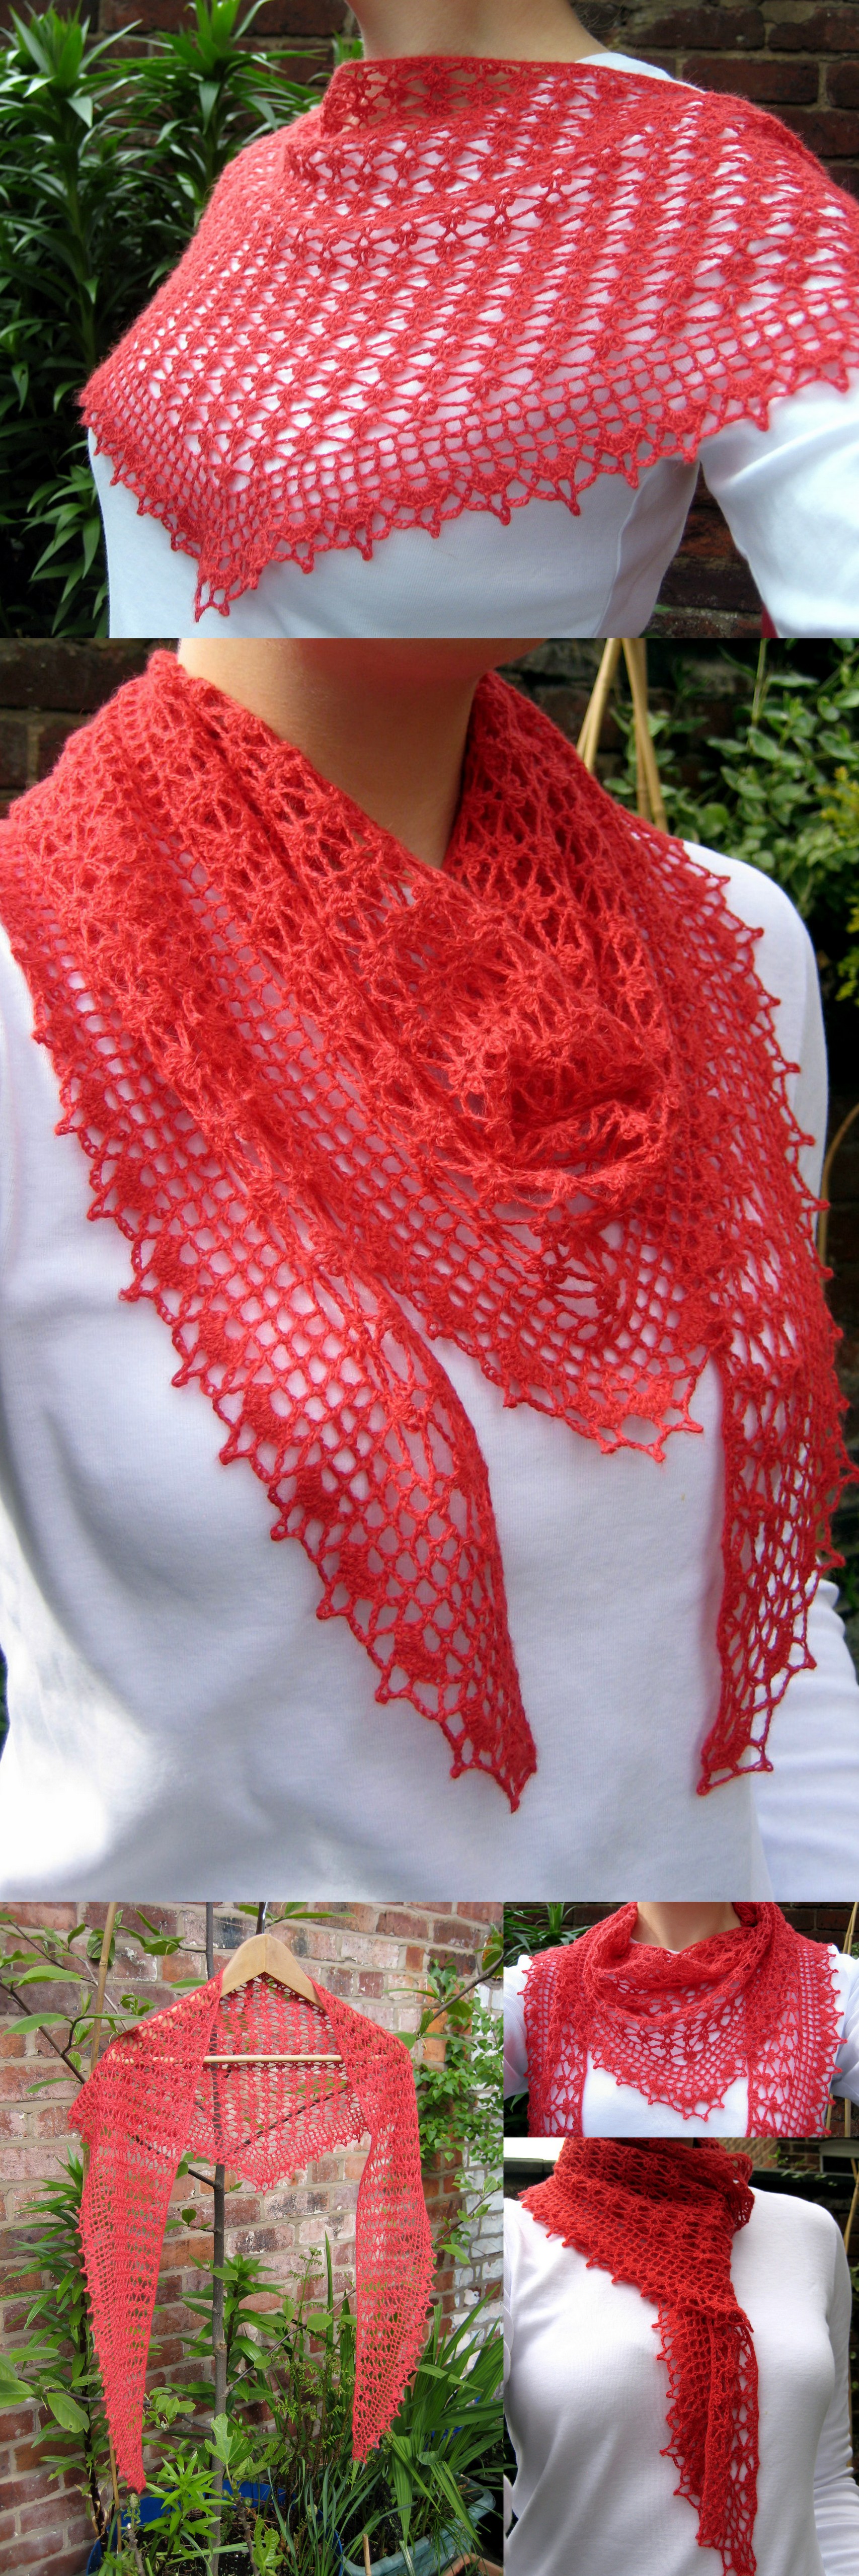
Summer Sprigs Lace Scarf – Free pattern!
I also think this project would work in dk and a size 4 hook for a summer shawl. I’m not sure how much yarn that would take though – if you try it let me know!
I chose the name Summer Sprigs Lace for this scarf because I think the main stitch pattern looks a bit like little buds on twigs. What do you think?
Scroll down for pdf patterns and diagrams! (US and UK notation)
Materials:
- 400m (437yards) lace weight yarn (I used Rowan fine lace – a lovely soft mix of baby alpaca and merino wool)
- 2.00mm crochet hook (or size need to get gauge)
- St markers (optional)
- Blocking materials
Gauge:
Gauge is not critical for this project, however if your gauge is larger than mine was you will need more than one skein of yarn.
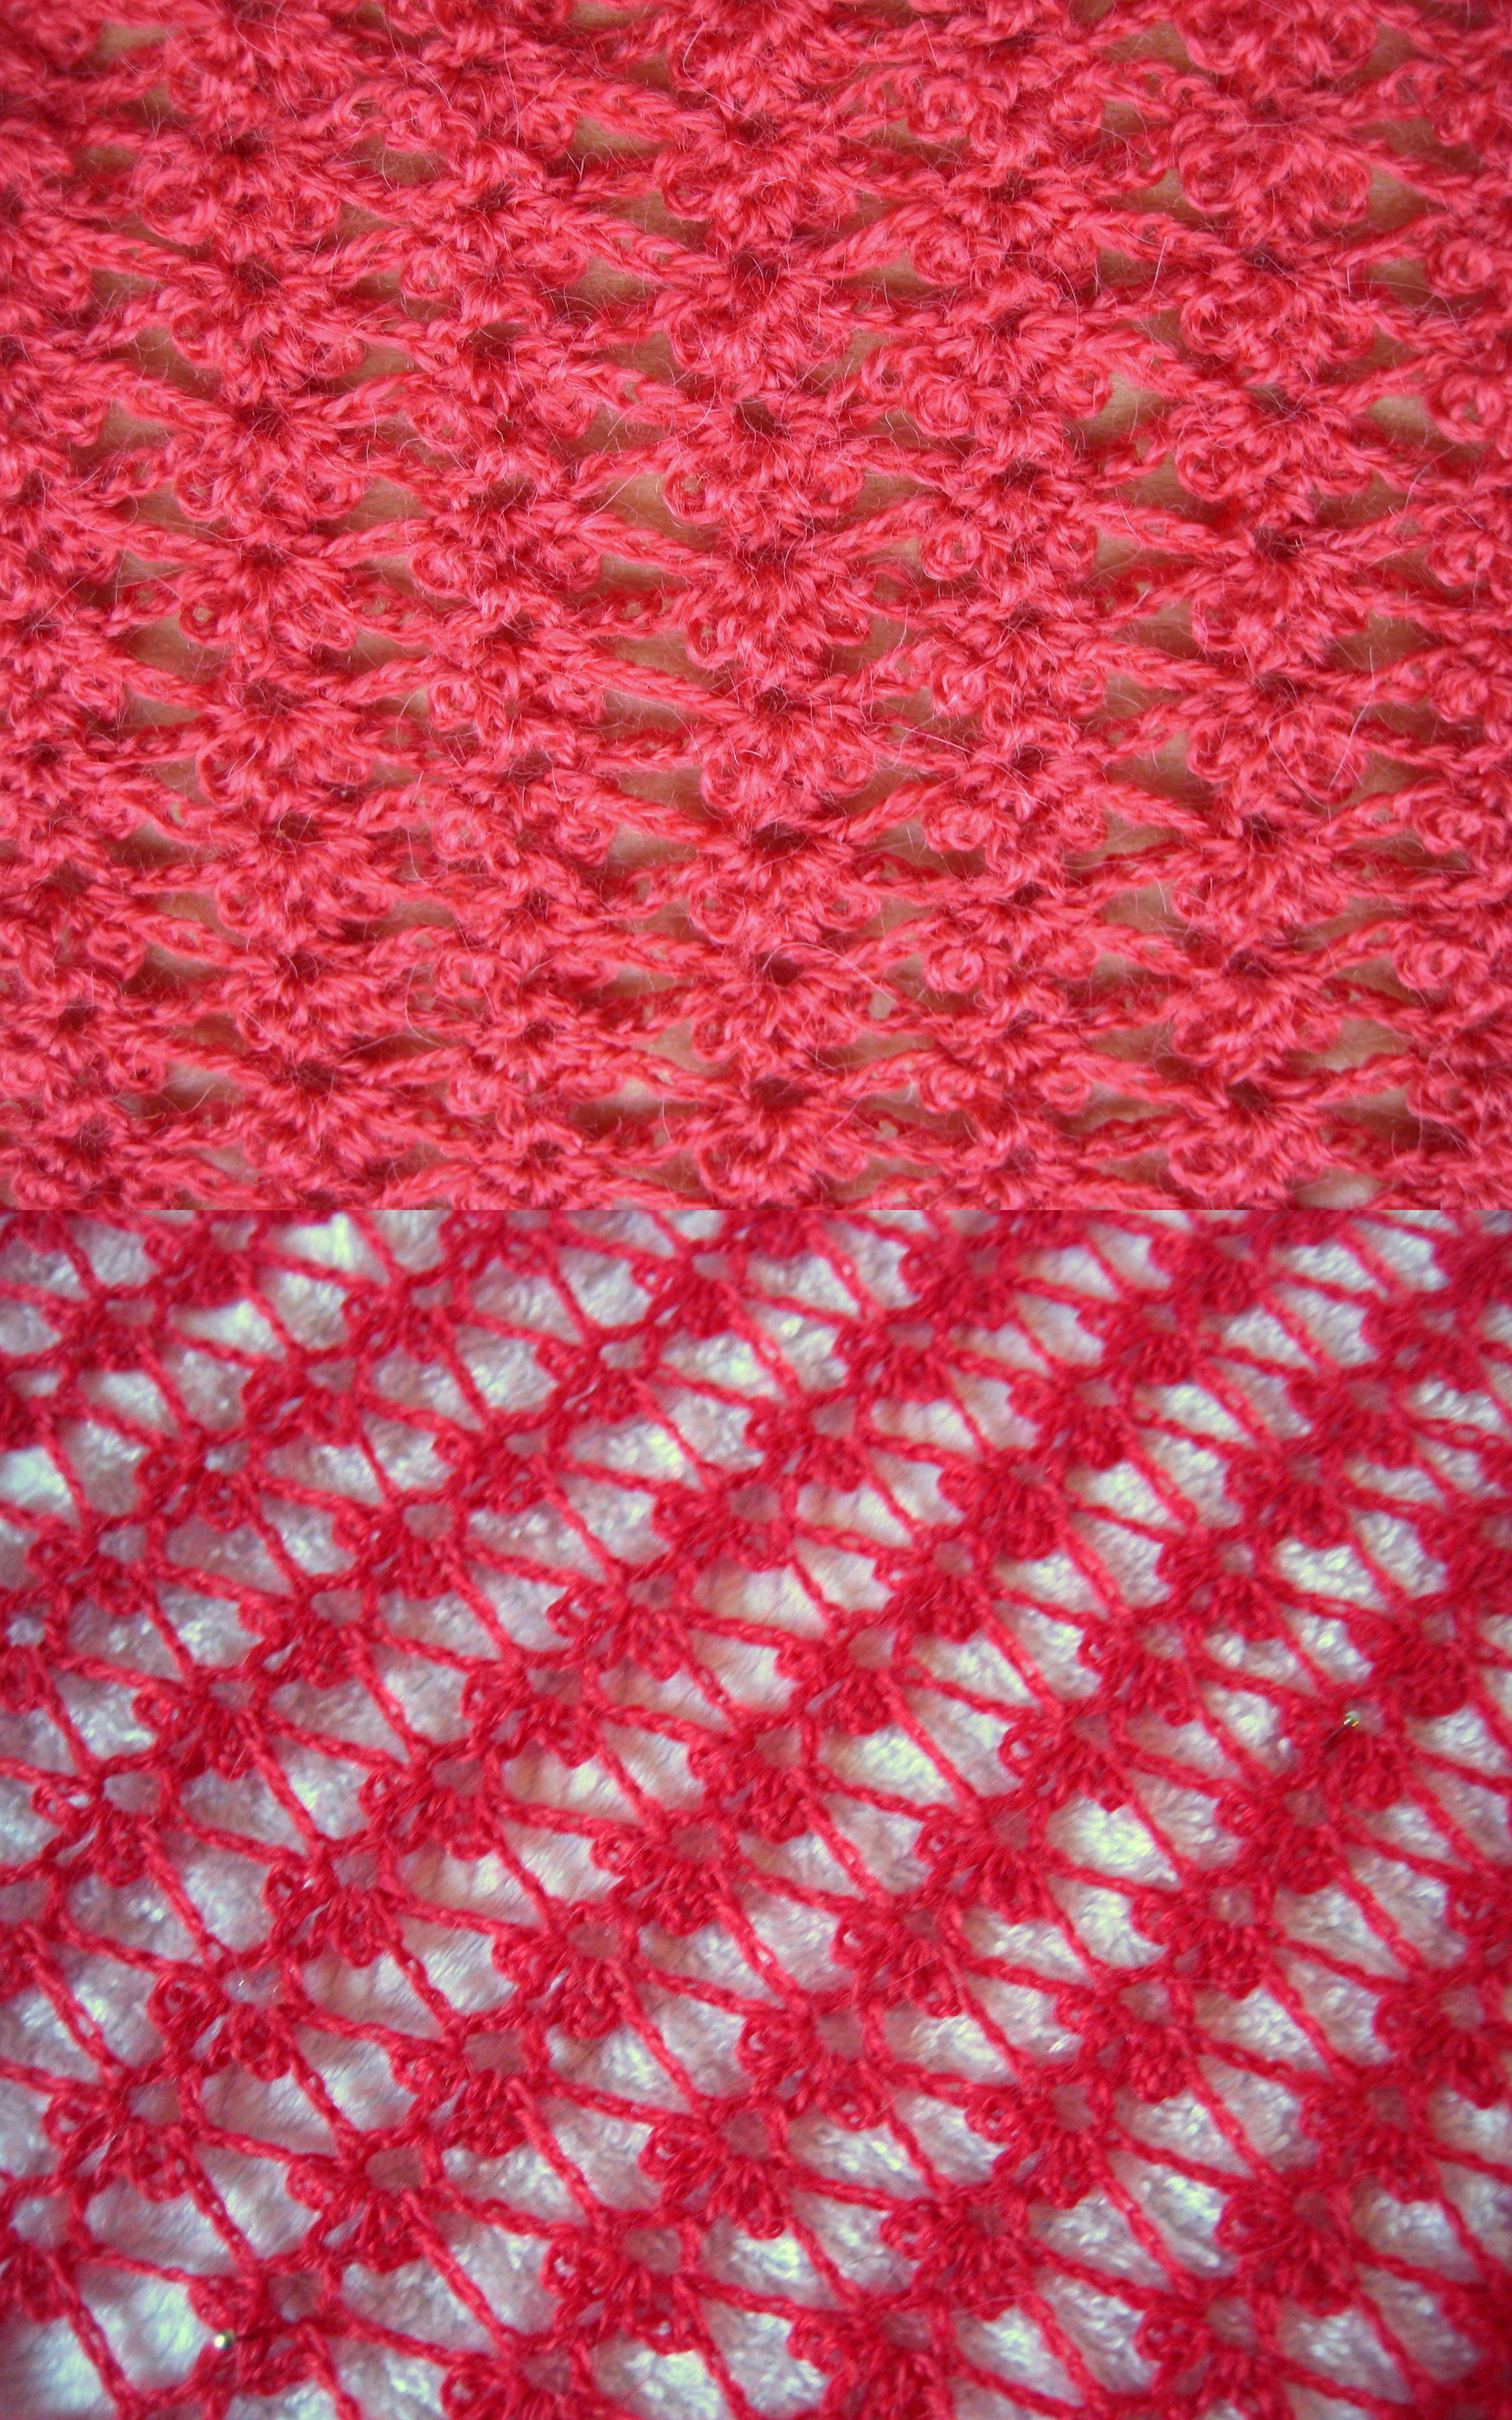
In the main sprig pattern, I worked 2.5repeats in 10cms.
In the squares portion of the edging, I worked 14 “squares” in 10cm.
These are my pre-blocking gauge measurements.
Pattern:
This scarf is worked in 2 sections. First the main triangular section is worked by making a foundation row, and then the rows are decreased to make the triangular shape. The pattern is a simple 1 row repeat!
The edging is then added along the two shorter sides.
Main body (Sprig Lace pattern)
Begin by making a ch 386+1. (Alternately you can begin by making 386 fsc and skip row 1)
R1: turn, sc in second ch and then in each ch to the end (386 sts)
R2: Ch 5 (counts as being worked in the very first sc), turn, [sk3 sts, *sc, ch3, repeat from * 2 more times, sc, ch3, sk3 sts, (dc, ch2, dc) in next st, ch3] repeat [] 33times, sk3 sts, *sc, ch3, repeat from * 2 more times, sc, ch3, sk3 sts, dc in final st. Turn work. (35 pattern repeats total)
R3: ch4, sk first 2 ch-sps, (dc, ch2, dc) into next ch sp, *ch3, sk2 ch-sps, (sc, ch3, sc, ch3, sc, ch3, sc) into next ch sp (between dc’s), ch3, sk2 ch-sps, (dc, ch2, dc) into next ch sp repeat from *to end, finish with a dtr into either ch5 (1st row 3) or ch2 sp between dc’s (all remaining repeats). Turn work and sl-st into dtr just made, sl-st into ch2 sp, sc into ch2 sp.
Repeat row 3 until the piece has decreased to the penultimate row – there will be two (dc, ch2, dc) sets.
Final row: ch4, sk first 2 ch-sps, (dc, ch2, dc) into next ch sp (this will be the central ch-sp), ch4, sk 2 ch-sps, sl-st into final ch-sp, fasten off.
You may wish to mark the centre ch-sp in the final row with a st marker.
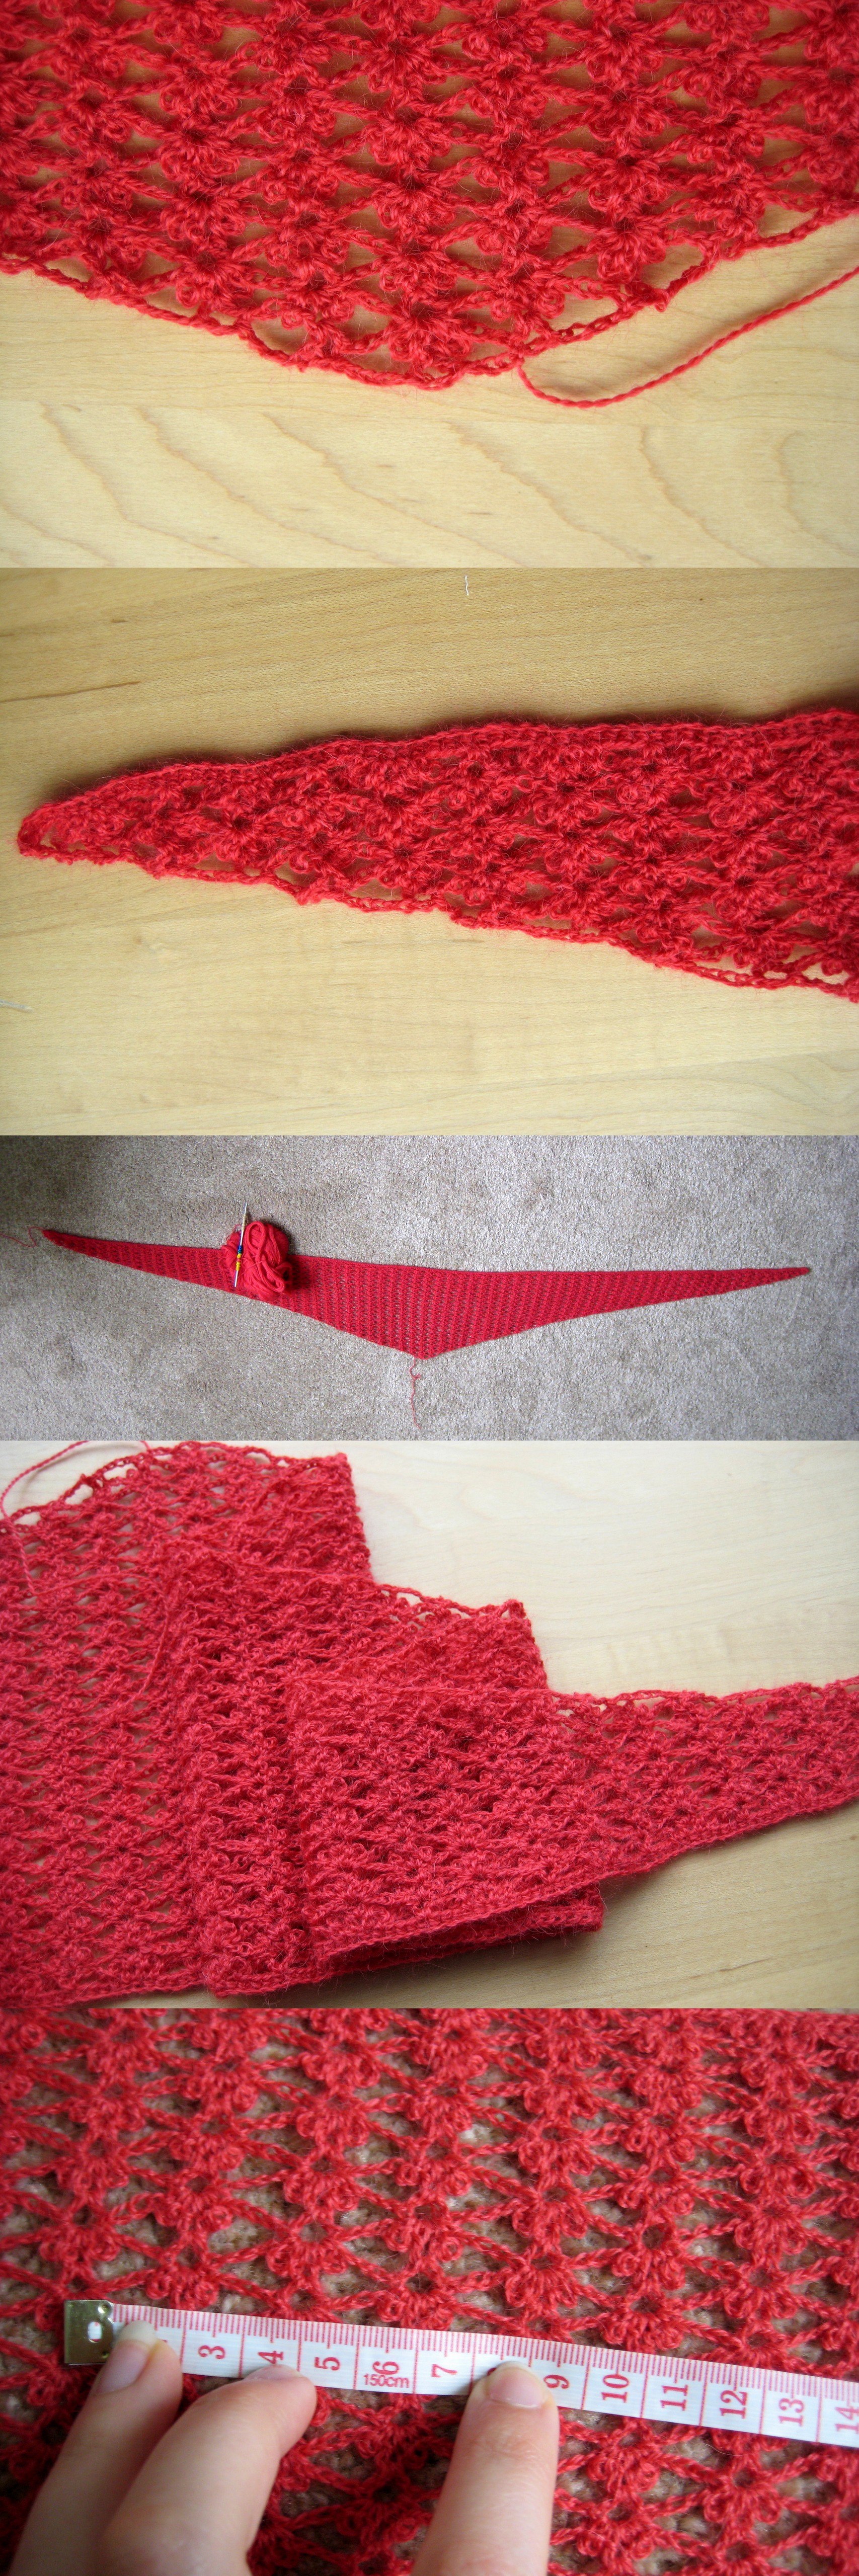
Main section of Summer Sprig Lace Scarf
Edging:
The edging is worked in two sections – a simple square mesh followed by a scalloped, picoted edging.
The mesh is worked by working 2 dc into every ch4 sp, and 1 dc into every ch2 sp as you work along the edge. The dc’s are all separated by a ch2.
Re-join the yarn to the end of the long edge on the foundation row.
R1: Ch3 (counts as 1dc, ch1), dc in same space, ch2, dc in top of ch3 of first row on main body, ch2, dc in ch2 sp (i.e. on second row of main body). *ch2, dc, repeat from * all the way along the edge working 2dc in each ch4 sp (dtr post counts as ch4) and 1 dc into each ch2 sp.
At the central ch sp, work 2dc (separated by a ch2) and then continue in pattern along the second edge until 2 ch-sp remain. You should have just worked a dc into a ch2 sp.
Ch2, dc into next ch sp, ch2, dc into the corner of the foundation row, ch1, dc. (211 ch-sps)
R2: Ch5 (counts as dc, ch2), turn, dc in next dc, *ch2, dc in next dc, repeat till centre ch-sp, ch2, dc in centre ch-sp, ch2, dc in very next dc, *ch2, dc in next dc, repeat to end (212 ch-sps).
R3: Ch5, turn, dc in same st, *ch2, dc in next dc, repeat till centre dc, work an extra ch2, dc in central dc, *ch2, dc in next dc, repeat to end, ch2, dc in same st (215 ch-sps).
The mesh section is now completed. The final 3 rows make the scalloped edging.
R4: ch1, turn, sc in same st. *Ch4, sc in next dc, repeat from *to end (continue to mark the centre ch-sp).
R5: Ch4, turn, sc in ch-sp, *8dc in next ch sp, sc in next ch-sp, ch4, sc in next ch-sp, repeat from *until there is one ch-sp left before the central one, 8dc in next ch-sp, sc in central ch-sp, 8dc in next ch-sp, **sc in next ch-sp, ch4, sc in next ch-sp, 8dc in next ch-sp, repeat from ** until there is one ch-sp remaining, sc in final ch-sp.
Special st- Picot: Ch4, sl-st in 3rd ch from hook, ch1
R6: Ch2, turn, dc in same st, ch4, sk first two dc, dc, picot, sk2 sts, dc, *ch4, sc into ch-sp, ch4, sk next two dc, dc, picot, sk2 sts, dc, repeat from * to central st, ch1, picot, ch1, sk 5sts (two dc, one sc and two dc) dc, picot, sk 2 sts, dc, ch4, sc into ch-sp, **ch4, sk next two dc, dc, picot, sk 2 sts, dc, ch4, sc into ch-sp, repeat from ** to end.
Fasten off and weave in ends.

Blocking out the Summer Sprig Lace Scarf
Finishing:
I recommend wet blocking for this item.
I found the pretty sprig pattern and picot edging really benefitted from blocking. If you stretch out the main pattern of the scarf you can see how blocking it out will help show off the stitches! I made sure I stretched mine out a little whilst wet, particularly width wise.
Before and After blocking
It does take a bit of patience to pin out the picot edging, but it is worth it!
My finished scarf was 146cm long and 26cm wide pre blocking, and 166cm long and 34cm wide post blocking. So you get a larger scarf too by blocking it out too!
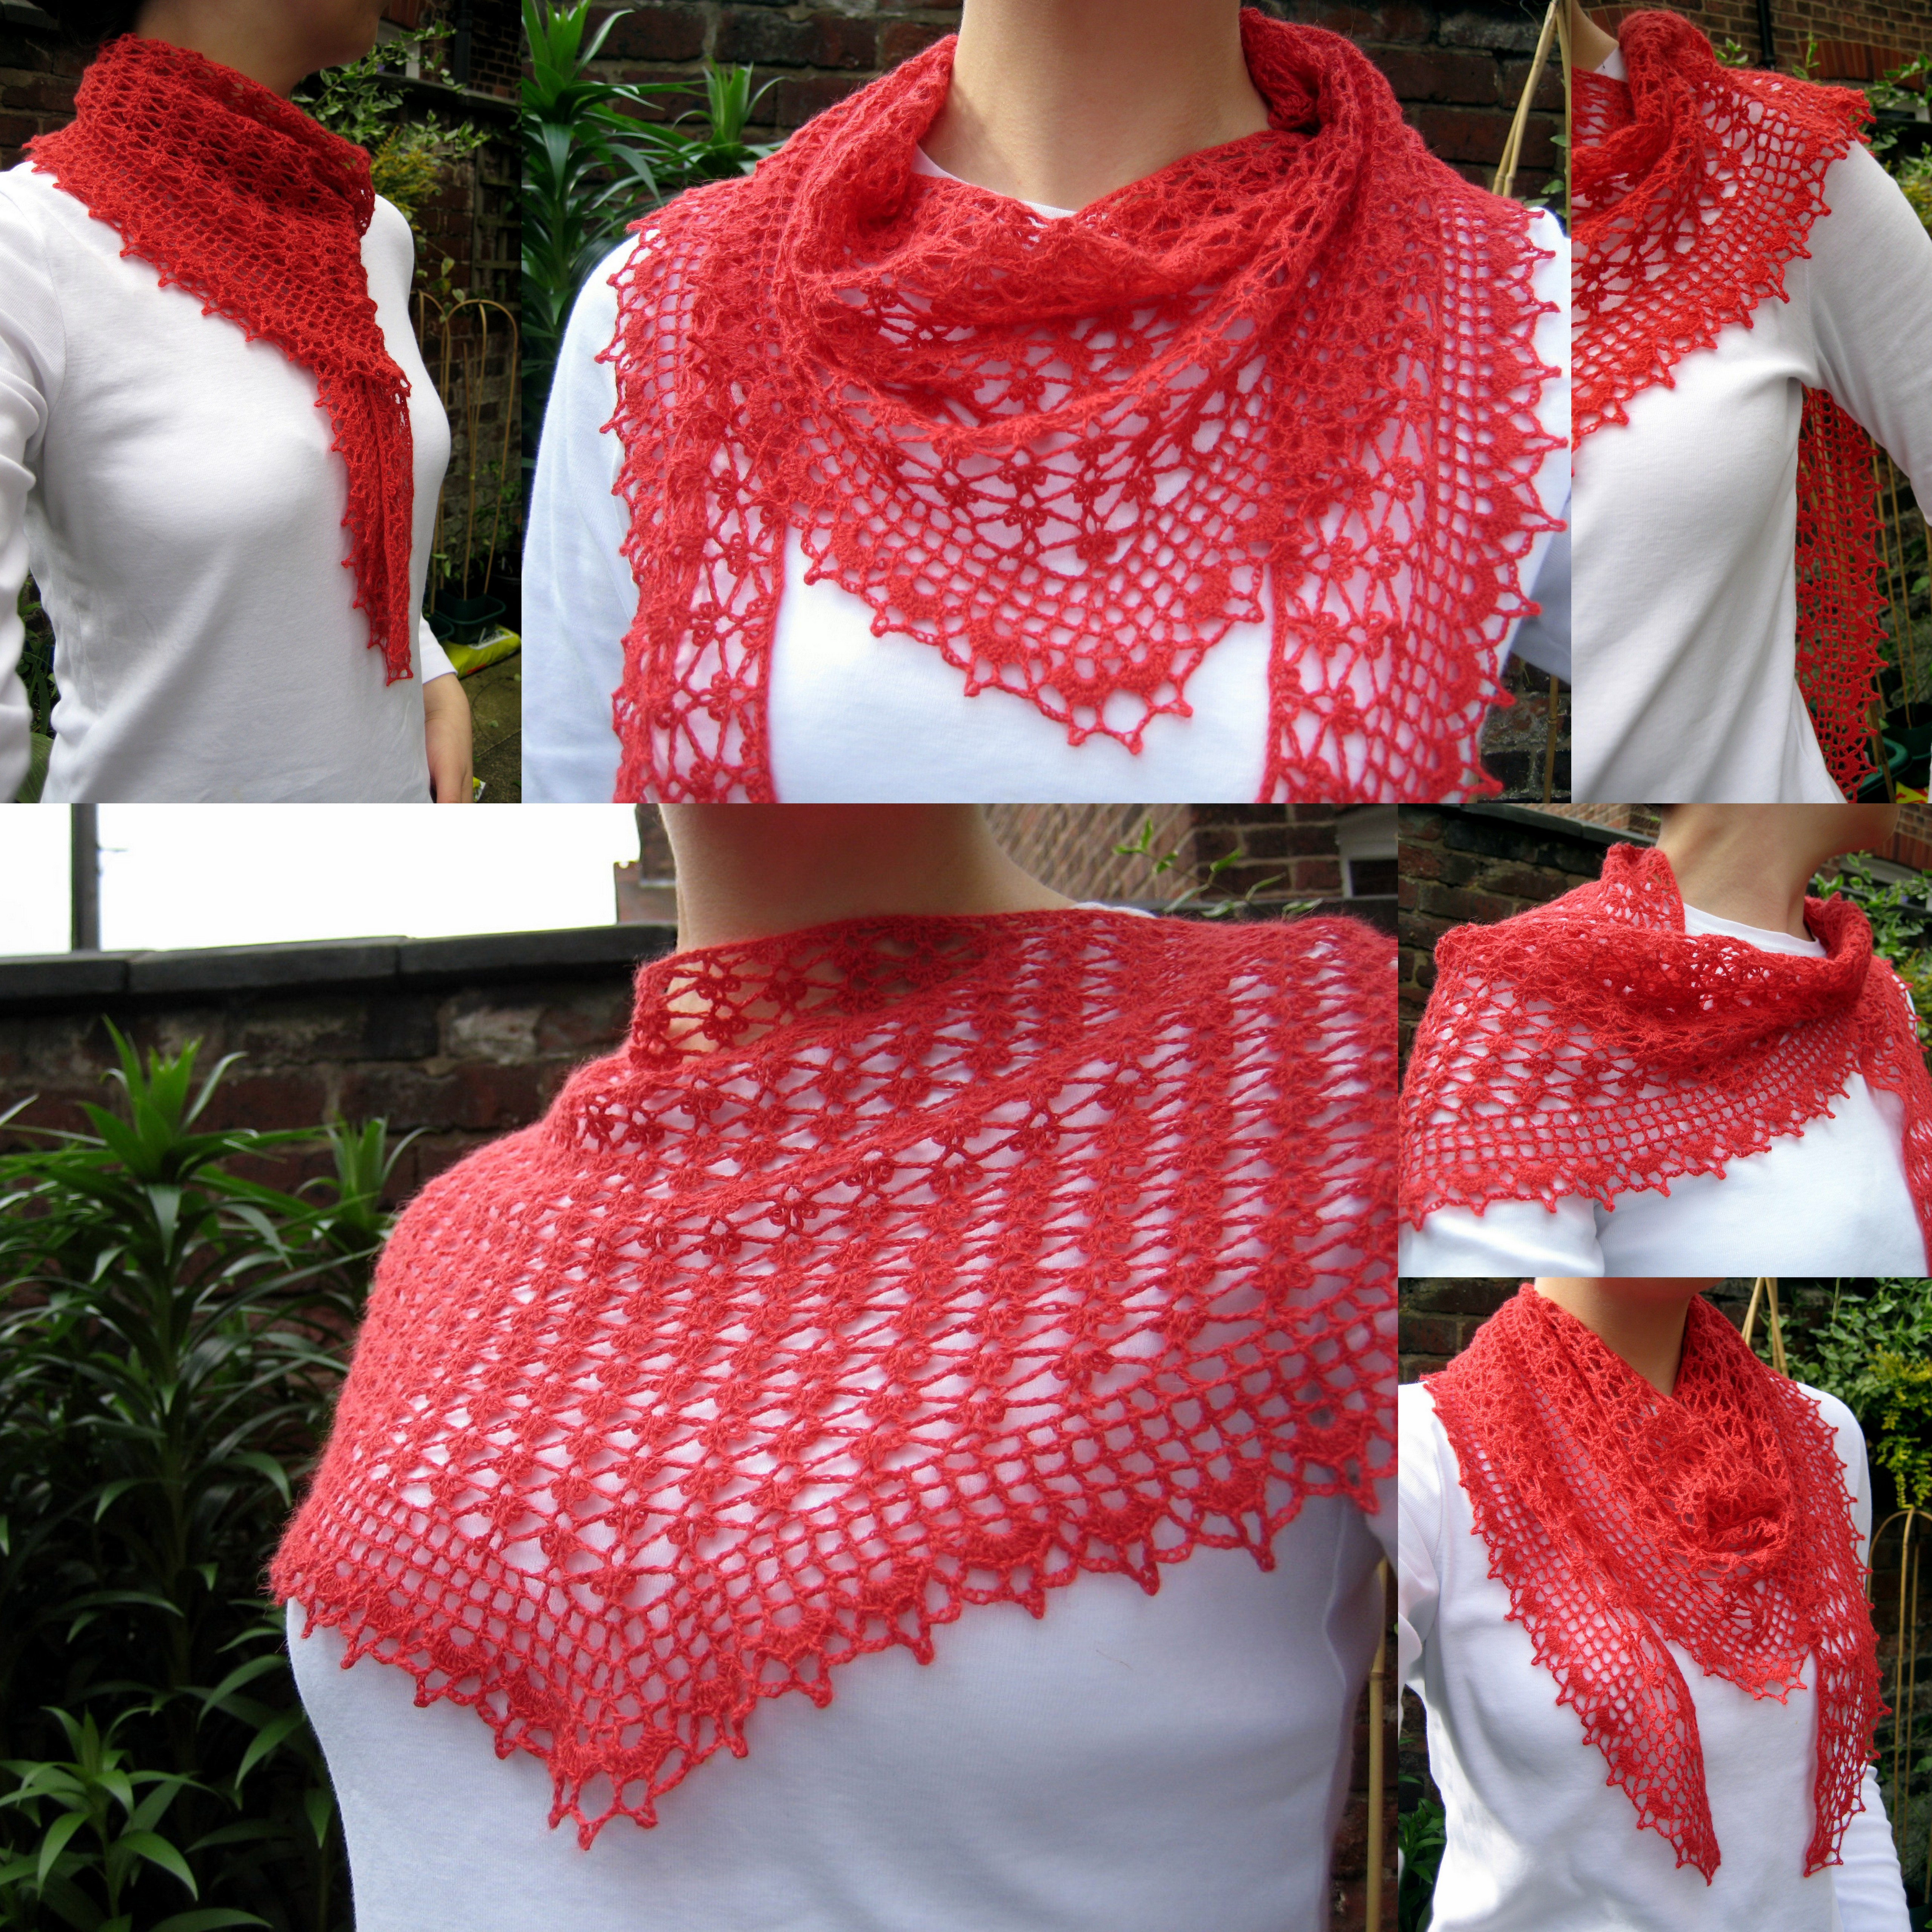
Ways to wear Summer Sprigs Lace Scarf


Your Summer Sprigs lace scarf is gorgeous. I wouldn’t have patience to make it but my daughter Oona would love to make it I think and it would suit her in this colour. Thanks for sharing your pattern Esther.
Thank you! I love this nice bright colour. It’s sort of orange-red, so I think it would be nice going into autumn too. :)
Esther – lovely but check your links as they do not work – the scroll down and website links on the pdf m xx
I’ve checked and they seem fine to me! Let me know if you have any more problems.
Just lovely!! Beautiful color!!
Thank you! Yes I couldn’t resist it even though it was just one ball by itself! Really pleased it made a whole project!
Just stunning! Thanks for sharing, I’ve queued it. To solve the hook problem, I use a cork from a wine bottle. It takes some pushing to get it on there, but it’s oh so comfortable, especially on the teeny hooks!
What a great idea! And a good excuse to open a bottle… :)
Beautiful! Love the stitch pattern, the color… Just wonderful!
Thank you
Thanks! :)
Thank you for sharing! It is wonderful and I’m going to start with it immediately.
You’re welcome! I hope you enjoy making it. :)
What Do you mean by FSC?
Hi there! fsc is standard US notation for foundation single crochet. There are many great tutorials on this stitch on youtube if you want to learn how to make it! The notation I use can also be found on my crochet pattern notes page: https://makemydaycreative.com/about/pattern-notes-2/
I asked about because i thought iIheard of it before; and i dislike very much working in chain with very fine yarn or thread. Thank you for your help. I think i got it , This will make this project much more enjoyable.
Yes, it isn’t the easiest to do! However for this project the row of sc stops the stitches from distorting the chain. The foundation row was the least nice part of the project – but I like to get he worst bits out of the way otherwise I lose motivation to finish! :)
What a lovely pattern. I am working in UK crochet. I cannot find any reference to ddtr. I have searched thru google and in my pattern books. I am stitching the scarf using Katia Jaipur. The colours look beautiful and I can’t wait to finish it. I am also making a summer jacket in turquoise to wear with the scarf.
Hi Christine! Your yarn sounds lovely. :) ddtr is double double treble crochet- yarn over hook 4 times, insert hook in stitch, yarn over and draw up a loop (6loops on hook) now *yarn over, draw through 2 loops, repeat from * until only one loop remains on hook.
Pingback: Summer Sprigs Lace Scarf | undertherowantreesblog
Would it be possible to make this wider by doing extra rounds of row 2 before starting the decrease row?
Hi Claire! Yes you can. I think adding multiples of two rows will mean the border works out ok- you’ll need a multiple of 3 mesh squares for it to work. :)
Pingback: Beautiful Crochet Lace Shawls and Scarves–8 Free Patterns!
Hello! Thanks so much for this lovely pattern. I have a gorgeous pure silk ooak skein from Fyberspates that I’ve been saving – I have only 400m, and couldn’t find a pattern to suit. If I run out of yarn I can always make a contrasting border. Thanks again!
I made this scarf with cotton my mother gave me. She bought it in the 80’s. ;-)
She died two weeks ago and making this helps me a lot.
Thank you for this pattern! First time I’ve used the blocking-technique, the difference is impressive!
http://haakselsenco.wordpress.com/2014/06/09/sjaals/
You’re welcome! Yes I was pleased it blocked out so well myself, it surprised me! :)
I love this scarf! Thanks for sharing the pattern. I finished row 2, but I’m only counting 15 repeats, with 8 stitches left. I’m not sure where I went wrong. I have 6 ch-3 sections in between each V stitch.
I’m glad you like it! There are a couple of reasons why your repeat number may be off- firstly, did you have 386sts after row 1? Secondly, and most likely, each repeat is worked over 11 sts of row 1, did you use more than this for each repeat (the bit in the square brackets)? Also, it may help you to look at the chart so you can see where the stitches go! If you are still having problems please let me know! :)
Reblogged this on crocheting and commented:
great work.
Just made one: Thank you for this lovely pattern!!!
If you want to, you can have a look here:
http://valeriesurletoit.blogspot.fr/2014/08/un-brin-dete.html
It’s in french but with photos…
I love it! The dark border is so pretty. :)
This has to be the most beautiful crocheted scarf I have ever seen. Thank you so much for sharing this pattern and your talent.
Thank you! So glad you like it :)
You are very generous. Thank you for this beautiful pattern. My daughter will also be thanking you!
Thanks! Lucky daughter to have it made for her! :)
i just want to say that I love you for sharing these beautiful free patterns with us
Thank you Samia! I hope you enjoy trying them out :)
Angela,
Hello, I love the pattern so far, but I am not about Repeat row 3 until the piece has decreased to the penultimate row – there will be two (dc, ch2, dc) sets. How am I decreasing? I don’t know what penultimate row means..I tried looking it up.. Thanks
Hi Angela! Penultimate just means second to last. Each time you do a row 3 you will lose one pattern repeat – if you followed the pattern exactly you will have 35 repeats at the end of row 2, 34 at the end of row 3, then 33 repeats and so on. You just keep repeating until there are only two repeats left and then do the final row. Please have a look at the stitch diagram which is in a pdf at the bottom of the post if you are confused! And if you’re having trouble with row 3 itself let me know.
I made this for my Great Niece and she loved it.
I would post a pic, but that is proving harder to do than making the scarf.
Hi Lynn! I’m glad your niece liked what you made :) If you want to post a picture may I suggest using Ravelry projects? I love browsing what people have been up to with my patterns over there!
How long could I expect this to take someone who crochets a lot to make? Is it time intensive? Is it beginner friendly if I were to attempt it. I’m wondering if my MIL could make it in a week.
Hi Danielle! During the crochet along (CAL) – see link in my replay to the comment above- some were finishing this in a week or two. But I would say it depends very heavily on the individual and how long you can crochet each day! If you are pushed for time you could use a larger hook and yarn thickness, and reduce the number of repeats. The repeat is 11 sts, if your MIL crochets a lot I’m sure she could adjust the pattern to fit the time available. :)
Sorry, the link I mentioned is here:
http://www.ravelry.com/discuss/crochet-shoulder-wrappers/2960658/1-25?jump=1
Some one left a comment on the about page rather than on this post!
Pingback: Merry Christmas! And Best of 2014 | Make My Day Creative
I have all my yarn wound for this project but I am using a mercerized cotton and need to size it down. Trying desperately to do the math. Is this done in multiples of 11 plus one?
Hi! Yes, it is multiples of 11 plus 1. Sounds like a nice yarn choice! :)
Pingback: Summer Sprigs Lace Scarf | Chris-Craft
I really enjoyed making this scarf. I used 8 ply wool from my yarn stash with a 4.5mm hook. It is a lot chunkier than yours as pictured but still very pretty design. I ran out of my original colour during the scalloped edge so I unravelled it and did the scalloped row and the picot row i a contrast colour and it looks quite good. Thankyou for sharing the pattern it is lovely!
I’m glad you liked it! Yes, it seams to modify nicely for other yarn weights. And a contrast border sounds lovely! :)
Reblogged this on Frosty's work and commented:
Just got done with two versions of this! :) will post photos soon!
I love your patterns,they look so fresh and young.
Thank you Sandie! :)
I love your pattern, do you have a video? I’m confused how to follow the instructions, because I’m a beginner!! Thanks very much!!!
Hi Sandra! There’s no video for this but the chart will help you. Also there’s some good tips in the CAL on Ravelry, if you want to check that out!
Thank you so much. I have just completed this using a 4ply cotton. So pretty and elegant. Thank you also for the choice of UK or US terminoly.
You’re welcome! I’m glad you’re pleased with your project! :)
This is a beautiful scarf and I would love to make it. Unfortunately, I cannot seem to get any of the PDF links to download to my Adobe Printer. I keep getting the message that it is not a correct PDF code. Could you help me with this? Thank you.
Hi! I’m not sure what would cause that to happen. The links are all working fine and the files are written by adobe at my end. You’ll have to read the pattern directly from the blog! :)
I am in the deep south in the USA and want to be able to wear the scarf even when it is in the 80’s and 90’s, so what type of yarn would be the coolest? I am guessing a type of cotton, so could you please advise me of one that will work well with this pattern?
Hi Brenda! Cotton/silk/linen would all be fine to use for this. The pattern works out well using different yarn thicknesses and matching hook sizes, so I suggest you select something you like along with an appropriate hook. If it’s a larger size then you probably want to subract multiples of 11 from the starting chain else it will be too big – and I’m guessing extra fabric is not what you’re going for in all that heat! Lots of people have made this using different yarns – have a look at the ravelry projects if you want more suggestions! :)
I would like to make the scarf in a very cool thread as I live in the deep south where summers are so hot. Can you recommend the lightest thread that would work well for this pattern, perhaps some type of cotton?
See my reply to Brenda just above! :)
Hello! I first would like to say it is a beautiful shawl! Secondly, I have some questions about the pattern itself. First, when I crochet a foundation chain of 386+1, I end up with WAY more repeats than just 35 by row 3…is that an error or did I misread something? Also, for the repeats, do they all tend to end on (dc, ch 2 dc)? or are they on the (sc, ch3, sc, ch3, sc, ch3)? Do you repeat all of row that row over and over or is it just from * to *? I’m having issues with it not working out right and I’m not sure if I’m misreading it or not!
Hi Ally! I think it would help you to look at the chart for this. The repeat is over 11 stitches so there are 35 repeats. A common mistake seems to be people working the sc stitches all into one stitch in the foundation row. The repeats do end on a (dc, ch2, dc). I think your last question is about row 3? if so, yes, repeat the entire row for row 4, row 5, etc. Hope that helps!
Pingback: Summer Sprigs Scarf Award | Make My Day Creative
I am a little confused on Row 3 decreasing. The pattern states “sl-st into ch2 sp, sc into ch2 sp.”
I do not understand what ch2 sp you are referring to and it is not on the diagram. Do you mean to slip stitch into the first (dc, ch2, dc) that appears and then to also single crochet into that spot and then begin row three again by chaining 5? I am very lost on the decrease
Hi Manda! The 2 sl-sts and sc are marked in red on the diagram, at the end of row 3 (they are worked in the opposite direction to the previous stitches in the row, as detailed in the written instruction). Your deduction is correct except that you make 2 sl-sts total, one in the dtr, and then one in the ch-sp and then the sc as you described. I mention this just in case because I wouldn’t want your edge to turn out too tight!
Esther,
I get an error when I try to download the diagram. Adobe says it’s not valid pdf document. I really want to make this scarf. I think this is a lovely pattern. I have some beautiful raspberry colored lace weight that I picked up as a mill end at Joann’s.
Esther,
Must be something wrong with Adobe on my tablet. The pdf downloaded just fine on my laptop. I can’t wait to get started. The diagram is extremely helpful.
Thanks.
Hi Carol! I’m glad you’re sorted for the pdf :) your yarn sounds lovely!
This is such a lovely shawl, I decided I wanted to make it for my daughter – for her wedding.
I decided to try this pattern on a smaller scale to get the feel for it before actually chaining or fsc 386 (and then have difficulty figuring it out how to make it).
Admittedly, I am a novice at reading patterns. If there is a tutorial for this anywhere that would probably be enough to get me through this. I believe that I could do this one (with tutorials) due to repeating pattern – even if it took longer than I originally thought it may take.
I’ve done other patterns that had enough tutorials that I was able to figure the rest out between pictures and the tutorials were offered and now can make them without the tutorial.
I have the mechanics down fine, once I understand what I need to do.
So, would you please let me know if there is a tutorial out there someplace that could help me through this?
Thanks. Judy
I just NOW noticed the diagram pdf and downloaded it. THANK you for the foresight with this pattern to put that there. I’m sorry that I didn’t notice it before.
I believe that the diagram will be enough to figure it out.
Thanks again.
I’m glad the diagram can help you! :)
I would love to see this pattern in a shell top, with a tutorial video.
That would be lovely! Although my feeling would be that this pattern is too lacy to work as a top – the fabric has a lot of drape and is very delicate. See more about selecting the right stitch patterns for projects here: https://makemydaycreative.com/2015/03/20/how-to-design-and-alter-crochet-patterns-part-1-stitch-patterns/
I’m fairly new to crochet and the diagram included with this pattern is helping me a lot; except, I wish that you had done a second row 3 to show how to repeat it. I’ve taken apart my work twice and am hoping you can provide me with instructions that are a little more clear. The end of row 3 has the (dc, ch2, dc), then dtr. So when I go up to the next row I’m following the instructions for the sl-st & sc and crochet until the end of the row. When I turn it I end up at a (dc, ch2, dc). Do I skip that and do my final work in the last (sc,ch3,sc3,sc3,sc)? Or do I do the dtr in the (dc, ch2, dc)? Thanks.
Hi Jennifer! I’m glad you are finding the chart helpful. If you refer to it it shows where the 2 sl-sts and sc are worked (in red) – into the last dc worked, the ch-sp, adn the ch-sp again. These last 3 sts move you to the place where you start the next row from and you turn before you make them! Then when you begin row 4 you will chain 4 and make the first (dc, ch2, dc) into the middle of the group of 3 chain 3 loops which were worked into one chain space.
Oh, and from row 4 onwards the dtr is always into the last ch2 space (that is the (dc, ch2, dc) group) at the end of the row. Hope that helps!
And where does the following row start?
See my reply above :)
That helps, one more question. What do you mean by the ch2 space? The space in between the 2 dc? Thanks.
Yes. I wrote ch2-sp rather than ch-sp to indicate which one! :)
I learn from your blog and the clearly presented pictures and instructions. I am new at this craft and appreciate the effort you put in.
Thank you Ruth! I’m really glad you’re able to follow the patterns well :)
I love this :)
Thanks Krystal! :)
Pingback: How to Design Crochet Patterns Part 3b: How to increase and decrease in stitch patterns | Make My Day Creative
Lovely design! I’m working on the edging right now. I’m using a KnitPicks Stroll tonal (462 yds) fingering weight and It definitely requires a second ball of yarn. It’s a fun pattern to do and I’m very pleased with how it’s working up, can’t wait to block it, I know it will be even prettier.
Thank you so very much for posting this pattern, I already have plans to make it again for a gift.
I’m glad you are enjoying this! Thanks for sharing about your yarn usage. Helpful for anyone using fingering weight! :)
Pingback: How to Design Crochet Patterns: Triangular Shawl Bonus | Make My Day Creative