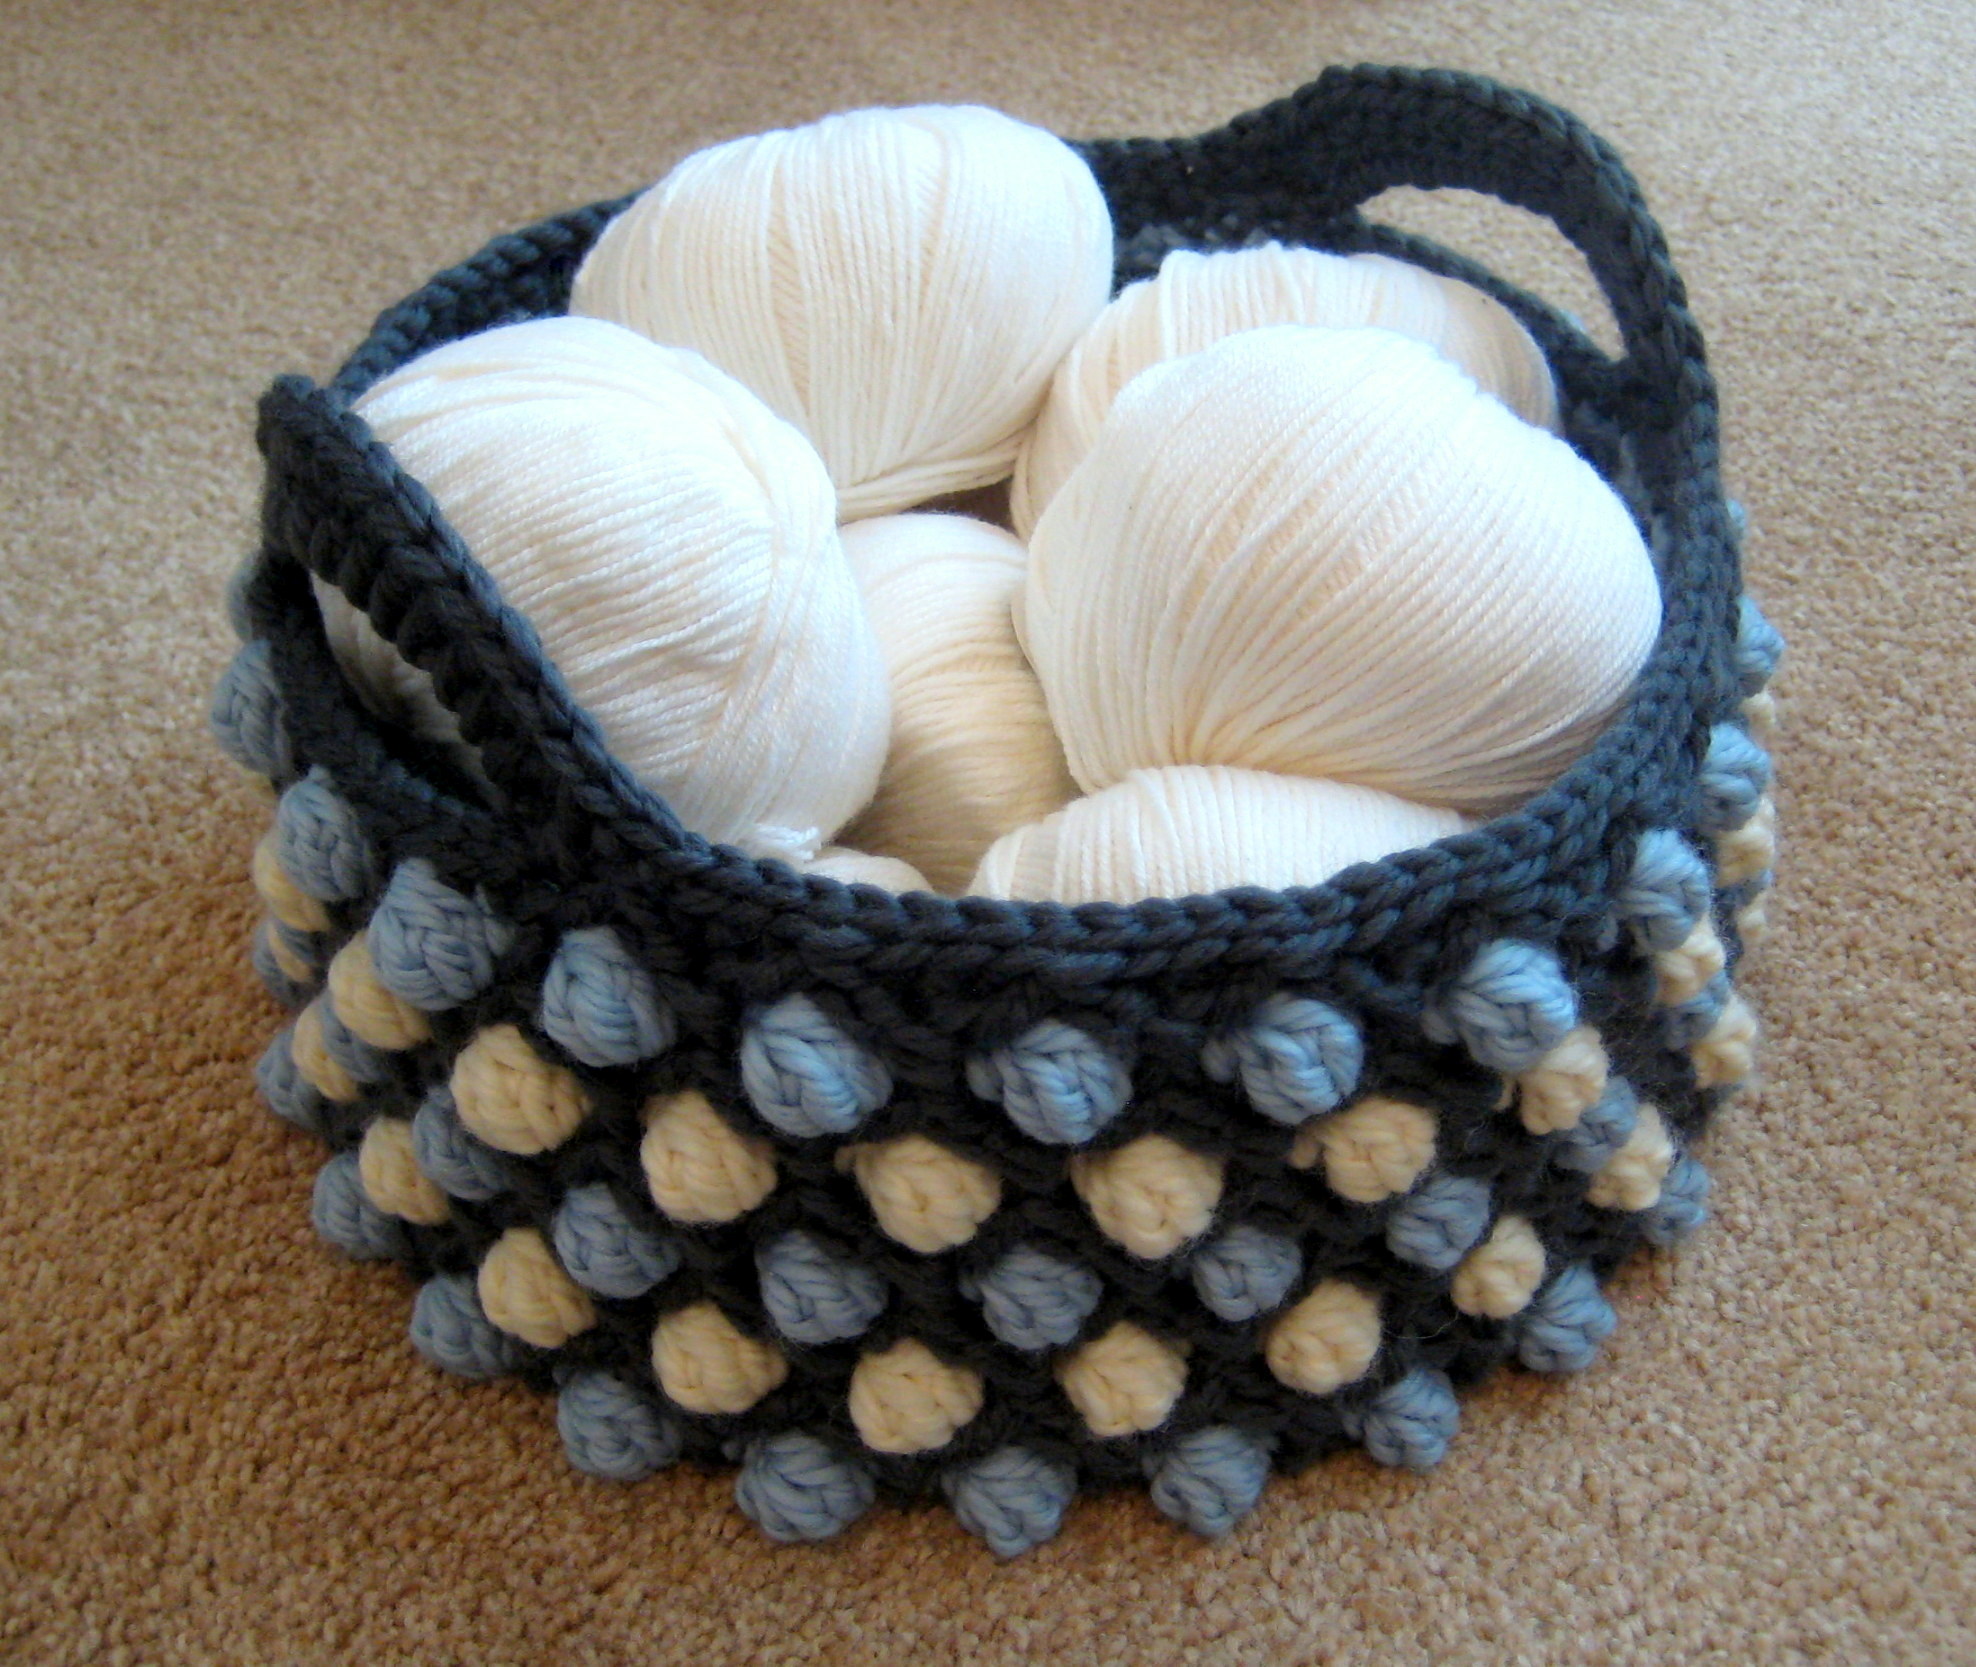
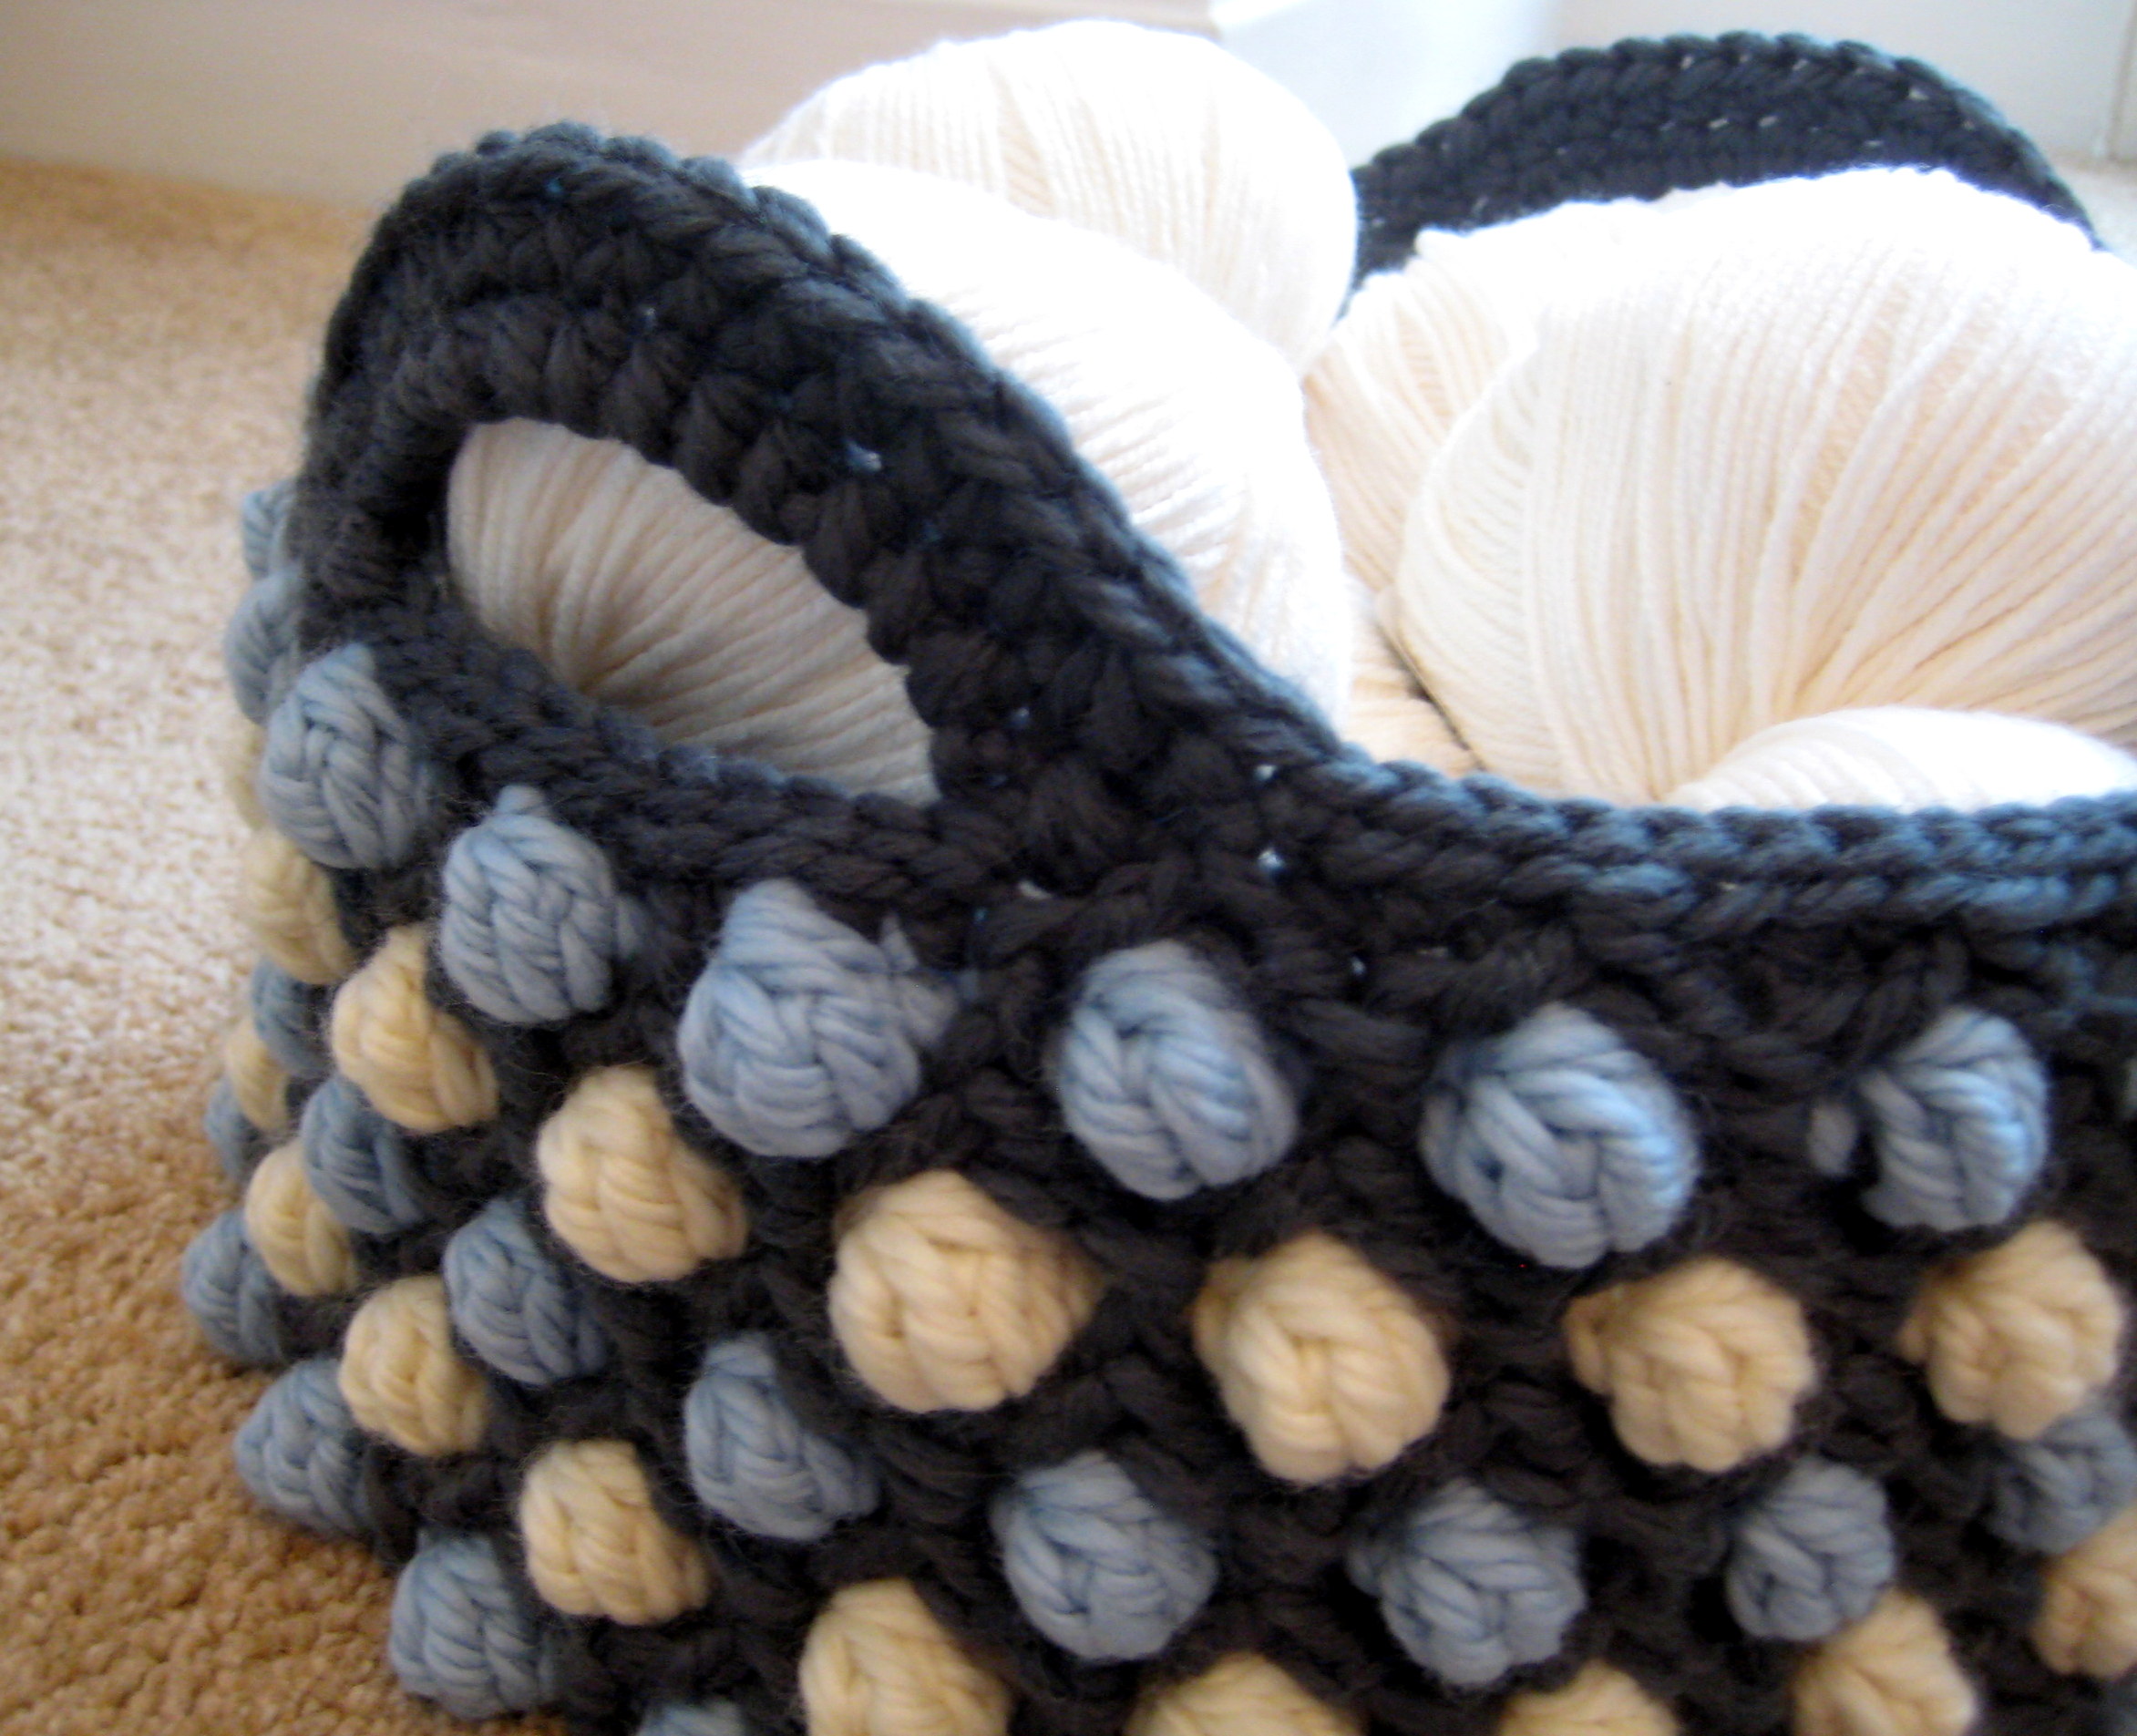
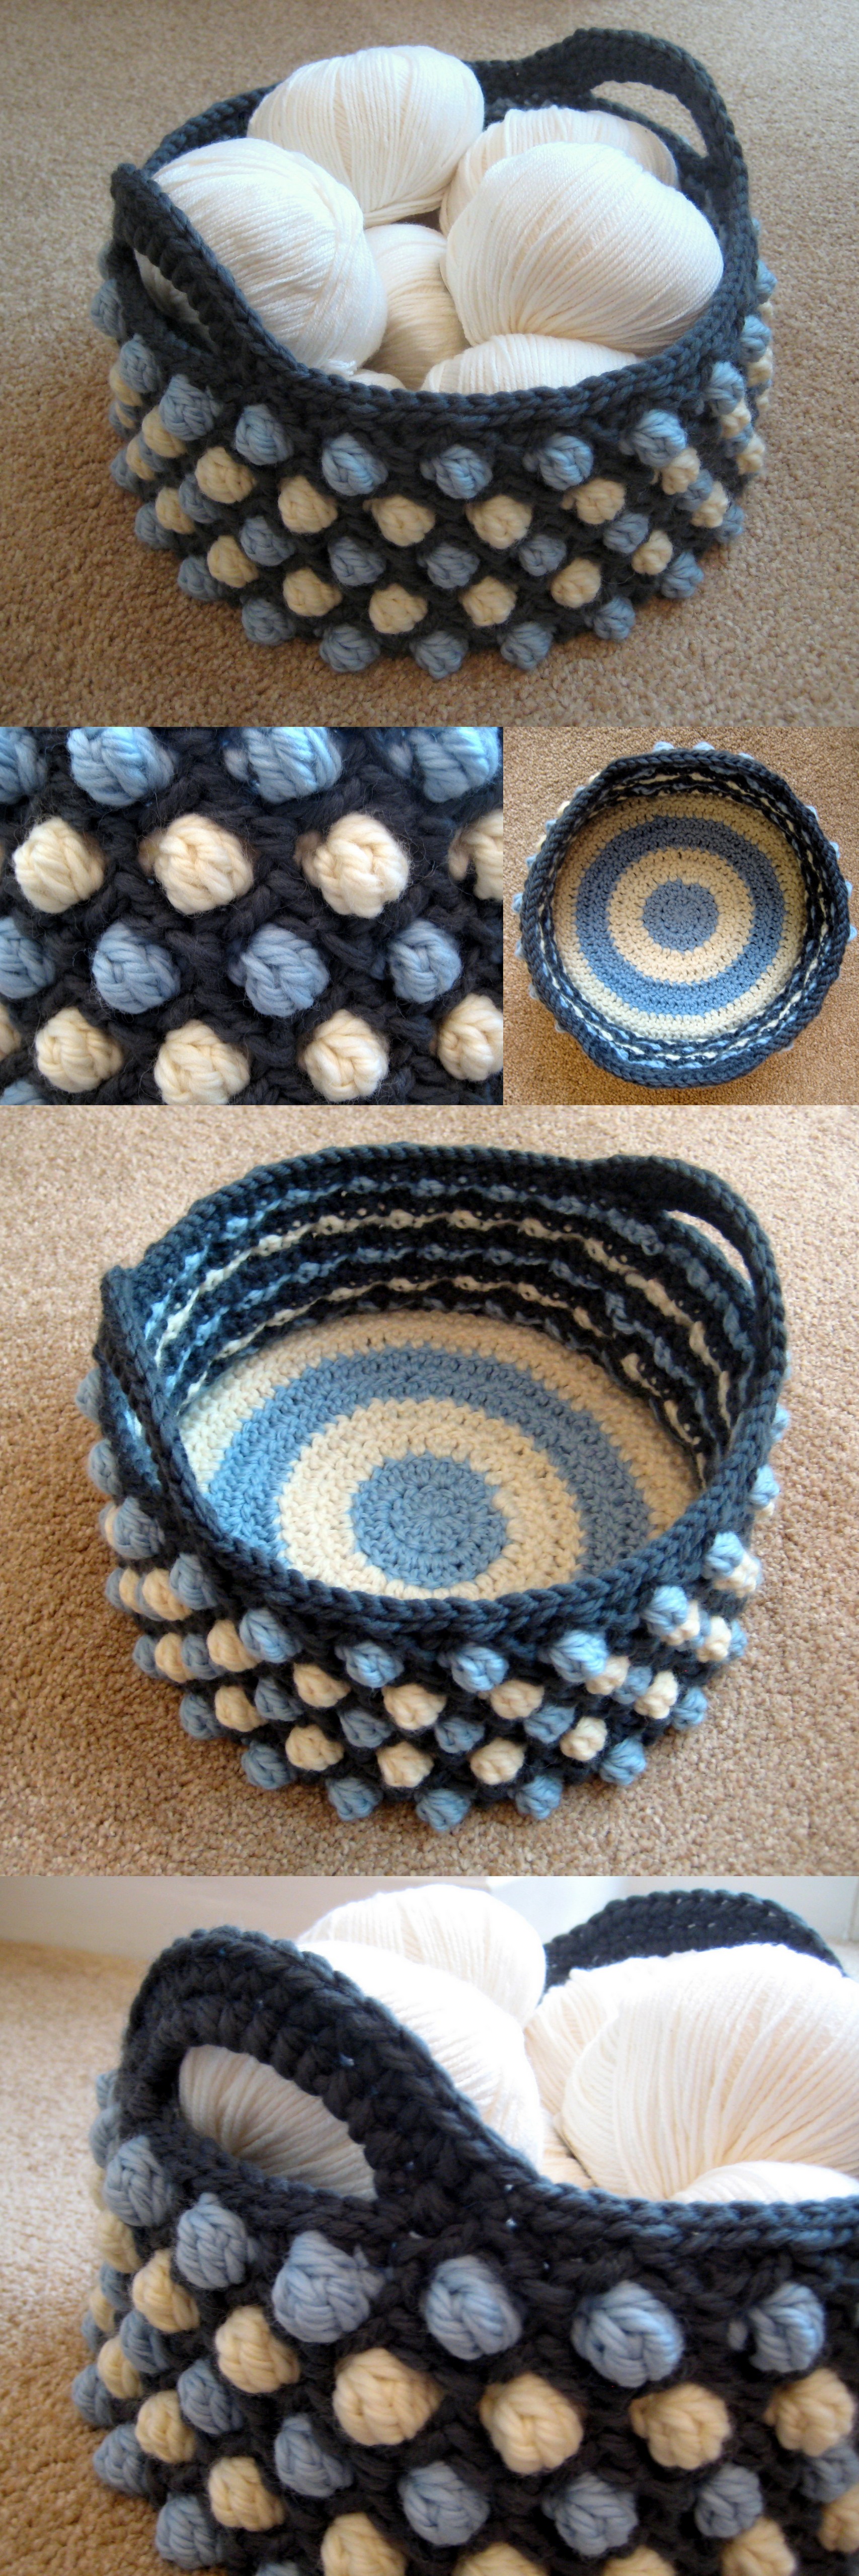
Honeycomb Pop Basket – a free crochet pattern from Make My Day Creative

If you follow me on facebook, you’ll have seen that this project has been near completion for a while. One of the problems I often come across is running out of yarn. I really don’t like to overbuy and of course when you are making something up as you go it is hard to gauge what you’ll need!
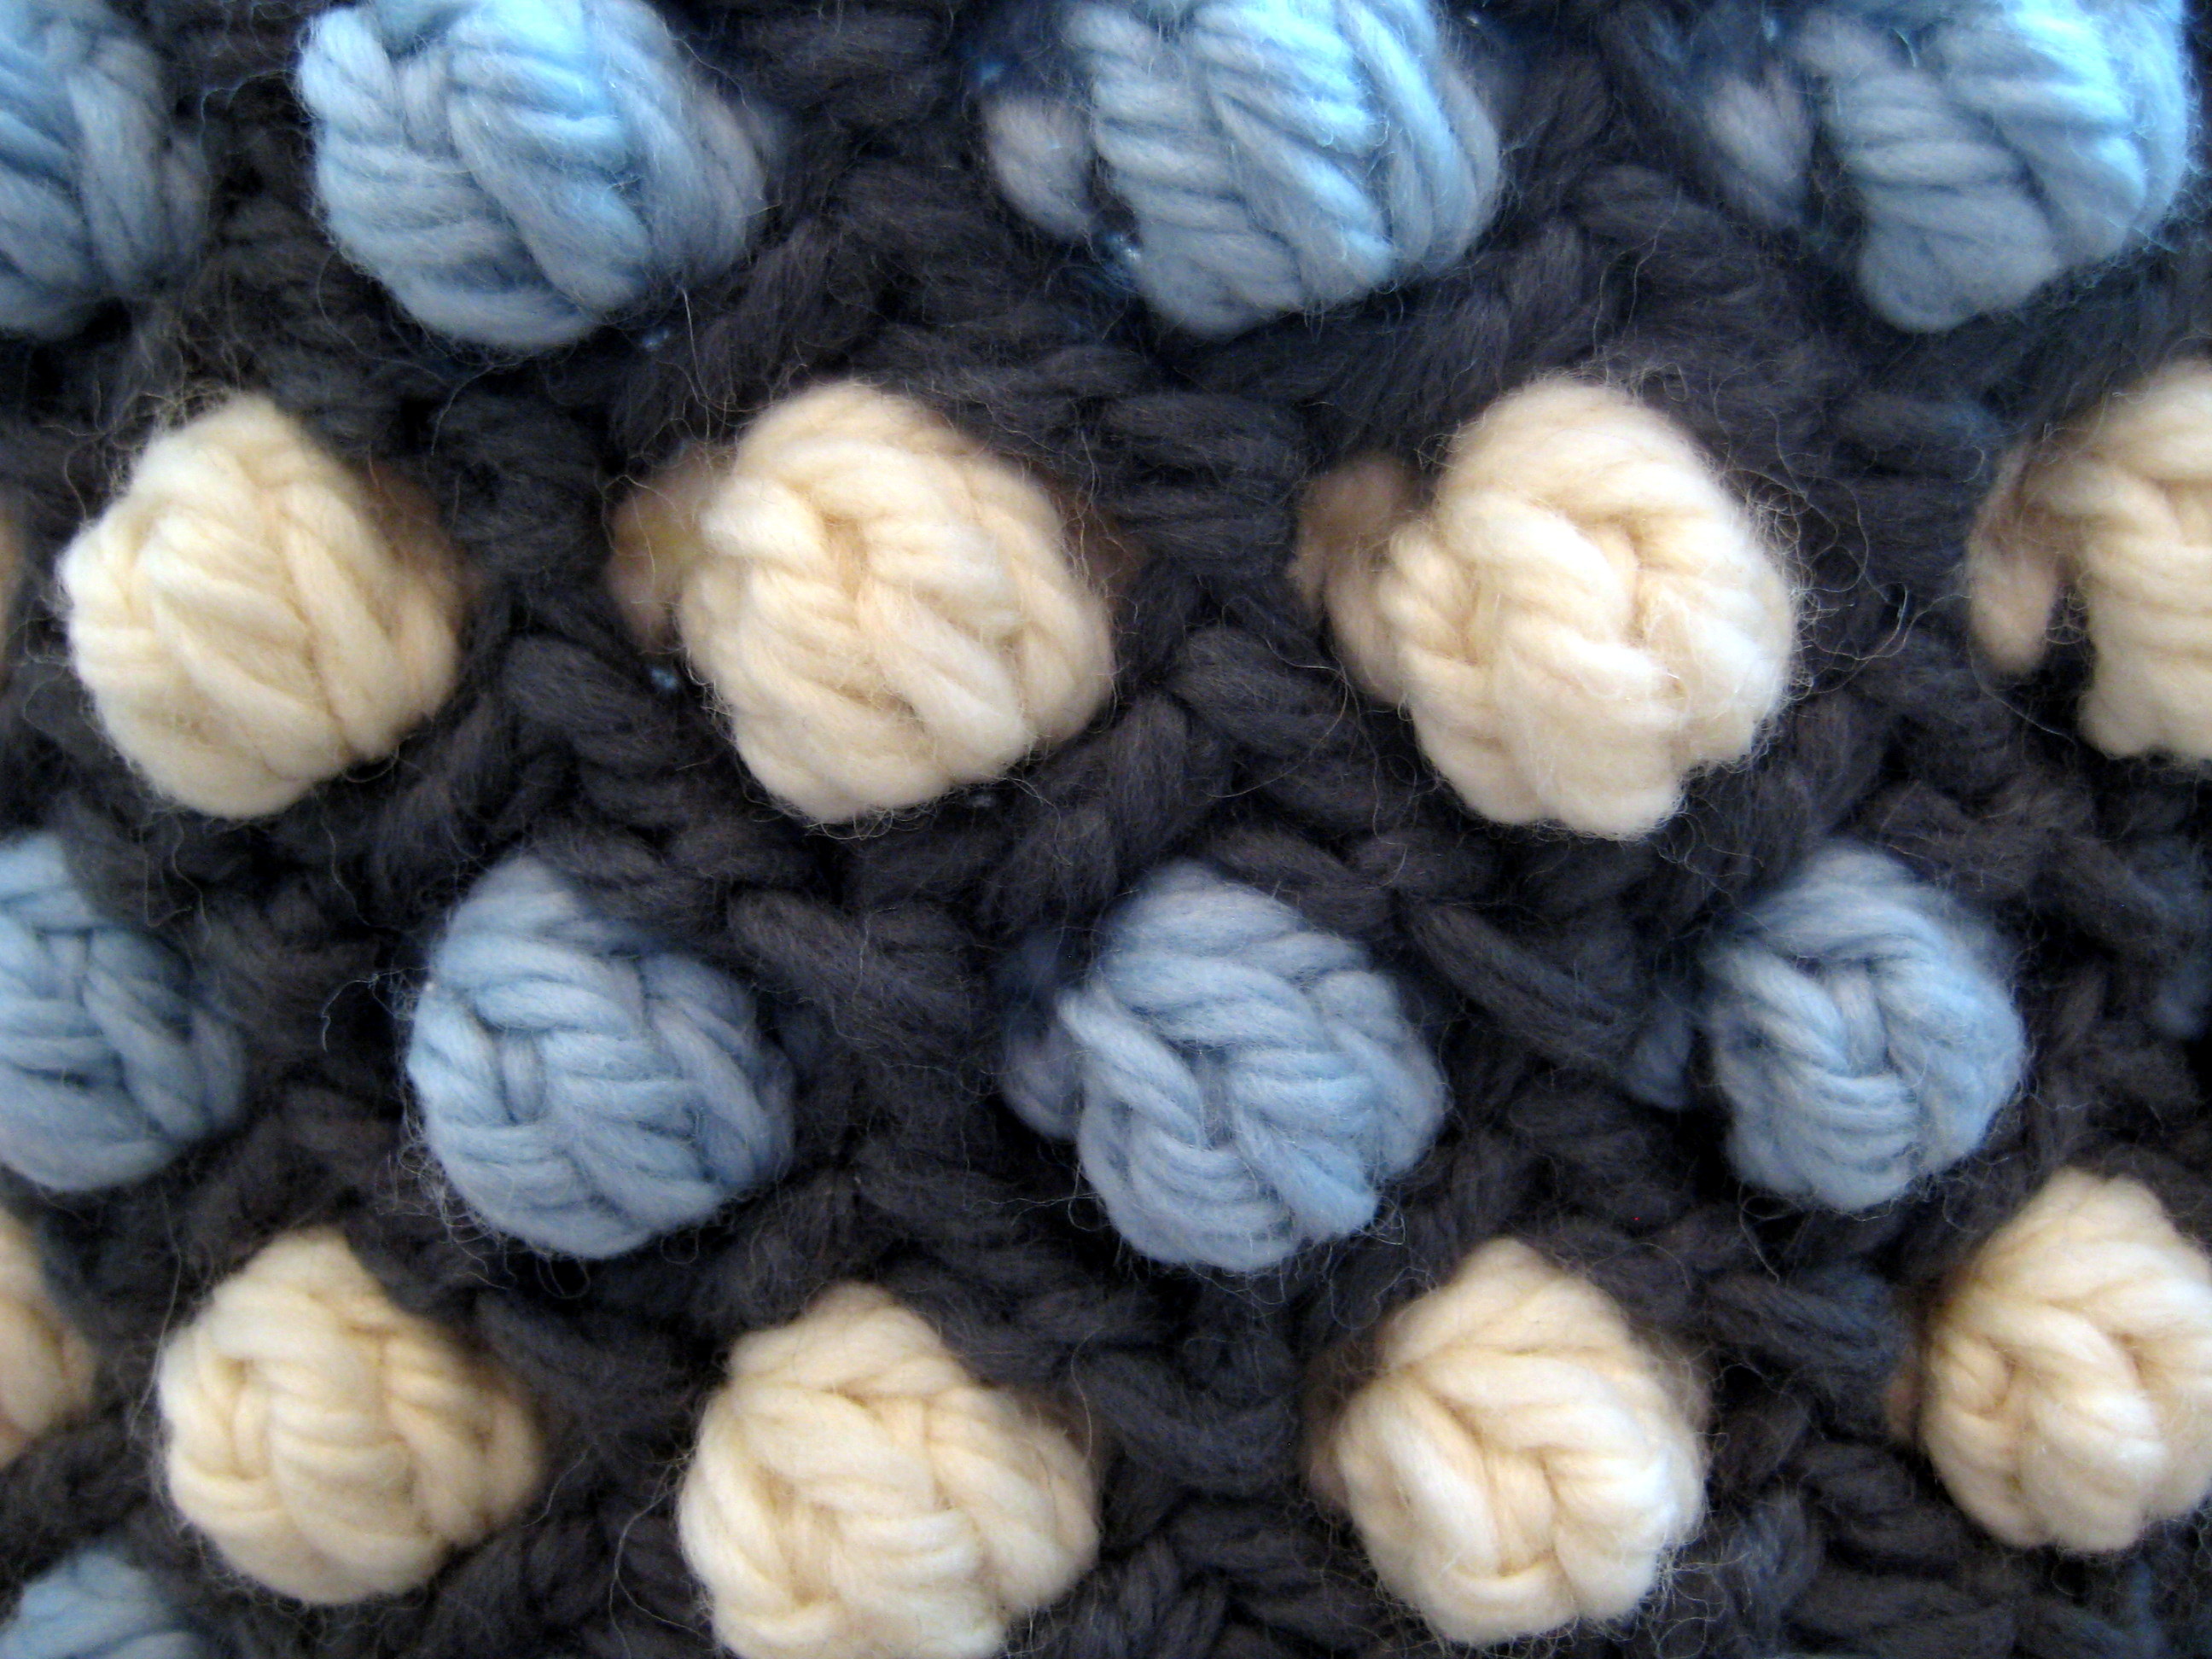
I was experimenting with a regular spot stitch for another project and thought it would work well for a basket given the thickness it adds to the fabric. So here I’ve merged it with post stitches (like my Diamond Trellis Basket) to add even more stability to the basket sides.
If you’ve already made my Diamond Trellis or Rectangular Diamond Trellis baskets then this one will be easy peasy. It’s a similar principle of using post stitches across the work but uses only dc’s and no trebles! (US notation)
Use a super chunky yarn like me, or try holding 2 or 3 strands of worsted or dk yarn together. If in doubt about the thickness of the fabric, go down a hook size!
This design is also customisable; just make sure you work an even number of rounds to the base so that you end up with a multiple of 8 sts, before you start the sides.
My basket turned out 28cm (11″) across.
Scroll down for pdf patterns! (US and UK notation)

Honeycomb Pop Basket – a free crochet pattern from Make My Day Creative
Materials:
- Size 7mm hook
- 265m (350g) Super Chunky yarn (recommended hook size 10mm) – I used Erika Knight for John Lewis’s Super Chunky – 2 balls of grey, 1 blue and 1 cream ball.
Some wool content in your yarn will give structure to the basket – this is a good project for using up scratchy yarn!
Special Stitch – Spot stitch
This is made by working a dc5tog into one stitch:
*Yarn over hook, insert st, draw up a loop, yarn over, pull through two loops, repeat from * 4 more times so that there are 6 loops on the hook, yarn over, draw through all 6 loops. (You may need to poke the spot to the front of the work after working the sc which follows this stitch.)
Special stitch – fpdc2tog
These are worked around the post stitches made in the row below. The first of the fpdc’s is worked about the post you have just crocheted past, and the second is about the next post stitch up ahead, so as to make a wide “v” shape around the spot stitch (which will be centred below this stitch):
Yarn over hook, insert hook about the post stitch from the round below, yarn over hook, draw up a loop, yarn over draw through two loops (two loops left on hook). Yarn over hook, Insert hook through next post stitch along, yarn over, draw up a loop, yarn over, draw through two loops (3 loops on hook). Yarn over and draw through all 3 loops.
Don’t forget that your post stitch will leave an unworked stitch behind the front of the stitch. You will not be working in this stitch.
The next fpdc2tog in the round will be worked about the same post stitch as just used, and the next one along.
See my video tutorial on the fptrc2tog stitch, which is very similar in principle, if you are confused!
Honeycomb Pop stitch- a free crochet basket pattern from Make My Day Creative
Pattern:
The basket is worked seamlessly in the round from the centre base out. Stitches in brackets () are all to be worked into the next stitch.
Base:
Example shown works the base in double rounds of blue and white (you can use your preferred colours). (Note – you can follow the base instructions for my Diamond Trellis Basket if you prefer to work in hdc for a slightly stiffer base – I have used dc stitches in this basket as I know a few people had difficulty with the hdc base lying flat.)
Begin with a magic ring.
R1: Ch2 (counts as dc), 11dc into circle, join with a sl-st, pull circle closed [12 sts]
R2: Ch2 (counts as dc), dc in same st, (2dc) into each st around, join with a sl-st [24sts]
R3: Ch2 (counts as dc), dc in same st, *dc, (2dc), repeat from * 10 times, dc, join with a sl-st to top of chain [36sts]
R4: Ch2 (counts as dc), dc in same st, *2dc, (2dc), repeat from * 10 times, 2dc, join with a sl-st to top of chain [48sts]
R5: Ch2 (counts as dc), dc in same st, *3dc, (2dc), repeat from * 10 times, 3dc, join with a sl-st to top of chain [60sts]
R6: Ch2 (counts as dc), dc in same st, *4dc, (2dc), repeat from * 10 times, 4dc, join with a sl-st to top of chain [72sts]
R7: Ch2 (counts as dc), dc in same st, *5dc, (2dc), repeat from * 10 times, 5dc, join with a sl-st to top of chain [84sts]
R8: Ch2 (counts as dc), dc in same st, *6dc, (2dc), repeat from * 10 times, 6dc, join with a sl-st to top of chain [96sts]
If you prefer a larger base then continue to work in expansion pattern (or stop prior to round 8 if you want a smaller one). Work an even number of rounds so that you finish the base on a multiple of 8 sts – each round will now have this number of stitches for the sides of the basket.
Sides:
If you are not already using it, switch to the colour you will be using for your hexagon post stitches (grey in example pictured).
R9: Working in the back loops only, ch 1, sc in each stitch around, sl-st to join [96 sts]
Switch to the colour of your first spot round (blue in example)
R10: ch1, *sc in each of next 3 sts, spot stitch, repeat from * around, join with a sl-st [96sts]
Switch to your hexagon post stitch colour (grey in example)
All fpdc’s in round 11 are worked about the sc two rows below – it will be the same colour yarn as you are currently using and should make a vertical st in between the spot sts.
R11: ch1, sc, fpdc, *sc in next 3 sts, fpdc, repeat from * 22 more times, sc in each of last two sts, join with a sl-st [96sts]
R12: ch1, *sc in next 3 sts, fpdc2tog, repeat from * 23 more times, join with a sl-st into first st [96sts]
Switch to your next spot colour yarn (cream in example)
R13: ch1, sc, *spot stitch, sc in each of next 3 sts, repeat from * 22 more times, spot stitch, sc in each of last 2 sts [96 sts]
Switch to your hexagon post stitch colour (grey in example).
All fpdc’s in round 14 and throughout the remainder of the project are worked about the fpdc2tog sts made in the round two below where you are working.
R14: ch1, *sc in each of next 3 sts, fpdc, repeat from * 23 more times, join with a sl-st [96 sts]
R15: ch1, sc, *fpdc2tog, sc in next 3 sts, repeat from * 22 more times, fpdc2tog, sc in each of last 2 sts, join with a sl-st [96 sts]
Repeat rounds 10-15 until basket is desired height. Finish on a round 11 or 14.
Handles Loops:
If you just worked a fpdc at the end of your last round, join with a sl-st in the back loop only.
If you just worked 2sc, join with a sl-st and work 2 more sl-sts. Sl-st in the back loop only of the next st.
Work 10 more sl-sts in the back loop only, sl-st through both loops of next st. Ch12, turn and skip the 11 sts made in the back loop only, sl-st in next st. Fasten off and turn to work in the usual direction.
Count 48 sts (or half of your total stitch count, if you have made a custom size) around from where you fastened off and rejoin the yarn to repeat making the second handle loop. You should be joining into a fpdc st.
Work 11 sl-sts in the back loop only, sl-st through both loops of the next st, ch12, turn, sl-st into the joining st. Sl-st into the next st, ch1, and turn.
Honeycomb Pop Basket – a free crochet pattern from Make My Day Creative
Handle Rounds:
R16: hdc2tog working into the current st and the st prior to the handle chain. Work 13 hdc over the chain, hdc2tog over the first two stitches after the chain. Now work in pattern over the next section:
[*dc2tog, 3sc, repeat from * 7 times, dc2tog], hdc2tog (over the last 2 sts before the chain), 13hdc into handle chain, hdc2tog over first two stitches after chain, repeat everything inside [], join with a sl-st.
R17: Ch1, *hdc2tog (this will be in the hdc2tog and a regular hdc), hdc, (2hdc), 7hdc, (2hdc), hdc, hdc2tog, sc, sl-st in back loop only 31 times, sc, repeat from *, join with a sl-st.
Fasten off.
Base Edging:
Optional: To edge the base, join the main colour (grey) to the unworked front loops which run around the basket edge. Sl-st into each loop around. (I did this because my base gauge was looser at the base and this tightened the edge up to stop the edges sloping out at the bottom).
Fasten off and weave in all ends.
A note on changing colours:
You can fasten off your colours at the end of each round and then crochet over the ends as you go to save weaving in (this works ok as you can see the fabric is quite dense so good at hiding them), or weave in as normal. Alternatively strand the main colour (grey) up the inside of the basket where it is hardly visible.
What colours will you use for yours?
Honeycomb Pop Basket – a free crochet pattern from Make My Day Creative


I LOVE it! Darn! I had planned on making your Diamond Trellis Basket as my first basket…it’s on my “To-Do” list for the year…but now I don’t know which one I want to do first!
Will, no doubt, do both….eventually…so many projects…so much beautiful yarn! WHERE DO I START?
Thank you for sharing so generously with the hooking community! That is so generous of you!
and those of us on very limited income DO appreciate it. Your work is beautiful!
Thank you Carol! I’m so glad you like my projects! I think you’ll like both baskets but I suppose this one is better if you’re in the mood for a colourful basket and Diamond Trellis if you prefer a single colour… :)
http://joyabbottntlworld.blogspot.co.uk/2015/02/update.html
A really well made basket x
Thanks Joy!
What a gorgeous design. I want to make some laundry baskets, but all the patterns I’ve seen so far have been quite plain. These might be just the thing to add some detail to our magnolia bedroom
Ooh that’s an interesting idea! I might do that myself! :)
Loving this basket, Hoping to get into town at the weekend and get myself some super chunky to give it a go. Thank you for sharing the pattern.
I finished the base ‘yay’ but have a feeling that was the easy bit, I’ll start on the sides tomorrow..lovely pattern, hope I can pull it off :-)
Well done Barbara! I hope the sides are going well :)
Struggled a bit with the fpdc2tog’s but I’ve completed my second row of spots and it looks good so far (I think)…
They can be tricky at first so well done! :)
Pingback: How to Design Crochet Patterns Part 2: Pattern Repeats | Make My Day Creative
I’ve been working on this basket since yesterday and I’m so lost. I’ve never done some of these stitches but I’m having fun learning. I got the spot stitch but I think I’ve messed up passed there. The pattern says a Fpdc but that gives me a dc in between each spot stitch. When I go to do the fpdc2tog I’m lost of where to go into cause I have the Fpdc. Idk maybe I need to send you pictures to see if it’s right. Lol
I love the looks of this basket, and I did fine until row 11. I dont understand how there can be the same # of sts at the end of a row with decreases, same as row 10 (96). And when I do the fpdc2tog row, my basket starts to turn in…please help.
Hi Diane! There are no decreases in round 11. If you are decreasing then it would explain why your basket is pulling inwards! Don’t forget that a fpdc counts as a stitch and you should not work the loops of the stitch behind it.
I actually figured this out! Lol took me till 3am but I’m actually on row 16. I found I had to do the row with the spot stitch in the opposite direction to get the balls on the outside. Is it just me or is that right? Loving this though & im excited I learned 3 new stitches doing this.
Hi Julie! I’m glad you got this sorted out! Trying new things can be a challenge but I always feel good when I’ve mastered something new. Well done for figuring this out by yourself! :)
Pingback: Blue Cushions | Make My Day Creative
Pingback: How to Design Crochet Patterns Part 4: Selecting Yarn | Make My Day Creative
merci pour le partage
You are welcome! :)
Pingback: Ten Baskets to Crochet with Free Patterns | Cynthia Banessa
I love this design, but I’m having a lot of trouble. Is there any way I could contact you for one on one help with it?
Hi Kendra, Let me know which element you are having trouble with and I will do my best to help :)
I am having trouble with the fpdc2tog.I’m not even sure if I did the fpdc correct. it looks like a V under the bobble stitch, instead of to the side of it. Is that correct? Then with the fpdc2tog, I’m getting confused at the part where you insert the hook into the second post stitch…the way I’m attempting to do it, it just creates a straight line across instead of diagonal, and I feel as though that is not correct.
Hi Kendra! It sounds like your fpdc stitches aren’t coming out right. They should make a vertical stitch between the bobbles. Then when you make the fpdc2tog it makes an upside down v shape joining two of the vertical fpdc stitches together, like a little hat over the bobble. Does that help?
I am confused on row 11, do you have a video for this one yet?
Hi Leigh Ann – no video, but if you can tell me what is confusing you I will try and help!
Pingback: Free Bobble Storage Basket Crochet Pattern
Hi, row 11 is not understandable. I have no trouble with the fpdc stitch, row 11 says this R11: ch1, sc, fpdc, *sc in next 3 sts, fpdc, repeat from ect. I ended with a slip st. then have 3 stitches left before the spot stitch where does the fpdc stitch go and is it only on one side of the spot stitch?
Hi Annette
If I understand you correctly, after repeating the sequence around are you ending up with 3 sts remaining when you should end up with 2? This pattern is based on a 4 stitch repeat, so I suggest you count your stitches and make sure you have 96 (or a number divisible by 4) before you commence R11. Then you should use 2 stitches before starting the repeat (one for an sc, one for a fpdc), begin the repeat pattern and continue until only 2 sts remain, and then sc in the last 2 sts before joining the round with a sl-st. Hope that helps!
Hi! I love this pattern and have completed R11 so many times and given up because I cannot understand R12. I wish there was a photo tutorial for it :P I read and re-read all your replies to everyone’s queries and I am none the wiser :( for it. This last attempt, I’ve put the project on hold for 2 weeks because I don’t want to give up. I’m going to try it again…wish me luck!
Hi Lois! Sorry to see you have had trouble. Are you still stuck or have you managed it now? I ask because I can see you have asked a question about the handle round so I’m assuming you’ve cracked it! Let me know if not and I’ll do my best to help.
Hi! I cannot make sense of the handle round. How can I go back and do hdc2tog? I’ve had such fun with the basket but now I want to give up. Pictures might have helped:)
Hi Lois! Are you on HR16? Did you rememner to turn the work prior to strting the round? You should have one stitch before the chain for the handle. You need to work the hdc2tog in to the st you are in and the next st. Does that help?
Hi do you sell this basket? because i would like to buy one.
Hi Maria! I don’t sell items because the time it takes to make them makes it unprofitable for me. But plenty of people either don’t mind this or work a lot faster than me – I’m sure you could find someone on etsy or similar who could make it from my pattern for you. Although, I do think the best thing would be to have a go at crocheting it for yourself! :)
Hi it’s a lovely basket.
I want to make a baby blanket. I’m having a lot of troubles working around the bobles. Can you make a video please.
Susanne from Denmark 😃
Pingback: Crochet Rope Basket Update | Make My Day Creative
Hi, I’m having trouble with row 12, I am unsure where to do the fpdc2tog. I watched the trellis pattern video, which is great. But I’m totally stuck, hope you can help as I really want to do this project.
Hi Mel! The fpdc2tog is work firstly about the fpdc post from row 11 which you have just crocheted past, and secondly about the post of the fpdc st just ahead, so that you make a wide v-shaped stitch. Hope that helps!
Can you please make a video for this.
Hi Shenika! Sorry but I don’t have any plans for making a video of this at the moment.