
Customisable Crochet Basket

I’ve been looking for a basket of specific dimensions for a while without any luck. Then I saw a circular version of this idea and realised I could make my own!
This uses a technique similar to thrumming, where you crochet over another thread to add bulk to a fabric. If you have ever crocheted over your ends to avoid weaving in, this works the same way.
In this case I used rope instead of another yarn, which is a lot bulkier but great for adding stiffness and making each row deeper. This project had the added bonus of using up a single skein I had left in my stash!
The resulting basket is rectangular with rounded corners.

Finished article
You will need:
- Length of rope (mine was 38m in length and 6mm diameter, for a 22x42x17cm basket)
- Stash yarn (I used 310m of Patons 100% cotton 4ply in a cream colourway)
- Size 5.00mm crochet hook (use a metal hook if possible as the work is quite stiff), or larger if your rope is thicker.
Pattern:
Foundation row: Decide what size base you need. Mine was 22 by 42 cm. The difference between the two dimensions (in my case 20cm) is how long a chain you need to make to begin. This was 30 or so chains for me.
Ch 30 (or number required for you desired dimensions) +2, turn
Lay the rope alongside the chain to work with an overlap of a few cm.
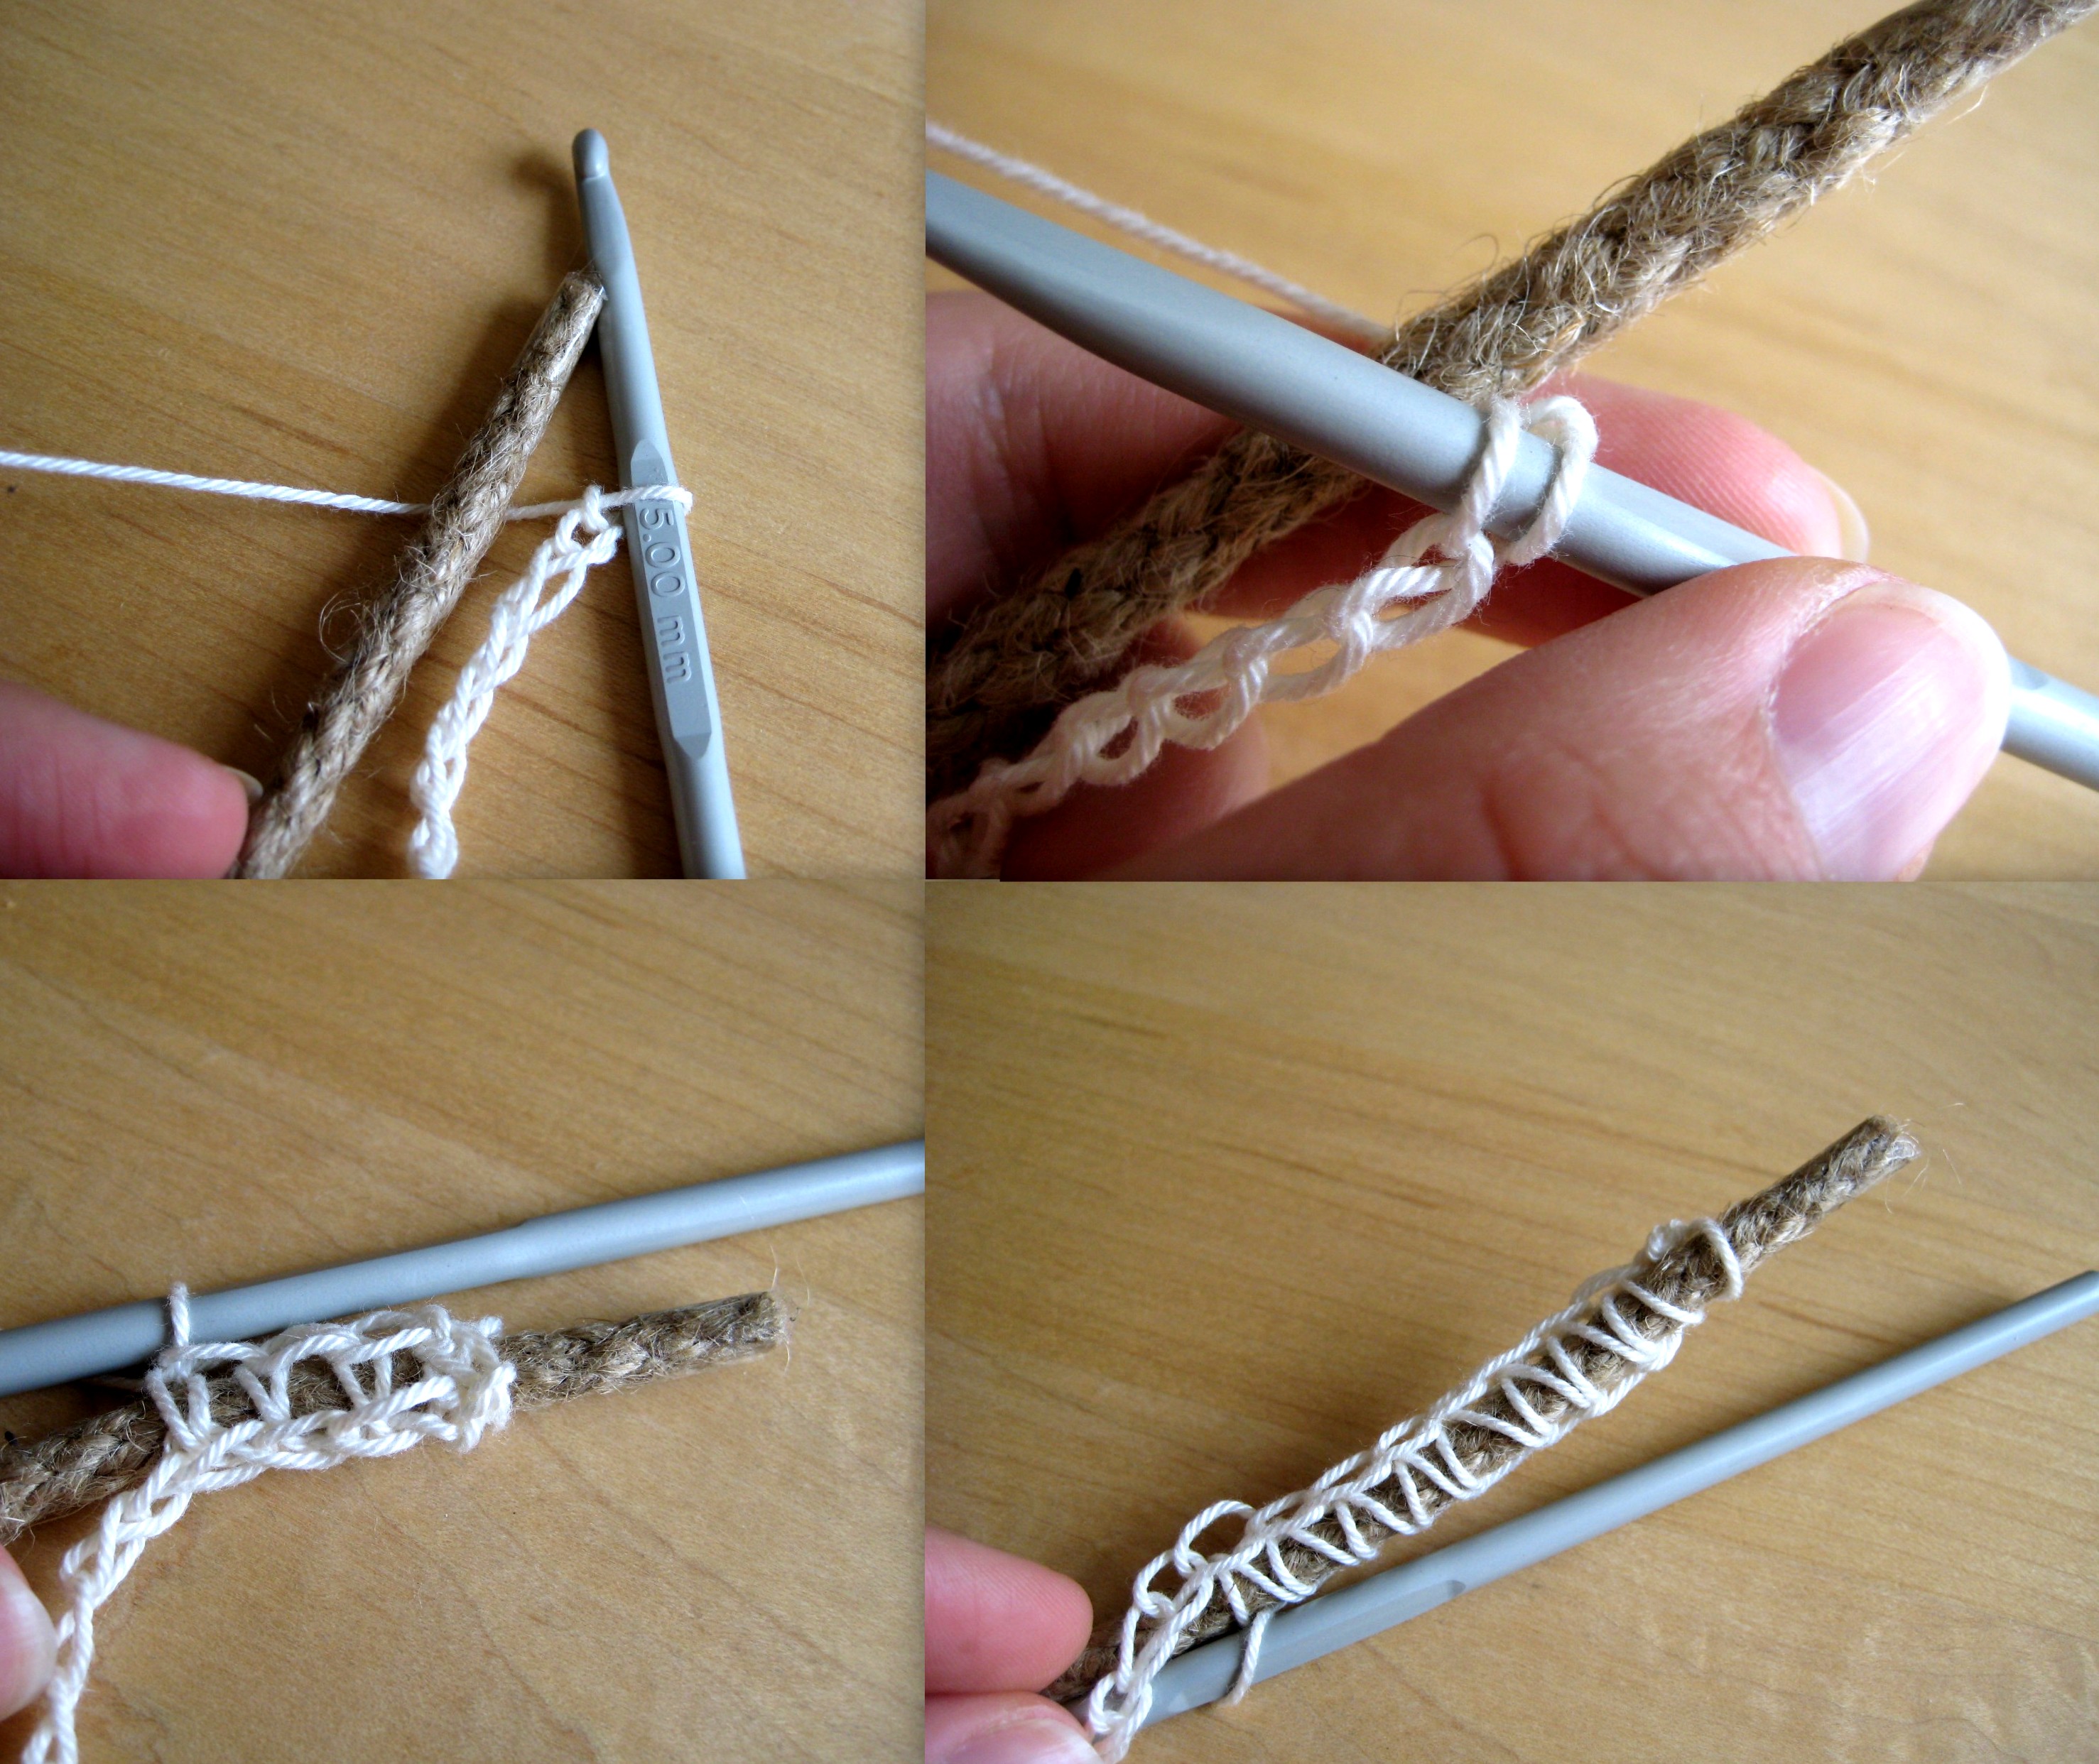
How to start round 1
Round 1: sc (working over the rope) in 3rd ch from hook. Complete a few more sc and then wriggle the rope forwards to line the end up with the beginning of the row (i.e. get rid of the overlap). Sc to the final ch, 5 more sc in final ch (turning the rope around the “corner” and rotating work), sc to end.
[NB: I sc in the back loop of my chain so that once I have turned the corner it is easier to complete the sc. You can see this in the photo’s, but it is not necessary to do the same, you can sc in your chain as usual if you prefer.]
Subsequent rounds: 3sc into each corner st and sc in all the other sts. Continue until the work is your desired base dimensions.

1&2: Turning the corner on round 1, 3: beginning round 2, 4: part way through round 3.
Transition to working the sides: Once the base is large enough, stop putting 3sc in each corner st, just do 1sc in each st around. For the first round of this you will need to make sure you lie the rope vertically on top of the row below, which can be a little fiddly.
Handles: These are optional. When the sides are high enough, and after completing a round, place st markers where you desire your handles to be. Now when you reach a marker, leave the next set of sts unworked (I left 15sts to make mine), and instead crochet over the rope more sts than you have left unworked (I did 20 sts over the rope). Continue to sc in the sts after the marker as before.

Starting the handle

Finishing handle
Securing the end(s): I did a modified sc st at the end of my rope (and when I needed to join a new length part way through):
Insert hook in next st, draw up a loop, yarn over, draw through one loop, insert hook in same st, draw up a loop, yarn over, draw through 2 loops.

Secured end
Finish with an sc in the next st, but not over the rope. Trim the rope if needed, and weave in all ends.
Handle

It fits!


Looks great, Thanks for sharing your technique!
You’re welcome! :)
That looks amazing, will definitely have to try this, so thank you for sharing the instructions!
Thanks! Hope yours comes out ok! :)
Pingback: Holiday Inspiration | Make My Day Creative
amazing! I can’t wait to try this!
Great! Hope yours turns out well.
Where did you get the rope from Esther? These baskets look like just what I could do with. If only I could crochet…
I bought sash window cord from B&Q. I guess you could try an HK equivalent? :)
Yes, I’ll keep my eye out! If I do find some I’ll have to get you to teach me how to crochet ;)
Need to give that a go, looks fab.
Thanks!
I LOVE this!
Thanks! :)
Fabulous! Thanks for sharing this!
You’re welcome!
You have saved me hours of shop hunting, thank you so much! I can now make a newspaper recycle basket that’s the perfect size. Is a great idea and you should put your pattern on Etsy to earn a few pennies as well as praise.
Thank you! I am thinking about selling patterns, so thanks for the vote of confidence! :)
Pingback: Thrum a basket – pattern translation | UK Crochet Patterns
Thank you so much for sharing, will go shopping for rope tomorrow and have a go at making one.
Great! :)
Thank you for sharing this pattern! I am always on the lookout for baskets and this one fits my ideal basket…. I can’t wait to make one..or more…
Cathy the Bagg Lady
You’re welcome! :)
I love this and will definitely try one! It looks like you used Jute, did you? I’m thinking clothesline cord!
Thanks Betty! I used a jute sash window cord. Clothesline would work, but if it is thinner than 6mm you may need to size down your crochet hook. Also, I suspect it could come out less stiff than my version, but that it would also probably be easier to work with. :)
Fantastic! You’ve made that so easy to follow – thank you. It’s now bookmarked to make.
Thank you! :)
This is fantastic – I have to reblog! Thanks for sharing.
You’re welcome! And thanks for the reblog. :)
Reblogged this on MonsterYarns and commented:
This is a fantastic idea to store all those things you just don’t know what to do with – which of course is never yarn. : )
It is funny you should say that because mine is only storing yarn for the photo – it is actually now storing my husbands socks! :)
Thank you for the pictures, whenever I am unsure about how to follow through with a project pics always reaffirm any lost confidence! Love the basket, just love it.
I think photo’s can make something a lot easier to follow too. Glad you like it!
Pingback: Crochet Rope Basket | Callyico Fiberworks
Reblogged this on Callyico Fiberworks and commented:
I just love this idea and pattern! I will do this!
Thanks for the reblog! And for your feedback. I hope yours comes out well!
I have been experimenting with lots of things – but truthfully I need to be making my yarns for Market day Saturday! I will just say I have nothing to sell and it is your fault! LOL I was almost completely bought out last week!
Whoops! But better to have too many good projects to work on then none! :)
A beautiful work of art!
Thank you! :)
I love it! I have some hemp rope and a huge stash of cotton I could use. Make a bunch for myself, and a bunch for friends. Thanks!!
Sounds like a good plan! Glad you like it. :)
Thank you so much! Great Idea!!
Thanks! :)
Reblogged this on SueStitches and commented:
Sharing this great pattern for a crocheted basket!
Thanks so much! :)
Brilliant!
Thanks for sharing!
You’re welcome!
What a great pattern! I shared it on my blog as well :)
Glad you like it!
l don’t like it, I love it! :)
Even better! :)
Pingback: ADK Project Part 2 | Wandering Wool
That looks amazing. Thanks very much for sharing the pattern. I’m definitely going to try it :)
Thanks! Hope yours turns out well.
Great looking basket! I’m going to try to make one. Thanks for the pattern!
You’re welcome!
I am so happy to try this. Thanks
Great!
Just tried this and I am hooked! LOL thanks for the tutorial.
Great! You’re welcome.
What a wonderful looking basket! Thanks very much for posting this!
Thanks for posting this pattern. I can’t help but think of Irish Crochet lace when I see how the stitches are worked around a cord..very similar to the Irish method.
This basket looks fabulous! I bet that cloth clothesline could be used to make this! :) :)
______
Lee Ann H
Posted with Blackberry Z10!
Crochet…Gotta Love It! Blog
Reblogged this on Crochet…Gotta Love It! and commented:
Thanks for posting this pattern. I can’t help but think of Irish Crochet lace when I see how the stitches are worked around a cord..very similar to the Irish method.
This basket looks fabulous! I bet that cloth clothesline could be used to make this! :) :)
Thanks! I’ll have to give Irish crochet a try sometime! :)
Ounnn . Very beautiful … and super practical. I’ll try.
Just do not understand how to climb the sides of the basket. Can you help me?
Thanks for the great idea, thanks for sharing and obrigda (already getting ahead of myself) for helping me.
Angela (do Brasil)
Very beautiful … and super practical. I’ll try.
Just do not understand how to climb the sides of the basket. Can you help me?
Thanks for the great idea, thanks for sharing and obrigda (already getting ahead of myself) for helping me.
Hi Angela! Glad you like this. To make the sides, stop increasing your stitches at corners. I then held the rope I was crocheting over in place (stacked vertically above the previous row) as I crocheted over it. This is a bit tricky for the first round (or two) but worth it! Let me know if you have any further problems. :)
Pingback: Crochet Rope Basket | Cotton Chronicles
I found your rope basket on Pinterest but no matter how deep I try to dig I can’t seem to find the pattern. It’s gorgeous and I’d love to start Christmas gifts.
Glad you found the right place! :)
Love it! Thanks!
You’re welcome!
Thanks for sharing!! I am so excited to make this, I have been looking for a basket like this on a budget and now I will just make it! Quick question, if I change the dimensions of the basket, make a trio of 3 sizes, should I use the same rope or change the thickness of the rope?
Glad you like it Christy! If you are making very small sizes I would suggest sizing down the rope thickness because it is harder to shape it well as you go. But the stiffness of your rope will also affect this. Maybe start with your medium one and see what you think? Also, if you are making lots of baskets, try and get a smooth rope because handling rough rope (like sisal) can hurt your hands after a while! I used jute sash window cord. Hope yours turn out well!
I have gone beserk with this pattern making several as gifts and got lots of ooh ahh! One of my new best favourites for gifts. Always looking for new ideas. Looovvee it thank you Bernice Australia
Great! Glad you like it, your friends must love you!
Cool idea! How heavy is the basket? I need some laundry baskets and was wondering if this would work.
Hi Steph! The basket is quite light but it will depend on what rope you use. I wouldn’t use mine for laundry myself because even though it is stiffer than using wool alone it isn’t as stiff as a traditional basket. Using a chunkier rope might solve this but would probably add more weight! Hope that helps.
LOVE this!! Will be making some for sure! Thanks so much for sharing!
No problem! Glad you like it.
wowo, einfach klasse
glg meggi53
Danke! :)
Do you think this would work well with plarn? If so what rope or cord would you recommend?
Hi Jenna! I haven’t used plarn before so I’m not sure how it would work. I suspect it would be less stiff though. If you try it let me know how it goes!
This basket is beyond cool. Will try it!
Great! :)
I love this idea but I am new to crocheting and don’t understand your abbreviations (sc and ch) also how do you get a smooth line from the base to the sides? I would really like to give this a go!!!
Hi Selina. Sc means single crochet and ch means chain. I use US abbreviations. If you use British notation, do a double crochet instead of an sc. You can find out more about my notation on my pattern notes page (left hand menu). To get a good transition from base to sides you will have to hold your rope firmly in place, I held mine further into the basket than it ended up because it does want to spring back a little! Good luck with yours. :)
Thanks :)
I love this and I reallllly want to try it! One question: I’m looking at the cotton yarn you’re using and trying to find something similar to use. Do you know what the weight is? In the pictures it looks so much finer than the cotton yarns I am used to seeing. I’m in the USA, not sure if that makes a difference. Are you able to give any more information that might help me find something similar? Are the pictures just misleading or is it a finer/lighter yarn?
Hi Kirsten! Yes I think it was sport weight. It matched a size 3mm hook when used by itself. It is a mercerised cotton if you are looking for something similar. However you can make this project with any yarn you like the look of; although I like cotton because it is less stretchy than animal fibres. The critical thing is to match your hook to your rope diameter, else it will take a long time to complete your project! :)
Hi esthermarie1985, this is a fantastic pattern, but “dollie dimple” me is having real trouble getting that first foundation row right :o/. How do you get the chain on one side with the sc row on the other side, do you have a video tutorial for this please?
Hi! Don’t worry it is a little tricky to get going with this one (it gets easier though). I made the chain first, then held the chain and rope together. Your chain should be at the bottom, then the rope, then the yarn, so that when you insert your hook into the chain and draw up a loop the yarn is wrapped over the rope. Then complete your sc. If you are finding you are not lined up very well (i.e. your sc sts are not exactly opposite the chain) and the work is tight, my advice is to draw up a longer loop. Don’t be afraid to be a bit forceful manipulating it all in to place either!
No videos yet, sorry! Hope this helps.
Love it! I hate buying the storage baskets because they’re always so expensive :/ Now I can make my own! Thanks for a great tutorial!
Jen
LPCrochet.com
Great! Thanks for your comment. :)
My immediate thought when I saw this basket was that it looks like the “Moses Basket” I had when my daughters were babies. I used it up until they were 6 months old, carrying them from room to room to do my house work. It was a port-a-crib when we were away from home. A bassinet pad fit inside perfectly. Now there are so many tutorials to make sheets. My daughters are both in their thirties & having beautiful grandchildren for me. Do you think this basket would be strong enough to carry a baby?
I’d love to know. Both daughters are presenting me with new grandchildren before Christmas.
Hi Jane! Yes it is quite like a Moses basket shape. This basket is working well for me storing yarn and socks etc, and it is quite stiff, but personally I would not recommend it for baby use because I suspect they would very quickly be too heavy for it! Two grandchildren before Christmas, lucky you! :)