
Stiff sided diamond trellis basket crocheted from stash yarn for storage – can be made in any size!

I’ve had this idea in my head for a while. When I was making my Zigzag Scarf and Diamond Cowl patterns I noticed that this stitch results in a firm fabric. Dense and cosy for a scarf, but when worked with a slightly smaller hook it becomes stiff and therefore ideal for baskets!
When I got all this yarn from my Great Aunty Di this was one of the projects I thought I’d make. I had about 200g of dk yarn in several part used balls of grey, all very similar but I knew it would show that they were different if I tried to use them all in one item – unless I crocheted something with them all held together!
Update 21/08/2014: You can view my video of the stitch pattern here!
I used 3 strands at once and a 6mm hook. You really could use a mix of different colours and yarn weights if you prefer.
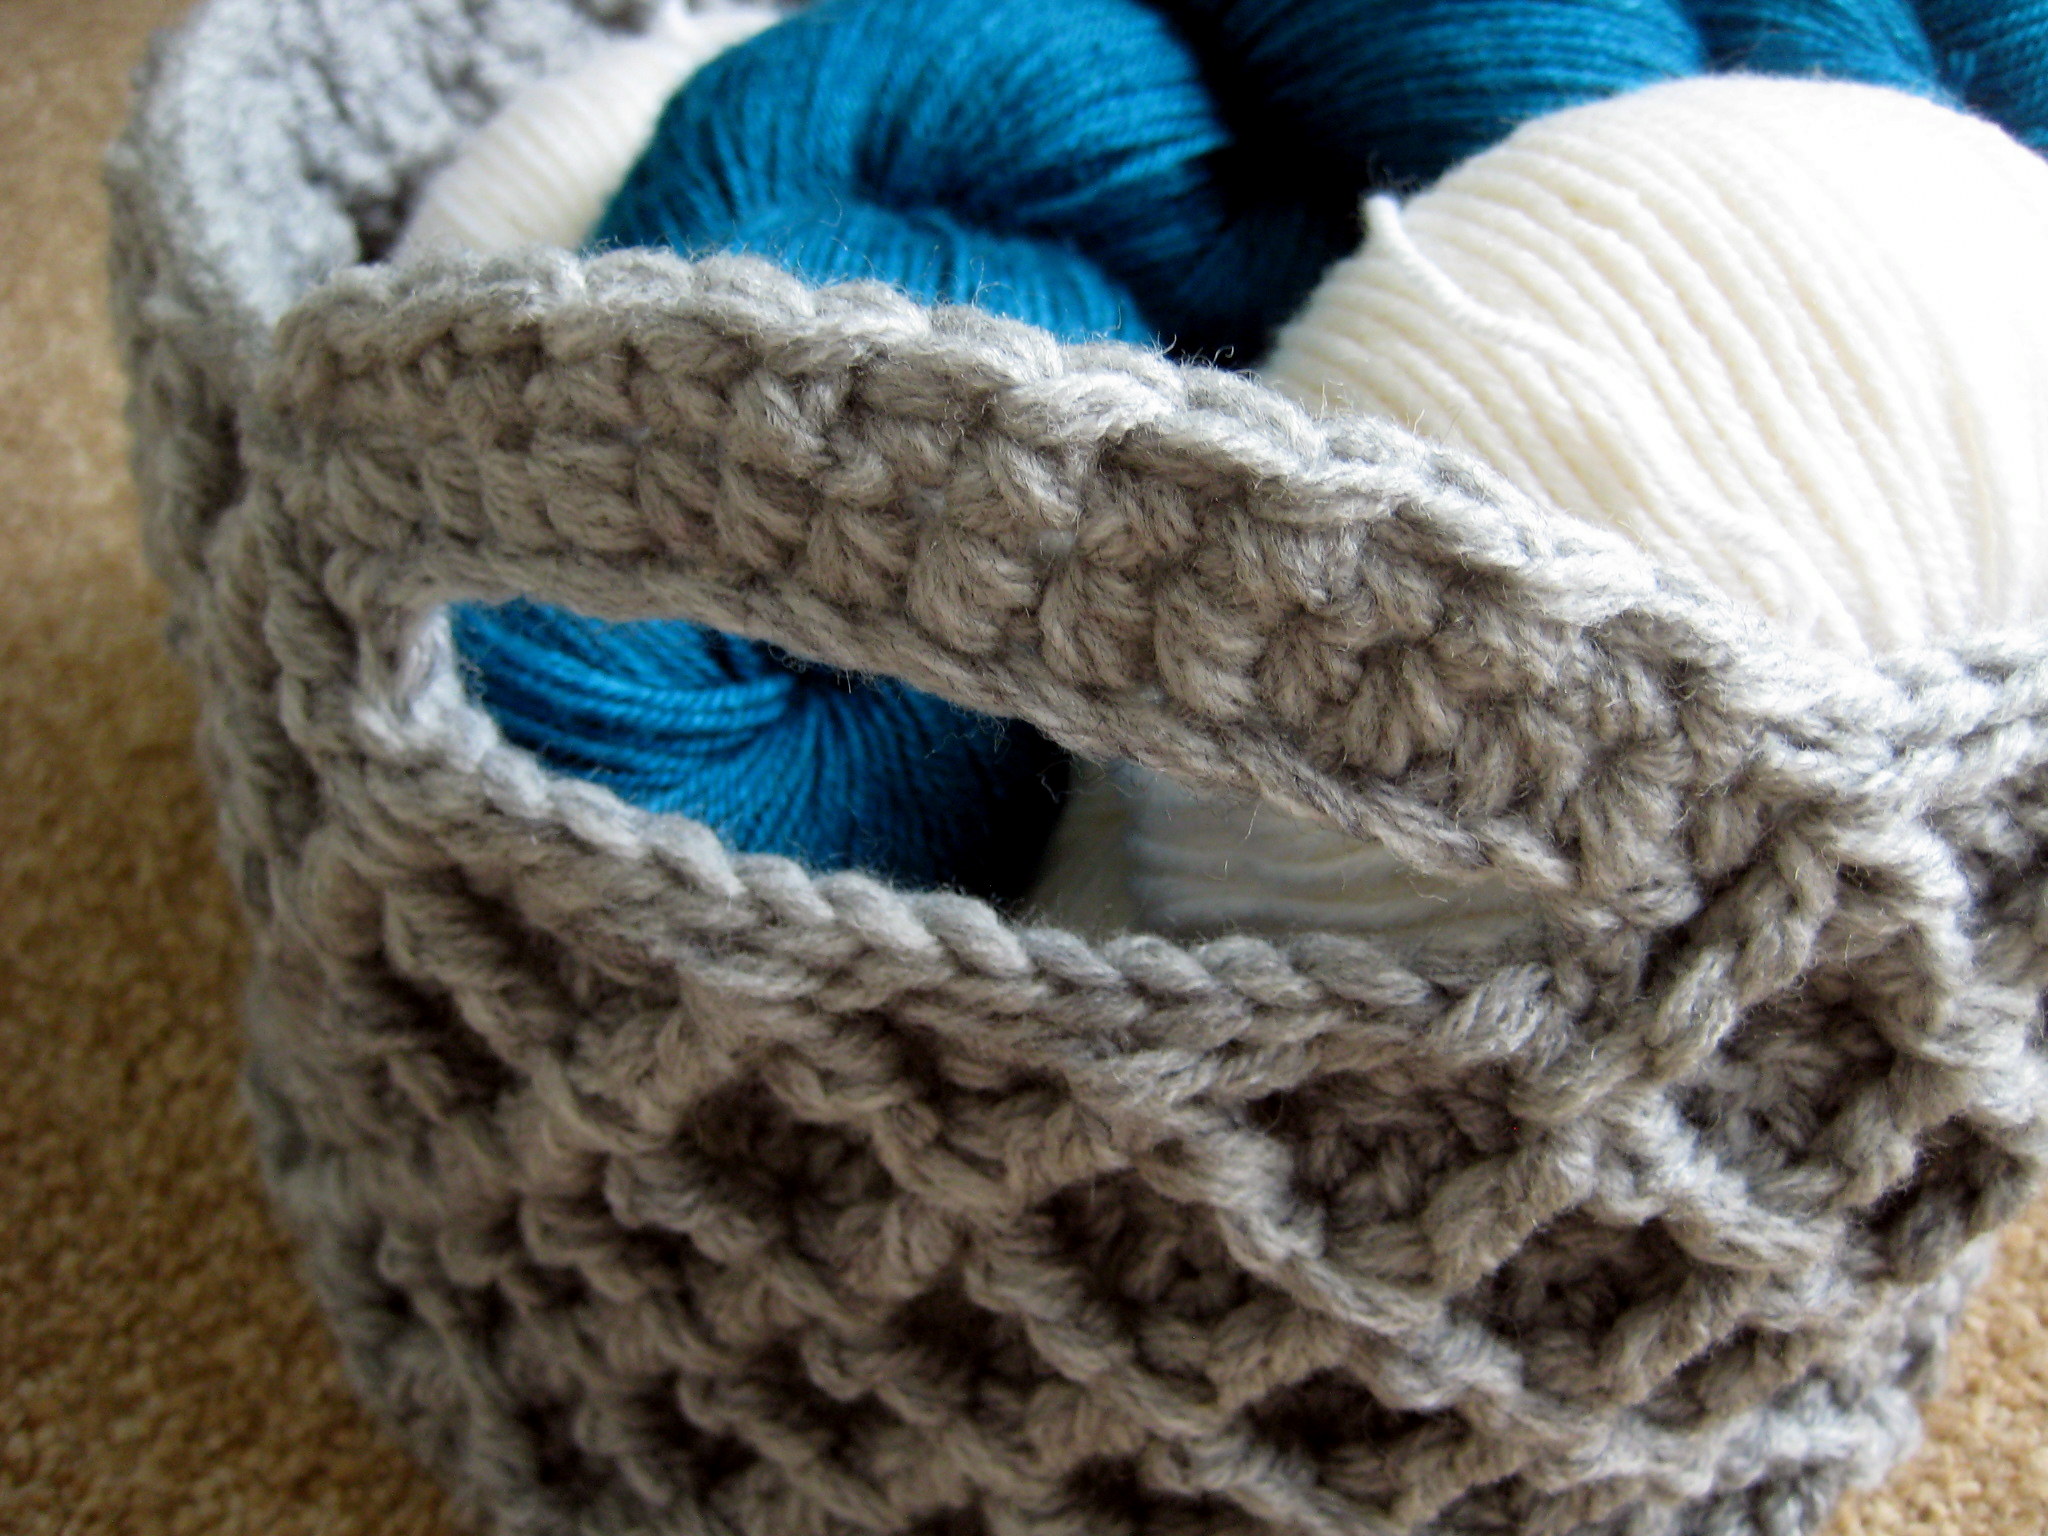
Handle detail of Diamond Trellis Crochet Basket – free pattern!
I designed the pattern so that it can size up or down depending on your needs and yarn supply. Just make more or less rounds for the base! To get the proportions right I used about a quarter of the weight of yarn I had (46g) for the base before moving on to the sides. So if you want to make a larger basket using stash yarn just weigh it first and use about a quarter for the base! Mine turned out to be 9 inches wide and 6.5 inches high (23x17cm).
Scroll down for pdf patterns! (US and UK notation)
Materials:
- 200g of either 3 strands of dk weight yarn or 2 strands of worsted weight yarn, held together.
- 6mm crochet hook.
Special stitch: Front post treble 2 together (fptrc2tog). This makes a V-shaped stitch in front of the work with the two arms of the V being worked around the posts of the stitches 2 rows below. All the V’s worked side by side make one half of the diamond pattern. Work the first fptrc2tog as follows:
- Yarn over hook twice, insert hook horizontally (from front to back to front again) behind the “post” of the 2nd dc in the row below, yarn over hook and draw up a loop (4 loops on hook). *Yarn over hook, draw through 2 loops, repeat from *, 2 loops left on hook (one arm of the V made).
- Yarn over hook twice, skip 3 dc posts, insert hook horizontally behind the next post. Yarn over hook and draw up a loop (5 loops on hook). *Yarn over hook, draw through 2 loops, repeat from *, 3 loops left on hook. Yarn over hook, draw through all three loops.
- There will be an “unworked” stitch left in the row below (behind the newly made fptrc2tog stitch).
The remaining fptrc2tog stitches of the first round using the stitch are worked the same way – with the first arm of the V worked around the same post as the last arm of the previous stitch. After the first round using this stitch the fptrc2tog stitch is worked around the top of the previous fptr2tog stitches rather than the dc posts.
Update 21/08/2014: You can view my video of this stitch here!
Pattern:
The basket is worked in the round from the base up.
Begin with a magic ring, Ch2
R1: 8hdc into magic ring, pull ring closed, sl-st to join, ch1 (8sts)
R2: (2hdc) in each st around, sl-st to join, ch1 (16sts)
R3: *(2hdc), hdc, repeat from *, sl-st to join, ch1 (24sts)
R4: *(2hdc), 2hdc, repeat from *, sl-st to join, ch1 (32sts)
R5: *(2hdc), 3hdc, repeat from *, sl-st to join, ch1 (40sts)
R6: *(2hdc), 4hdc, repeat from *, sl-st to join, ch1 (48sts)
R7: *(2hdc), 5hdc, repeat from *, sl-st to join, ch1 (56sts)
R8: *(2hdc), 6hdc, repeat from *, sl-st to join, ch1 (64sts)
R9: *(2hdc), 7hdc, repeat from *, sl-st to join, ch1 (72sts)
R10: *(2hdc), 8hdc, repeat from *, sl-st to join, ch1 (80sts)
R11: *(2hdc), 9hdc, repeat from *, sl-st to join, ch1 (88sts)
If you prefer a larger sized basket, you can continue in expansion pattern – just finish the base with a sl-st into the back loop only. My basket (pictured) had a base stopping at round 11.
R12: Turn and work this round into the front loop only. Ch2 (counts as dc), dc into each st around, join with a sl-st (88sts)
In round 13 the fptrc2tog stitches are worked around the dc posts of the row below.
R13: ch1 (counts as sc), turn, 2sc, fptrc2tog, *3sc, fptrc2tog, repeat from * around, join with a sl-st into first ch (22 fptrc2tog sts & 66sc sts – 88 sts total).
R14: ch2 (counts as dc), turn, dc into each st around, join with a sl-st (88sts)
In round 15 the fptrc2tog stitches are worked around the tops of the fptrc2tog sts 2 rows below. This forms the diamond pattern.
R15: ch1 (counts as sc), turn, fptrc2tog, *3sc, fptrc2tog, repeat from * around, 2sc, join with a sl-st into first ch (22 fptrc2tog sts & 66sts – 88sts total).
R16: Repeat round 14.
R17: Repeat round 13, working the fptrc2tog sts around the tops of the fptrc2tog sts 2 rows below.
Repeat rounds 14-17 until your basket is the desired height for handles – I took 6 more rounds (i.e. made mine 2.5 diamonds high to the handle). You will need to complete either a R15 or 17.
Handles: This step neatens up the edge of the basket under where the handles will be.
If you just completed a R15: do not turn.
If you just completed a R17: do not turn. Make 2 regular sl-sts – one in each of next 2 sc. You should end up with a fptrc2tog st as next st to be worked.
Now for both cases:
Working in the back loop only, sl-st 12 times, and then work a sl-st through both loops of the next st to secure (this should give a stretch of sl-sts from the top of one diamond point to another 3 points away).
Break yarn and skip 32 sts, re-join the yarn with a sl-st in the back loop of the next st (it will be a fptrc2tog st).
Working in the back loop only, sl-st 12 times, and then work a sl-st through both loops of the next st to secure (this should give a second stretch of sl-sts from the top of one diamond point to another 3 points away, directly opposite to the first stretch).
Do not break yarn – work the remaining handle rounds (HR) as follows:
HR1: Ch2, (counts as a dc), turn work. Ch 12, sk 12 sl-sts just made, dc in next st, dc in each of next 31 sts (until you reach the next stretch of sl-sts), ch12, sk 12 sl-sts, dc in next st, dc in each of next 30 sts, sl-st into top of turning chain to join. (64 dc’s and two ch-12 spaces- the handles)
The second round of the handle is worked in pattern as for main body of basket, but with alterations at the handle areas.
HR2: ch1 and turn. Sc, *fptrc2tog, 3sc, repeat 6 times, fptrc2tog, sc. (There should be one st left on the body of the basket before the ch.) hdc2tog over next 2 sts (1 on main basket and first ch of handle), 2hdc, (2hdc) in next ch, 4hdc, (2hdc) in next ch, 2hdc, hdc2tog (this will be in the final ch and 1st st back onto main body. Repeat from * join into first sc with a sl-st. (88 sts)
HR3: *working in the back loop only, sl st 30 times (i.e.until the next hdc2 tog in row below). Working through both loops, sc 14 times (across the handle top). Repeat from *, and finish with an invisible join into the next st (or a sl-st if you prefer).
Fasten off and weave in ends.
I do not recommend blocking this piece – we want the fibres to stay nice and stiff so that the basket has structure!
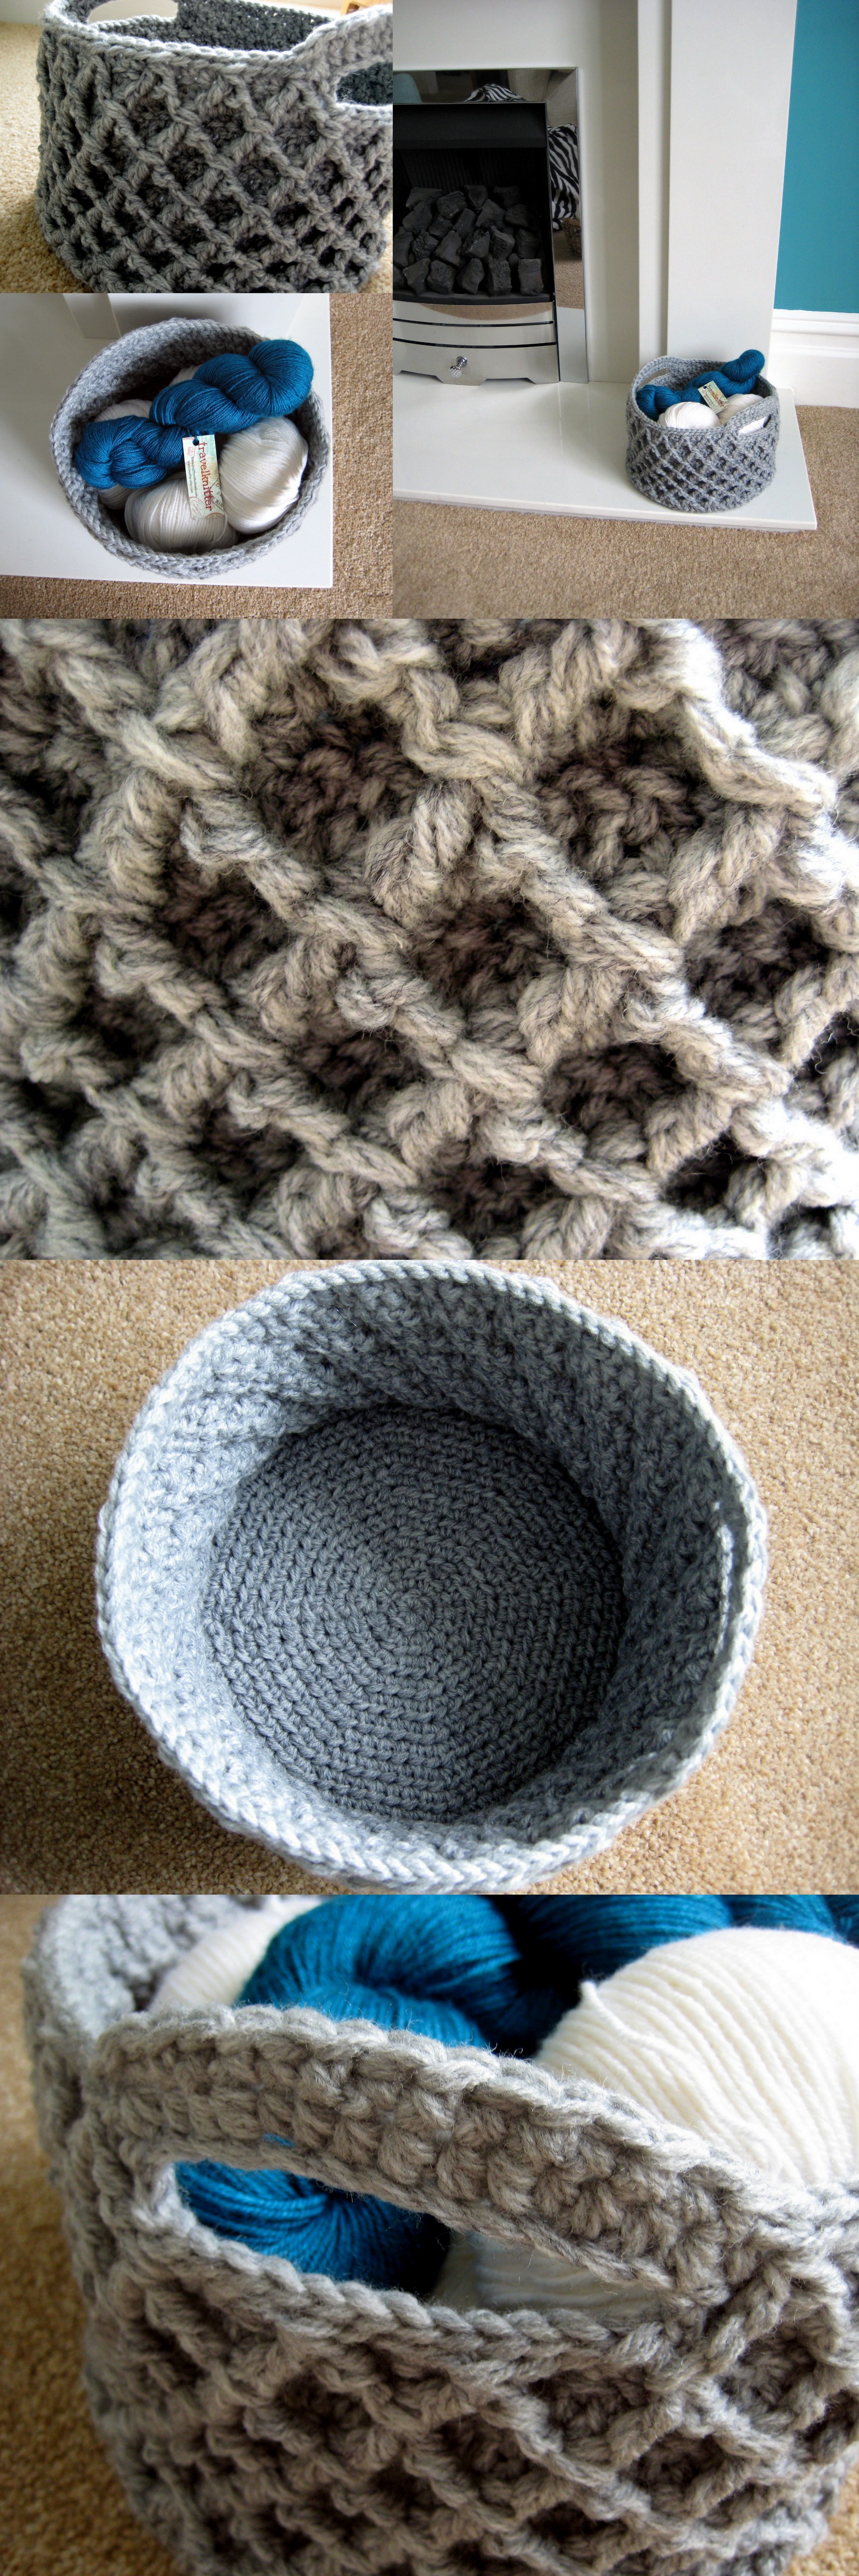
Diamond Trellis Basket -free crochet pattern which can be made in any size – and it is just nicely stiff too!
Free pattern for crochet basket – Diamond trellis stitch makes the sides stiff and it is made in one piece!
If you make this basket in a larger size then please do let me know how much yarn you take – I’m sure it will help others making this project.
What will you use yours for?
Updates 26/05/2014:
1. The original pattern contained a couple of errors (as you will see from the comments!) I have corrected for these and updated the pattern in both the blog post and pdf patterns.
2. Some users (but not all) are having some difficulty viewing the pdf patterns. They appear to be showing the text in white on a white background. I am looking into what could cause this; please accept my apologies in the meantime, and if anyone is more of a computer tech than I am and knows what causes this please let me know!
3. The lovely Marira has translated this pattern into German – you can get it for free here (you may need to register).
Update 31/10/2014:
The fabulous Marjolaine of Planete Laine has translated this pattern into French – you find it here!


Thank you so much for this wonderful pattern! I was wondering if there is a reason why you didn’t start the sides with sc, but with dc instead. I looked at your video tutorial and in that you do the first round into the sc below. In this pattern, however, you do it straight into the dc row. I guess I was just wondering if there is a special reason for this.
You’re welcome Heather! There is no special reason, I think I just did it that way. In retrospect I probably would add in a round of sc, but I didn’t want to alter the pattern as then the pattern and the picture of my finished item would be different and it’s confusing for those of you with eagle eyes! You can add in a round of sc if you like, but don’t turn at the end else your diamonds will be on the inside of the basket!
I have crocheted for 40 years, and I am having difficulty reading your pattern. R4: *(2hdc), 2hdc, repeat from *, sl-st to join, ch1 (32sts) Do you mean 2hdc every stitch? in round 5 do you mean 2 hdc in one stitch then 3 hdc in the next? Do you understand what I am asking? Kathy Please email me
Hi Kathy As with the other rows, whenever the instruction is in brackets() it is to be worked in one stitch. So it is saying to work 2hdc in one stitch, then one hdc in to each of the next two stitches, and then repeat the sequence around. This adds 8 stitches to the round (as does every round of the base. Hope that helps!
Thank you Esther for getting back to me so quickly I think I understand, thank you
No problem Kathy! I hope your basket turns out well :)
hi
do i need 200 gms each of the three strands i would be using? it is obvious but i just wanted to check anyways.
thanku
Hi Niru! I used 200g total. if you want it larger or taller you’ll need more! :)
Thanku estherchandler :)
Thank you for sharing your wonderful patterns! I just finished my basket for a friends Christmas present and now I think a few more people will be getting them as well :) I wasn’t sure I could do it, but the video and a couple of retries and I figured it out. Thanks again for sharing your talent with the world :)
I’m glad you’re pleased with it! Well done for persevering- I bet your friends feel very lucky to have you! :)
Pingback: Merry Christmas! And Best of 2014 | Make My Day Creative
I rarely, if ever, comment on the internet, but I had to thank you for this fantastic basket pattern and more importantly, the video tutorial! I watched and stopped the video no less than 15 times, trying to get my hook where it needed to be. It took me a few tries, several complete redo’s and I had to step away from my project more than once so as not to set it on fire, but I finally had my “aha, I get it” moment today and I’m having so much fun! I love the look of this pattern and I can’t thank you enough for posting the video. It was a huge help to me and I’m sure to all my fellow visual learners! As a side note, I have never used stitch markers before and they were a huge help to me in doing this project. I highly recommend them for anyone making these baskets. Thank you again!!!
Wow! Well done for persevering, I’m so pleased you got there in the end! PS I’m a stitch marker convert too ;)
Hi there,
I love this basket and am looking to make it for my sister for her bday. What ply is the yarn you use? I know you use 3 strands at a time and I would think 4 ply would be to thick to do 3 strands at a time. I was thinking of doing just 2 strands one 4 ply and the other a little thinner. Would this be thick and stiff enough or should I do 2 strands of 4 ply and 1 strand the thinner one added in in a contrast color?
Hi Penni! It is meant to be thick as this helps the basket hold its shape. I suggest you make the sample shown in the video (written pattern in the same blog post) and see whether you think it is coming out sturdy enough or not for what it will be used for.
Love this basket! I’ve pinned it and am rethinking my planned projects. I might have to do this one right after my current crochet project rather than the cross stitch I was planning on for a change of pace.
Thanks Kristina! For me these are a good break from “fine detail” projects – I hope you enjoy it!
Thank you
You’re welcome!
Many thanks for making the video I probably wouldn’t have been able to do the diamond stitch otherwise. I made a basket for a friend with two separate colors, cream for the bottom and “background” stitches and grey for the diamonds. It turned out well, although carrying the colors throughout the pattern was a little annoying. :) If I made another one I’d definitely do it in just one color. Thanks so much for the free pattern!
I’m so glad you liked it Jenna! Well done using two colours. That’s fiddly! :)
Hi there! I have just finished making my first basket and loved it. It is such a lovely piece! I am now working on a smaller one to make a “nest” of baskets for a housewarming gift for a friend. Someone has also asked about making a bigger one for a dogs bed! That’ll take loads of yarn! Thanks again for a great pattern!
Wow it sounds like you’re going to be busy! I’m so pleased you like this :)
Thank you SO much for the wonderful tutorial! I don’t think I could have made the basket without it. I’d like to make a smaller one now. Do you know if the diamond pattern will work if I choose to end on ANY round? Or, do I need to end on a specific round, or an odd-numbered round? Thanks for any guidance on smaller baskets!
Regards,
Mary
Hi Mary! I’m glad you like this. You can end on any round but you’ll need to modify the handle size and position to make sure they come out opposite to each other. I suggest you put a few stitch markers where you want them before you start the relevant round if you are unsure! Let me know how it works out :)
Thank you for the speedy reply and for the tip about the handles. I plan to make several of these for gifts for Christmas. Thanks again for the wonderful pattern!
I think I’m having a brain lapse or something. I just can’t seem to get the bottom to lay flat. Asi progress in the round it just begins to curl and I’m only on row 4. Do you mean it is 2 doc in one stitch then three or four single dc’s (and so on) ending with a sl? I want to think that’s what I’m doing but sure isn’t coming out like I would think it’s supposed to. Thank you, Brenda
Hi Brenda! It sounds like you are doing it right – increasing numbers of hdc’s in between each increase (2hdc in one st). Are you doing hdc’s (and not dc’s)? You wrote dc but I wasn’t sure if that was a typo. The other thing is it’s quite difficult to make a perfectly flat circle (especially without blocking) because of gauge variations. If you are doing it right it sounds like you may need to go up or down a hook size. The other thing you can do is increase the number of stitches in the first row (and then in each subsequent row) – just make sure you have a multiple of 8sts in your final round before you do the sides.
Thank you for replying. I think I have decided it is just going to be the “nature of the beast” with me and the material I’m using. I am trying this with some stash yarn and some twine, and the twine doesn’t have any give. I’m thinking I will block this a bit before beginning the sides. Again, thank you .. Brenda
Yes, you can do that too! I hope it turns out well. I bet the twine will make it last for ages!
Sorry for the typo’s. This auto correct gets me every time.
Pingback: Honeycomb Pop Basket | Make My Day Creative
I wondered if you could use 1 strand super bulky yarn rather than 2 strands of other? I dont know if it would turn out stiff or slouchy? Ive been looking to make a basket, my yarn seems to be multiplying and the cat seems to love to play in it. This basket will hopefully restrict it a little more ;)
Hi Lindsay! Yes you can use 1 strand of super bulky. In fact I just did this myself for my Honeycomb Pop basket! I recommend going down a few hook sizes from whatever is recommended on the yarn label – the more you size down, the stiffer your basket will be. If you aren’t sure try making the sample in the stitch video just to check the stiffness. :)
Hi Esther. I love your basket! Thank you for sharing the patter. I have been trying to make one and couldn’t get it right. I’m going to try it with a basket weave stitch after I do the diamond stitch. Thanks again for your generosity! ~Elsie
I’m glad you like this one Elsie! Basket weave stitch will make a nice thick fabric too, and I have seen a few baskets made using it. it might not be as stable as diamond trellis stitch because on diamond trellis the slanted stitches act like cross bracing. So you may find it helpful to size your hook down even more on your basket weave version!
Love this pattern. Is it possible to make this using fpdc instead of fptrb? I just can’t seem to master the treble stitch but would love to give this a try.
Hi Sara! If you use fpdc stitches then they will be too short. But you could try my Honeycomb Pop Basket instead as it doesn’t use any trebles. If you don’t like the “spot” stitches then you can replace these with a simple dc stitch, and you’ll end up with a plain honeycomb patterned basket instead. :)
Just discovered your site when I found the Summer Sprigs Lace Scarf and have added you to my Favorites! Patterns look lovely and very creative…….I hope to work on many of them. Detail photos are exceptional!
Thank you Nancy! I’m so glad you like my projects! :)
I almost have it! Question: when starting R13, after the 2 Sc, should it be a single fptrc just before the first 3 sc. The pattern is written R13: ch1 (counts as sc), turn, 2sc, fptrc2tog, *3sc, fptrc2tog, repeat from *
Thank you for your help. I really love the basket.
Hi Jan! Glad you’ve almost got it. All the post stitches in the basket are fptrc2tog sts (no single fptrc stitches like in the video, which is worked in rows not rounds). You’ll see why when you get to the end of round 13! :)
Thank you for sharing this pattern I downloaded it and can’t wait to make it. I need another basket to hold project yarn and I think this one will do. :)
Thanks Velda! I find mine just right for yarn storage. I hope yours turns out well! :)
Pingback: How to Design Crochet Patterns Part 2: Pattern Repeats | Make My Day Creative
Pingback: YOP – Week of the 5th of April. Happy Easter! | Silk & Wool
Hi, I just printed my pattern, and I can’t wait to make this Basket!!! Hmm bathroom décor, yarn projects, perfect for gifts.. and the list goes on!
I’m so glad you like it! :)
Whew!! Glad that I watched the video, and figured that perhaps that I should add a row of single crochet before doing my dc row, I have ripped out several times trying to get this straight. Starting with the dc row is confusing as to where to put the hook when doing the “fptrc” stitch. I will finish this project!! LOL
hi .. love the pattern .. i just finished round 11 and was wondering if you can clarify the next row .. if row 11 leaves me with 88 stiches and in the next row i have to dc into each stitch but till end up with 88 stitches .. how would i do that ? im new to crocheting so im a little confused .. thaank you
Hi Maria! Just work one stitch into each stitch around. You are working the sides now so you want them to stay the same size all the way up!
Pingback: Pattern Gallery: Crocheted Baskets | Morale Fiber
Pingback: Crochet Patterns You'll Actually Want to Try This Summer
I just don’t get the 2sc fptrc2 tog
Hi Carral! Did you watch the video on how to do the fptrc2tog stitch?
Thank you for this stunning pattern. I made one as a peg bag and experimented with putting a colour into the background. So pretty.
That sounds lovely Carolynn! :) glad you like it.