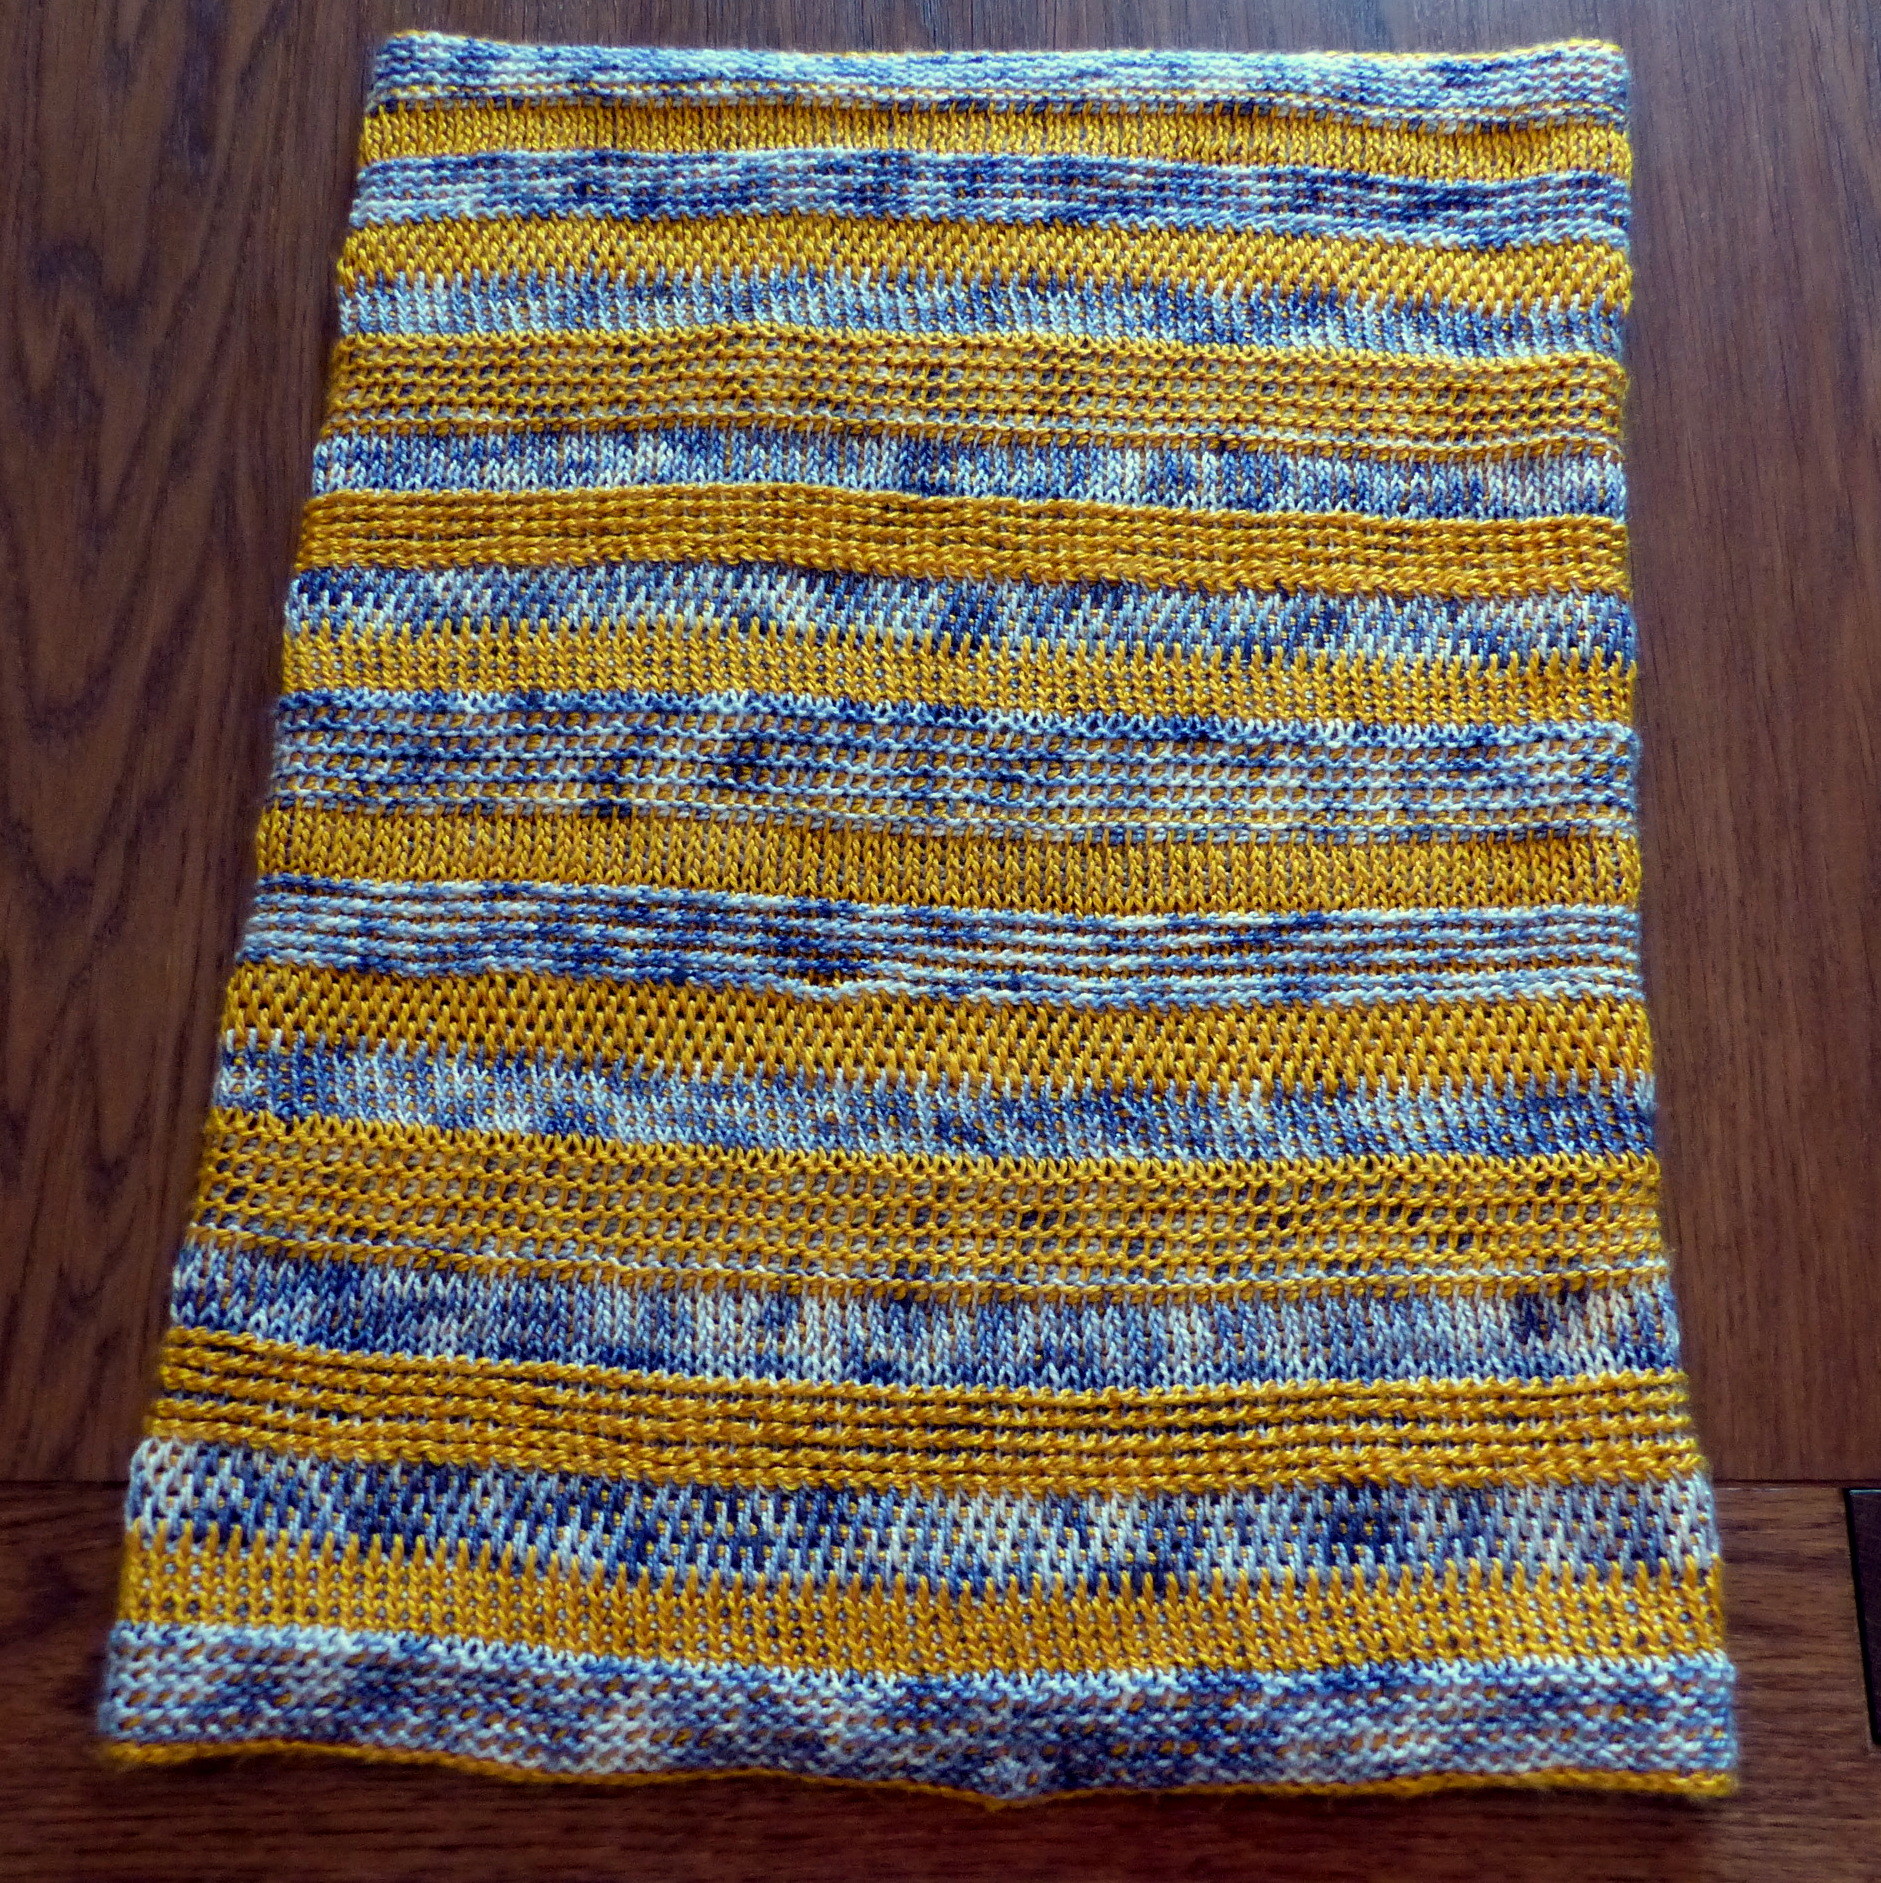
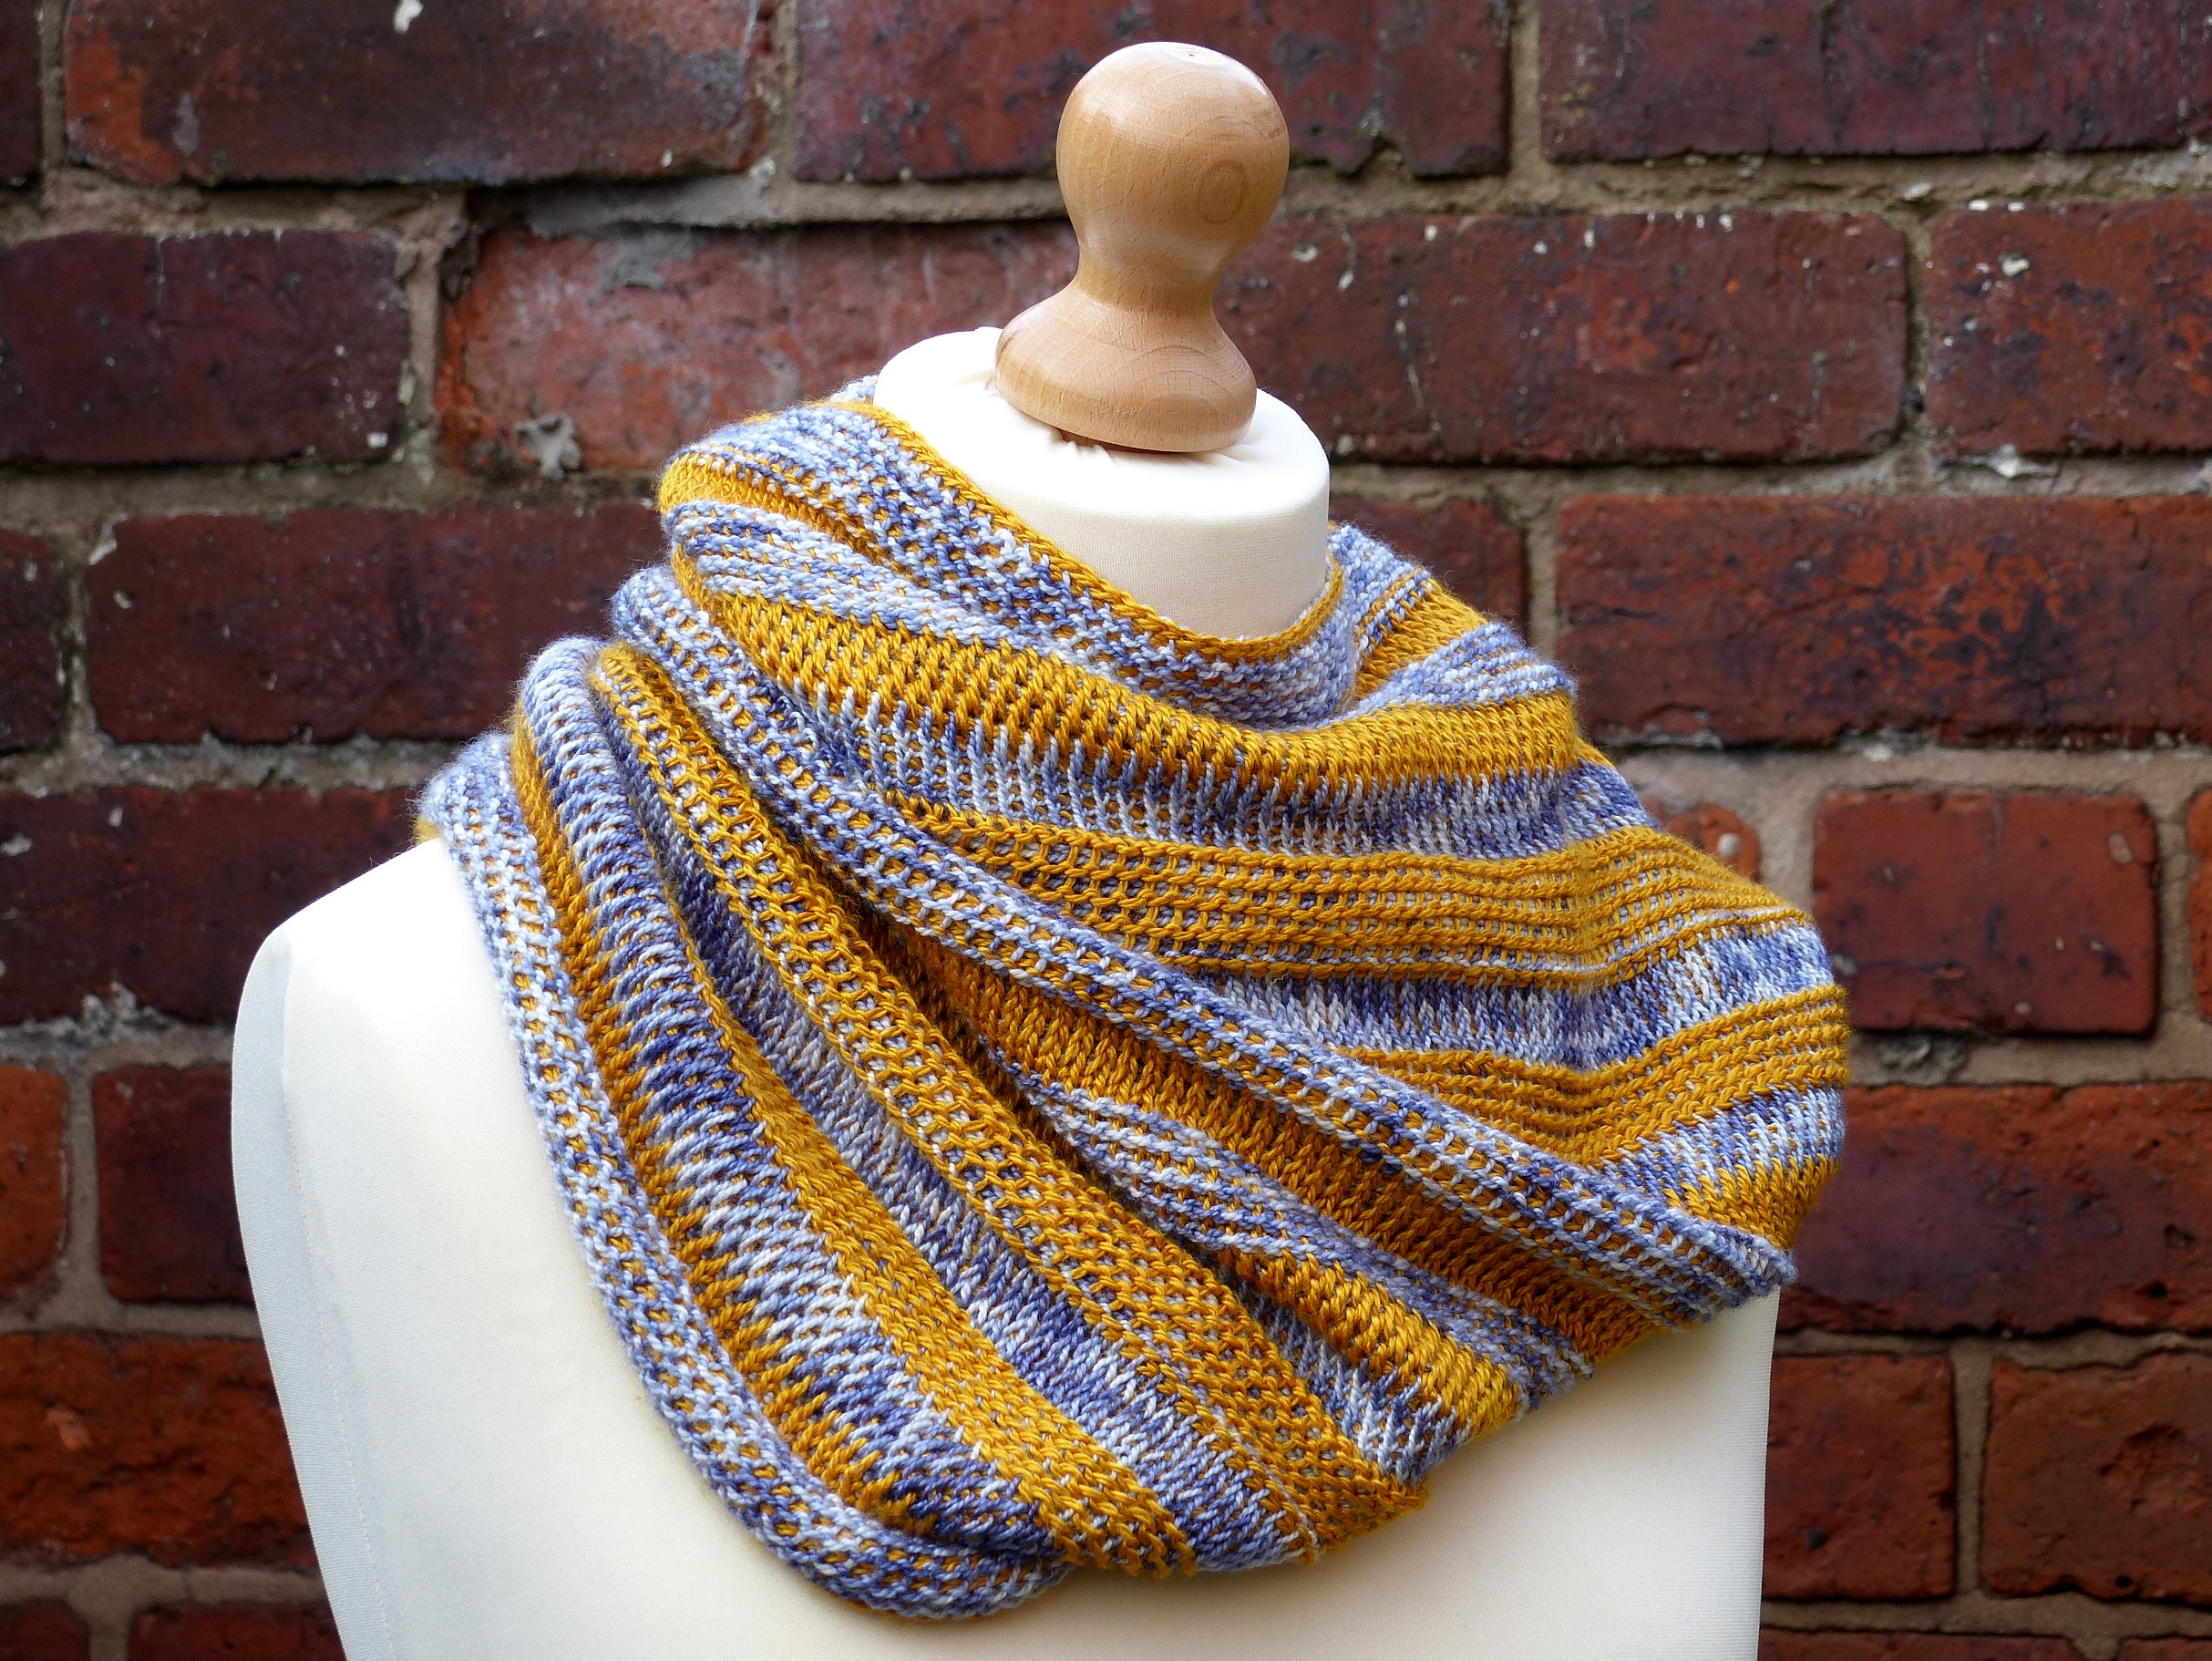
This is my first proper make using Tunisian crochet. It’s really a stitch sampler cowl because I wanted to try out lots of stitches, but was a bit fed up with swatches so I just experimented on a slightly larger scale hoping to make something wearable!
I was intrigued to try Tunisian in the round because you can work with two colours. For most stitches this means that the colour you work the loops onto the hook with comes out at the front, and the colour you work them off the hook with comes out at the back, so the whole thing has a reversed stripe effect with different textures front and back.

Strata Cowl – free crochet pattern by Make My Day Creative – Tunisian Crochet
To do Tunisian in the round you need a double ended hook. I ordered mine online for not much more than a standard hook. I only have the one size (so far) but that’s fine for something like a cowl where gauge is not important.
The double ended hook is used to work loops on at one end (this is called the forward pass), and then the loops are worked off at the other end (the reverse pass, or closing of the stitches). The method is not dissimilar to the principle of using double pointed needles in knitting (only a lot easy because you only need one hook!). In fact, Tunisian crochet resembles knitting quite closely; the construction is similar but with a chain (worked on the reverse pass) used to hold the stitches rather than a second needle. And the chain is left permanently in place, changing the resulting look and density of the stitch pattern.
Tunisian crochet can produce quite a dense fabric which has a tendency to curl up. To combat this I just chose a 5mm hook to match my 4ply yarn (i.e. went up 3 hook sizes). If you prefer less drape for your cowl then size up your yarn, or size down your hook.
Scroll down for the printable pdf patterns!
Materials:
- 5mm double ended Tunisian hook
- 95g/350m Fyberspates scrumptious in gold; 95g/350m Merino-silk 4ply in “Shibori” by Hand Dyed by Kate (or other similar yarn in your preferred colourway)
- Optional: Stitch marker
Strata Cowl – free crochet pattern by Make My Day Creative – Tunisian Crochet
Finished size:
My finished cowl has an 80cm circumference and is 53 cm long.
This pattern is very easily adaptable to your preferred size. I wanted a giant cowl which could be worn as hood as well as a cowl. As long as you start with an initial chain which is long enough to make a cowl which fits over your head you will end up with a wearable garment (so you do not need to worry about running out of yarn ruining your project!)
Pattern:
Begin with the gold, or your preferred yarn for the second stripe.
Foundation Round: Chain 140, or your preferred length for the cowl circumference. Remove the hook and place a stitch marker in the last chain so it can’t unravel.
Insert hook into the first chain made and draw up a loop using blue yarn (or the colour for your first stripe). Repeat until you are about two thirds of the way along the chain. Slide the work along to the other end of the hook and, being careful not to twist the rest of the chain, remove the stitch marker and slide the chain onto the hook at the opposite end to where you have been working loops on. Using the gold yarn, yarn over and draw through two loops (the gold and the first blue loop). Repeat, working off loops until you have around 5 remaining on the hook.
Slide the work back to the “on” end of the hook, and draw up loops in the remaining chains, using blue yarn as before, then working them off the other end using the gold yarn, leaving around 5 loops on the hook. You do not need to join rounds, the cowl is worked in a spiral. You can mark the first stitch with a marker if you like.
Project Tip: You will always be working loops on at one end with one colour, and off at the other end with the alternate colour – one colour appears at the front and the other at the back of the work (your stripe is reversible!)
Round 1-5: Tunisian Purl Stitch (tps)
With the blue yarn in front of the work, insert hook into the front vertical bar and draw up a loop. Repeat until you have filled the hook, then work the loops off the other end of the hook. To work the loops off, just do the same as for the foundation round: at the “off” end of the hook and using the gold yarn, *yarn over hook, draw through two loops, repeat from * until 5 loops remain. Repeat the process until you have worked 5 rounds, and close all the stitches so that you have only one loop left on the hook, in preparation to change colours.
To change colours, hold the blue yarn on the inside of the cowl so that the colour change isn’t noticeable. Work the next 5 rounds of stitches on with the gold yarn, and off with the blue.
Round 6-10: Tunisian Knit Stitch (tks)
*Insert hook from front to back of the work, between the front and back vertical stitches of the next stitch. The front vertical bar will be on the left of the hook, and the back vertical bar will be on the right of it. Draw up a loop, repeat from * until hook is full.
Pick up the blue yarn and yarn over (at the “off” end of the hook), and draw through one loop. Then continue to work off the loops as usual, by doing a yarn over and draw through two loops until 5 or so stitches remain on the hook. Continue working loops on and off until you have worked 5 complete rounds, finishing as before with one loop left on the hook.
Aside: Depending on which way you wind your yarn over before drawing up a loop, this stitch will look different. Turns out I do mine the “wrong” way. So my tks looks like twisted Tunisian knit stitch (tts). The reverse happens for tts – mine resembles tks!
Change colours as at the end of round 5.
Round 11-15: Tunisian Full Stitch (tfs)
*Insert hook in the space between the next two stitches, but under the “top bars” of the closing chain. Draw up a loop. Repeat from *, working loops on until the hook is full.
Pick up the gold yarn and yarn over (at the “off” end of the hook), and draw through one loop. Then continue to work off the loops as usual, by doing a yarn over and draw through two loops until 5 or so stitches remain on the hook. Continue working loops on and off until you have worked 5 complete rounds, BUT you can leave 5 loops on the hook, unclosed, before starting the next round because the next set of stitches does not require a colour change.
Round 16-20: Tunisian Reverse Stitch (trs)
This stitch flips the closing chain from the back of the work to the front of the work. This has the effect of making it look like you have changed colours because the closing chain is at the front and the drawn up loops are at the back. So don’t change colours either before starting or at the end of this set of 5 rows!
With the yarn at the back of the work, hold the hook at the back too, and insert the hook from right to left around the back vertical bar, and draw up a loop. Repeat, drawing up loops until the hook is full, and then work off the loops as normal. Work 5 rounds, finishing with about 5 stitches on the hook.
Make sure when you count the rounds that you do so correctly. Each round flips the chain from the round below forwards, so if you count these, don’t count the top chain of the last round (which may appear flipped to the front, until you work the next round).
Do not change colour yarn after working Tunisian Reverse Stitch!
Rounds 21-25: Tunisian Twisted Stitch (tts) – worked as for knit
This is worked the same as for tks, but when going between the front and back vertical bars, make sure that the front vertical bar is on the right of the hook, and the back vertical bar is on the left (this is the opposite way around to regular tks).
*Insert hook from front to back of the work, between the front and back vertical stitches of the next stitch. The front vertical bar will be on the right of the hook, and the back vertical bar will be on the left. Draw up a loop, repeat from * until hook is full.
Pick up the gold yarn and yarn over (at the “off” end of the hook), and draw through one loop. Then continue to work off the loops as usual. Continue working loops on and off until you have worked 5 complete rounds, finishing with one loop left on the hook, to change colour for the next round.

Strata Cowl – free crochet pattern by Make My Day Creative – Tunisian Crochet
Repeat rounds 1-25, only this time work each stitch in the opposite colourway, so that you have each stitch type worked in each colourway. Continue to repeat until the cowl is the desired size.
I chose to finish mine after two full repeats (i.e. 100 rounds) plus a final 5 rounds of Tunisian purl stitch. I like tps to finish because it is less tendency to curl than some of the other stitches.
To finish, after working all the loops but one off the hook, neaten by working a slip stitch into each stitch all the way around. Fasten off and weave in ends; block as desired.
Strata Cowl – free crochet pattern by Make My Day Creative – Tunisian Crochet
I have recently learnt Tunisian crochet using the handy book “Tunisian Crochet Stitch Guide” by Kim Guzman, and also Kim’s Youtube videos. If you need help learning Tunisian crochet then I can recommend these sources – she has a lot more expertise then I do!
26/10/2016 – PDF back soon! (apologies but it needs error correcting – pattern above has had corrections applied)


It’s lovely!
Thanks!
Reblogged this on fpvj.
Ahh! Beautiful colour combo! I am in love.
Thanks Natasha!
Thank you so much for sharing this. It’s beautiful! I can’t wait to try this new method. Approximately 30 years ago I learned the basic Tunisian stitch and then cross stitched a pattern.
Ooh that sounds like fun. I can imagine Tunisian making a good background fabric for cross stitching!
Beautiful! I thought it was knitted.
Your items are always a little more special.
Thank you. I just might get that double ended hook and try this!
Thank you! It does look knitted, even though the technique is different to knitting, the way the loops are pulled through one another makes it almost the same in resulting fabric from the front.
Ooooh how lovely! I haven’t tried Tunisian yet. I may give it a go. I love the reverse stripe effect!
Thanks! It has been fun to try, and quite easy if you can crochet already!
I’ve had this pattern bookmarked to feature it on my Make It Crochet website and I was just writing the post when I noticed the mention. Thank you so much! The coincidence is amazing, though. I am featuring your project for my weekly giveaway drawing and I’m giving away one digital copy of my book! Isn’t that funny?! Congratulations on another outstanding design. :-)
That’s fab, thanks Kim! Really pleased to have tried Tunisian successfully and glad you like this. Your book really helped! Aren’t co-incidences funny? :)
Any idea when the free pdf will be back up?
As soon as I can Crystal! Sorry, life is against me at the moment… :)
Pingback: Free Crochet Pattern: Strata Cowl – Make It Crochet
I Love it 💕
Thanks Tina!
Reblogged this on zero639.
I would love to make this, but can’t figure out how to do the foundation chain so that this is joined and worked in a continuous spiral. Do you have any tutorials or can you direct me somewhere that I can observe this process?
Thanks so much!
Hi Julie! Sorry to hear you are having trouble getting started. If you find it easier, you can make an initial chain, and join it using a slip stitch (make sure the chain is not twisted). Then you can continue around the loop pulling up loops as described, working the loops off the other end as needed. (The main reason I wrote the pattern the original way is because I find it difficult not to twist the starting chain- the method described avoids having to worry about it so much!) I hope that helps.