Increasing and decreasing in pattern is, in my opinion, one of the hardest things to do when designing a pattern. So if you can master it then nothing can stop you!
I’m going to cover shaping in this post and then increasing and decreasing complete stitch patterns next time. If you’re wondering what the difference is – well, to me shaping is when you want to gradually grow a piece “internally” – like in a top down sweater or the crown of a hat. My next post on increasing and decreasing with stitch patterns will be more focussed on “edge” increases, as is needed when making a triangular shawl, or if you are making a seamed item of clothing. Shaping will add a curve to your work (e.g. to fit the body) but edge increases alter the shape of a flat piece (e.g. to make a shawl triangular).
%20in%20chevron%20stitch%20pattern.%20How%20to%20shape%20crochet%20stitch%20patterns%20by%20Make%20My%20Day%20Creative)
Chevron stripes sweater has internal shaping at waist and hips. How to shape stitch patterns by Make My Day Creative.
Shaping by Altering the Stitch Pattern
This is something you may want to consider if for example you are making a sweater and want to nip in the waist or add more ease over the hips, or you are making an A-line skirt and want to increase evenly around the skirt. It can be quite tricky to do this if your pattern is very lacy and has a long repeat, especially over a number of rows. It will take a large area to remove stitches and can be quite obvious because of the contrast of the lace pattern to whatever background it is on.
But it is much easier if you have selected a stitch pattern repeat which is more closed, with basic stitches, and has either a long or very short repeat. So select your stitch pattern wisely!
Decrease row (purple) in chevron stitch pattern. How to shape crochet stitch patterns by Make My Day Creative
If your pattern repeat is long, then look for places where you can add or eliminate stitches without them being too noticeable. For example, in my Chevron Stripes Sweater, the repeat is 10 stitches, with 8 of these being double crochets (US terminology). To reduce the total stitch count and nip in the waist it is easy to work some dc2togs on either side of the chevron, and then add these stitches back in later to flare the sweater out over the hips. Look closely at the stitches to see where I have done this on my sweater. For a few rows a couple of the repeats become 8 stitches and then are increased back up to the original 10 stitches.
If your pattern repeat is short, then you will need to work out how to add or remove a complete pattern repeat over a number of rows. For example, in my icicles baby hat, the crown needs to expand and look like V-stitch (a dc, ch1, dc made into a ch-sp in the row below). To add this group in, I added a dc in one round, a second dc in the next, followed by a chain in the round after. So the repeat was added in gradually over 3 rounds.

Increasing in V-stitch pattern for Icicles Baby Hat. How to shape crochet stitch patterns by Make My Day Creative.

Increasing in V-stitch pattern for Icicles Baby Hat. How to shape crochet stitch patterns by Make My Day Creative.
Shaping “Lacy” Stitch patterns
If you are trying to increase or decrease in a project which is lacy, I generally feel it looks better to make the item more solid at the transition rather than more lacy – i.e. if you need to add a (dc, ch1, dc), add the dc’s in row by row first, then the chain. My eye tends to spot “missing” stitches (such as chains) much more easily than “extra” stitches (such as dc’s). I think this is because extra chains can look like you have a hole in your work.
Aargh! This stitch pattern just won’t be easily shaped!
If you are struggling to shape a lacy stitch pattern but are desperate to have a perfectly fitted sweater, consider using the lace as a panel and adding the shaping elsewhere. For example, you can work a panel of lace down the front or back of a piece and add in plain sections of dc under the arms where you can make adjustments at the bust/waist/hips to get the overall desired fit. Or add in a solid waistband, make your adjustments in single or double crochet, and then continue to work in pattern.
You can also consider adding sections of mesh for threading through a ribbon or yarn tie at the neckline, under the bust or at the waist, so that your item is gathered to fit well. This can sound lazy but works well for a drapey lace cover-up which tends to have little volume than solid sweaters might anyway.
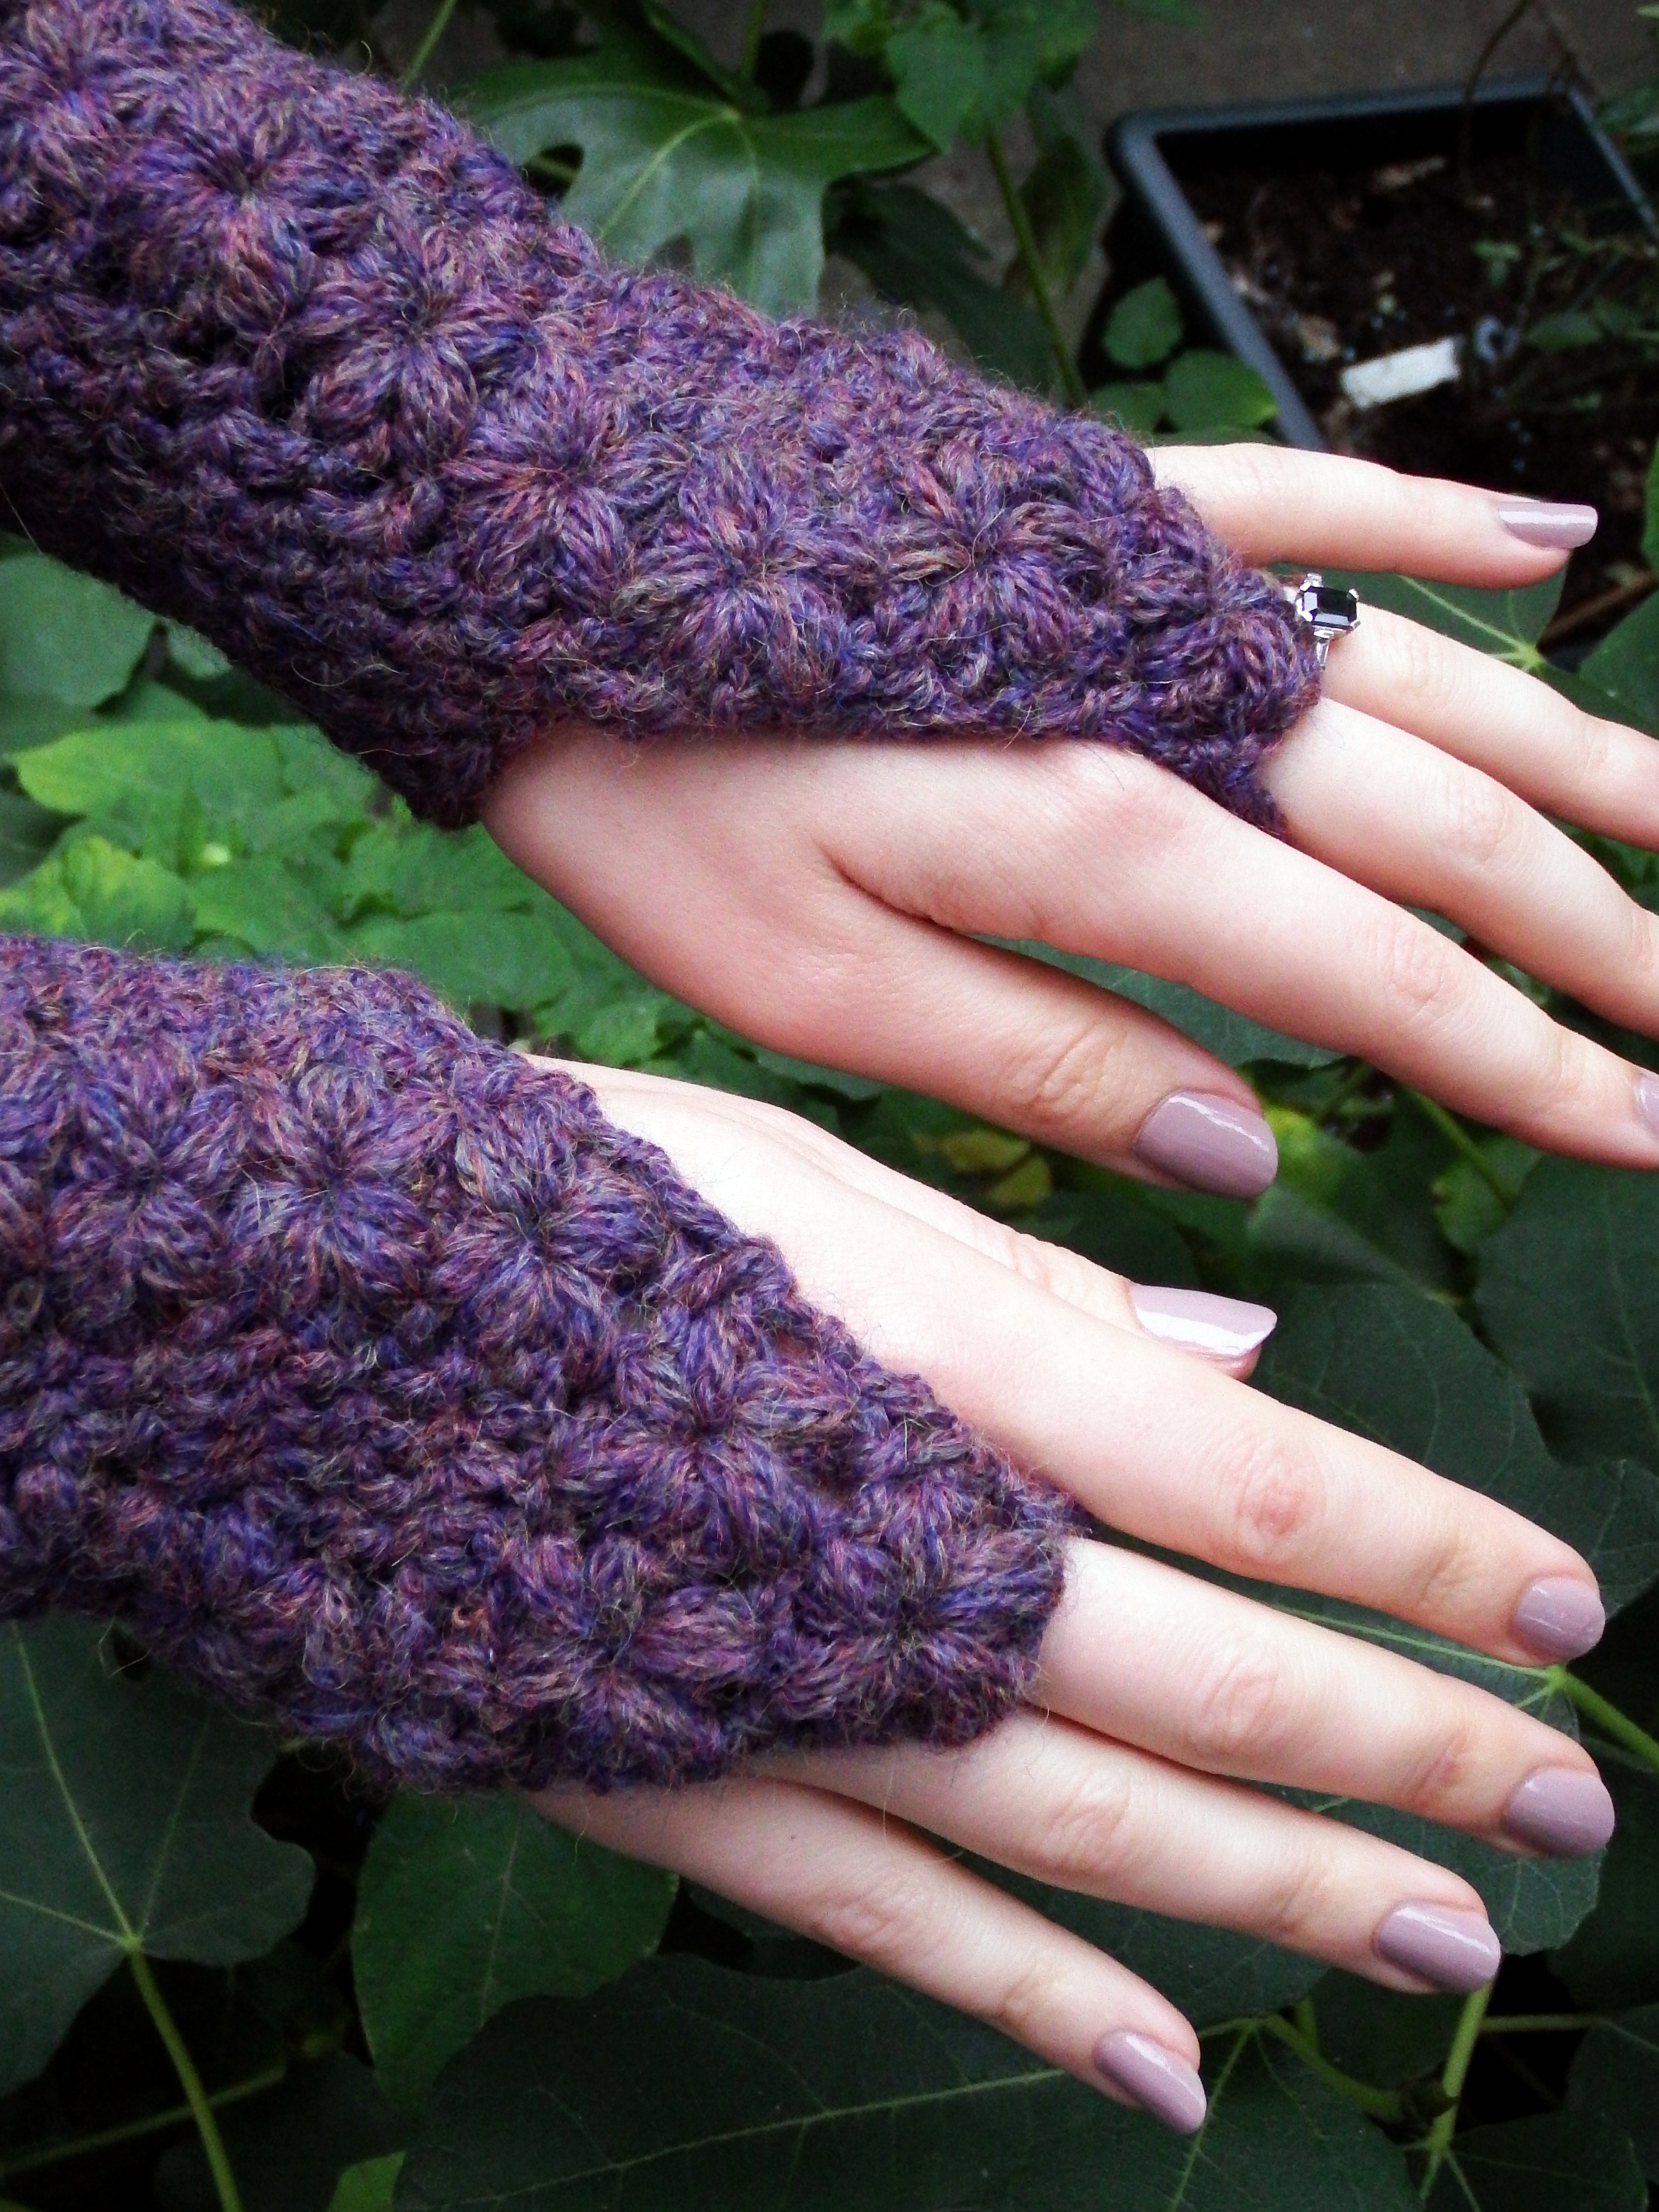
Flower Trails Fingerless Gloves Crochet Pattern has internal shaping to nip in the wrists. How to shape crochet stitch patterns by Make My Day Creative.
Making Samples
If in doubt, make a sample or two of your different options for shaping. I know we all hate doing samples and gauge swatches, but they really do save a lot of time in the long run. Personally I find that it can be faster to try things than sit around with pen and paper trying to figure things out – you can only get so far with visualising your project before you have to put hook to yarn!
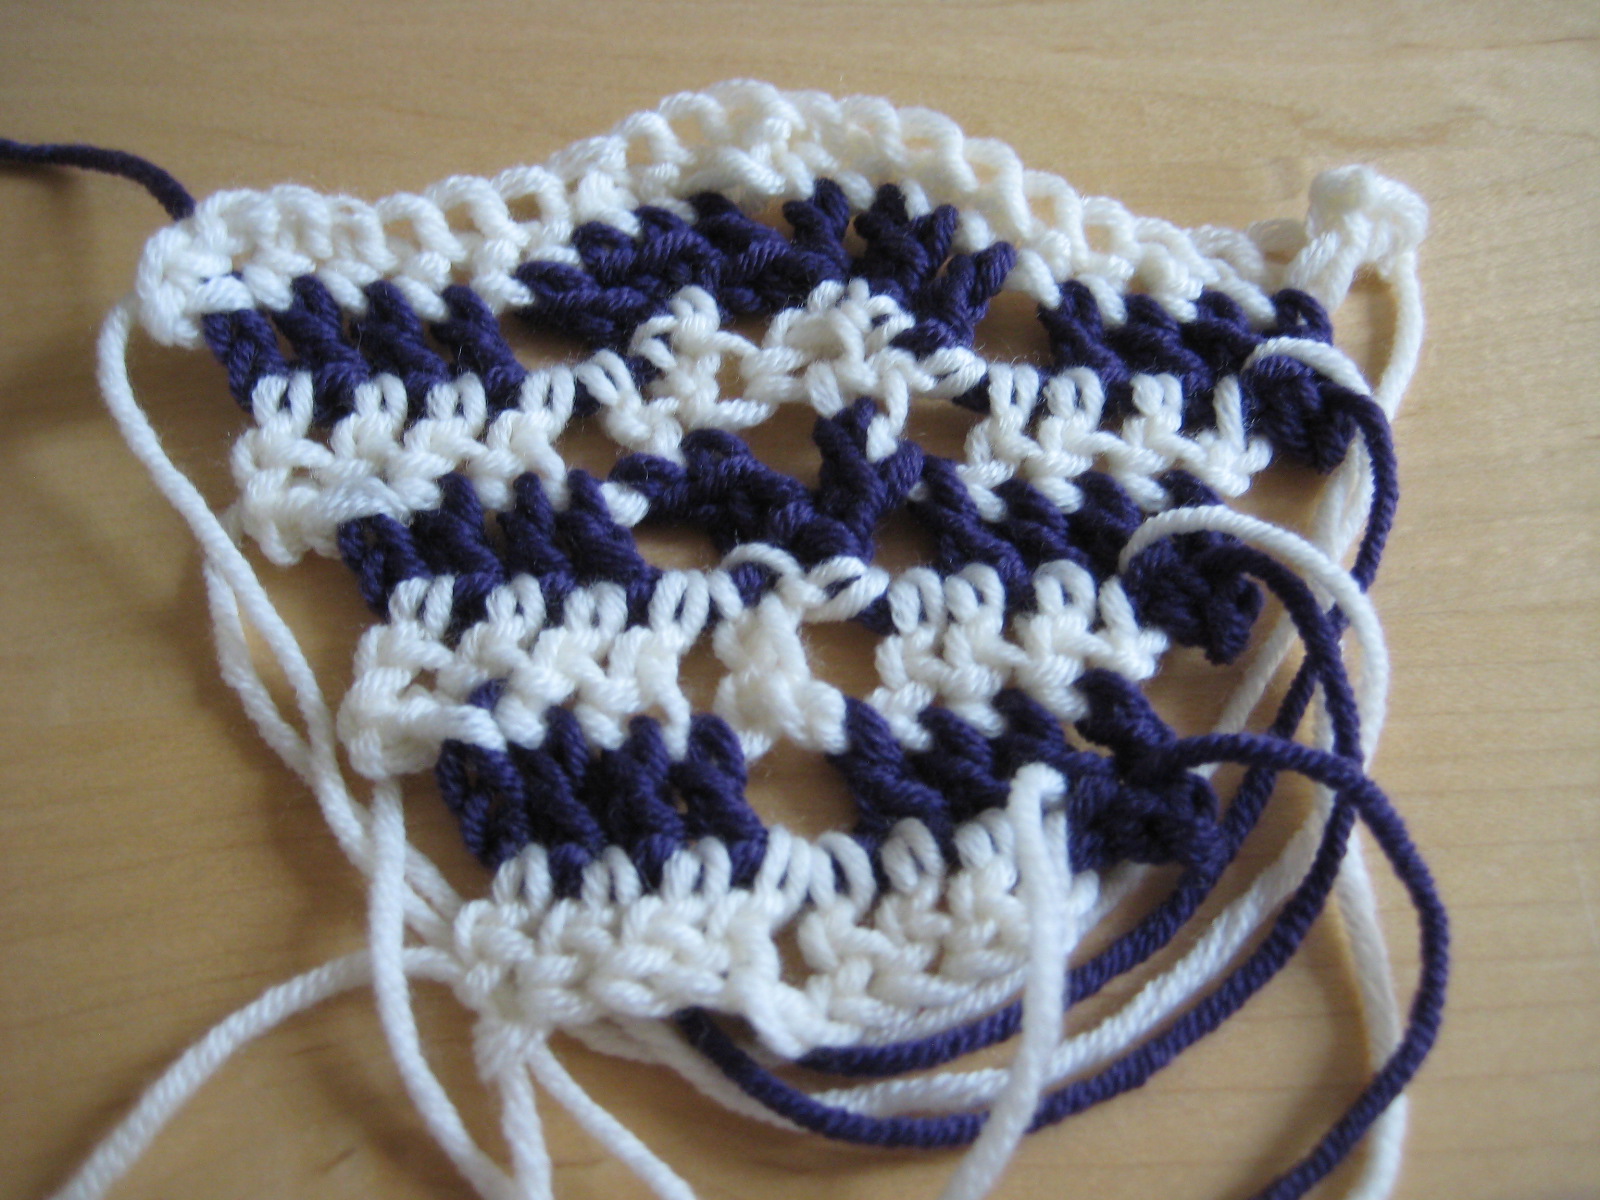
Make a swatch – decreasing by an entire stitch pattern over a number of rows (this is for Chevron stripes sweater). How to shape crochet patterns by Make My Day Creative
Don’t miss part b to this post coming soon: How to increase and decrease in stitch patterns
Find Part 1 (selecting a stitch pattern) and Part 2 (combining stitch patterns) here.


Fantastic post series! Eagerly awaiting the next :)
Thanks Regina! :)
This is a great series, keep it up!
Do you plan to talk about shaping using hook size?
Thanks Korina! Hmm, I probably should have mentioned shaping by changing your hook size in my last post. I’ll see where I can work it in to one of the remaining posts! :)
Hello. My name is Elena. Please, can you post the piece between sleeve and armhole, larger. Thank you kindly.
Hi Elena, just click on the photo and you’ll see the largest size in your browser :)
Onde posso encontrar o passo a passo?
Hi Luzenilha! This post is general because I can’t possibly show how to do it for all the possible ways you might want to shape something. It’s to help you think about how to approach it yourself! :)