This project is finally finished after having restarted it several times. I am really happy with the result though so it was worth persevering! The final pattern is actually very simple and quick to work up thanks to rows of broomstick lace.
Shooting stars stitch pattern
I am in love with this beautiful yarn which I treated myself to back in September. It is a lovely merino wool and silk blend. I have been thinking carefully about what to use it for because I really wanted to show off the pretty variegation in the colours.
I love how the star stitch displays the colours and I also felt that the yarn would look good if I could show off lengths of it so decided to include rows of broomstick lace. I think the lines of broomstick lace look like the trails of shooting stars, hence the name of this project!
I’m really happy that this came out large enough to wear as a cowl or draped over the shoulders (more like a poncho) for extra warmth.
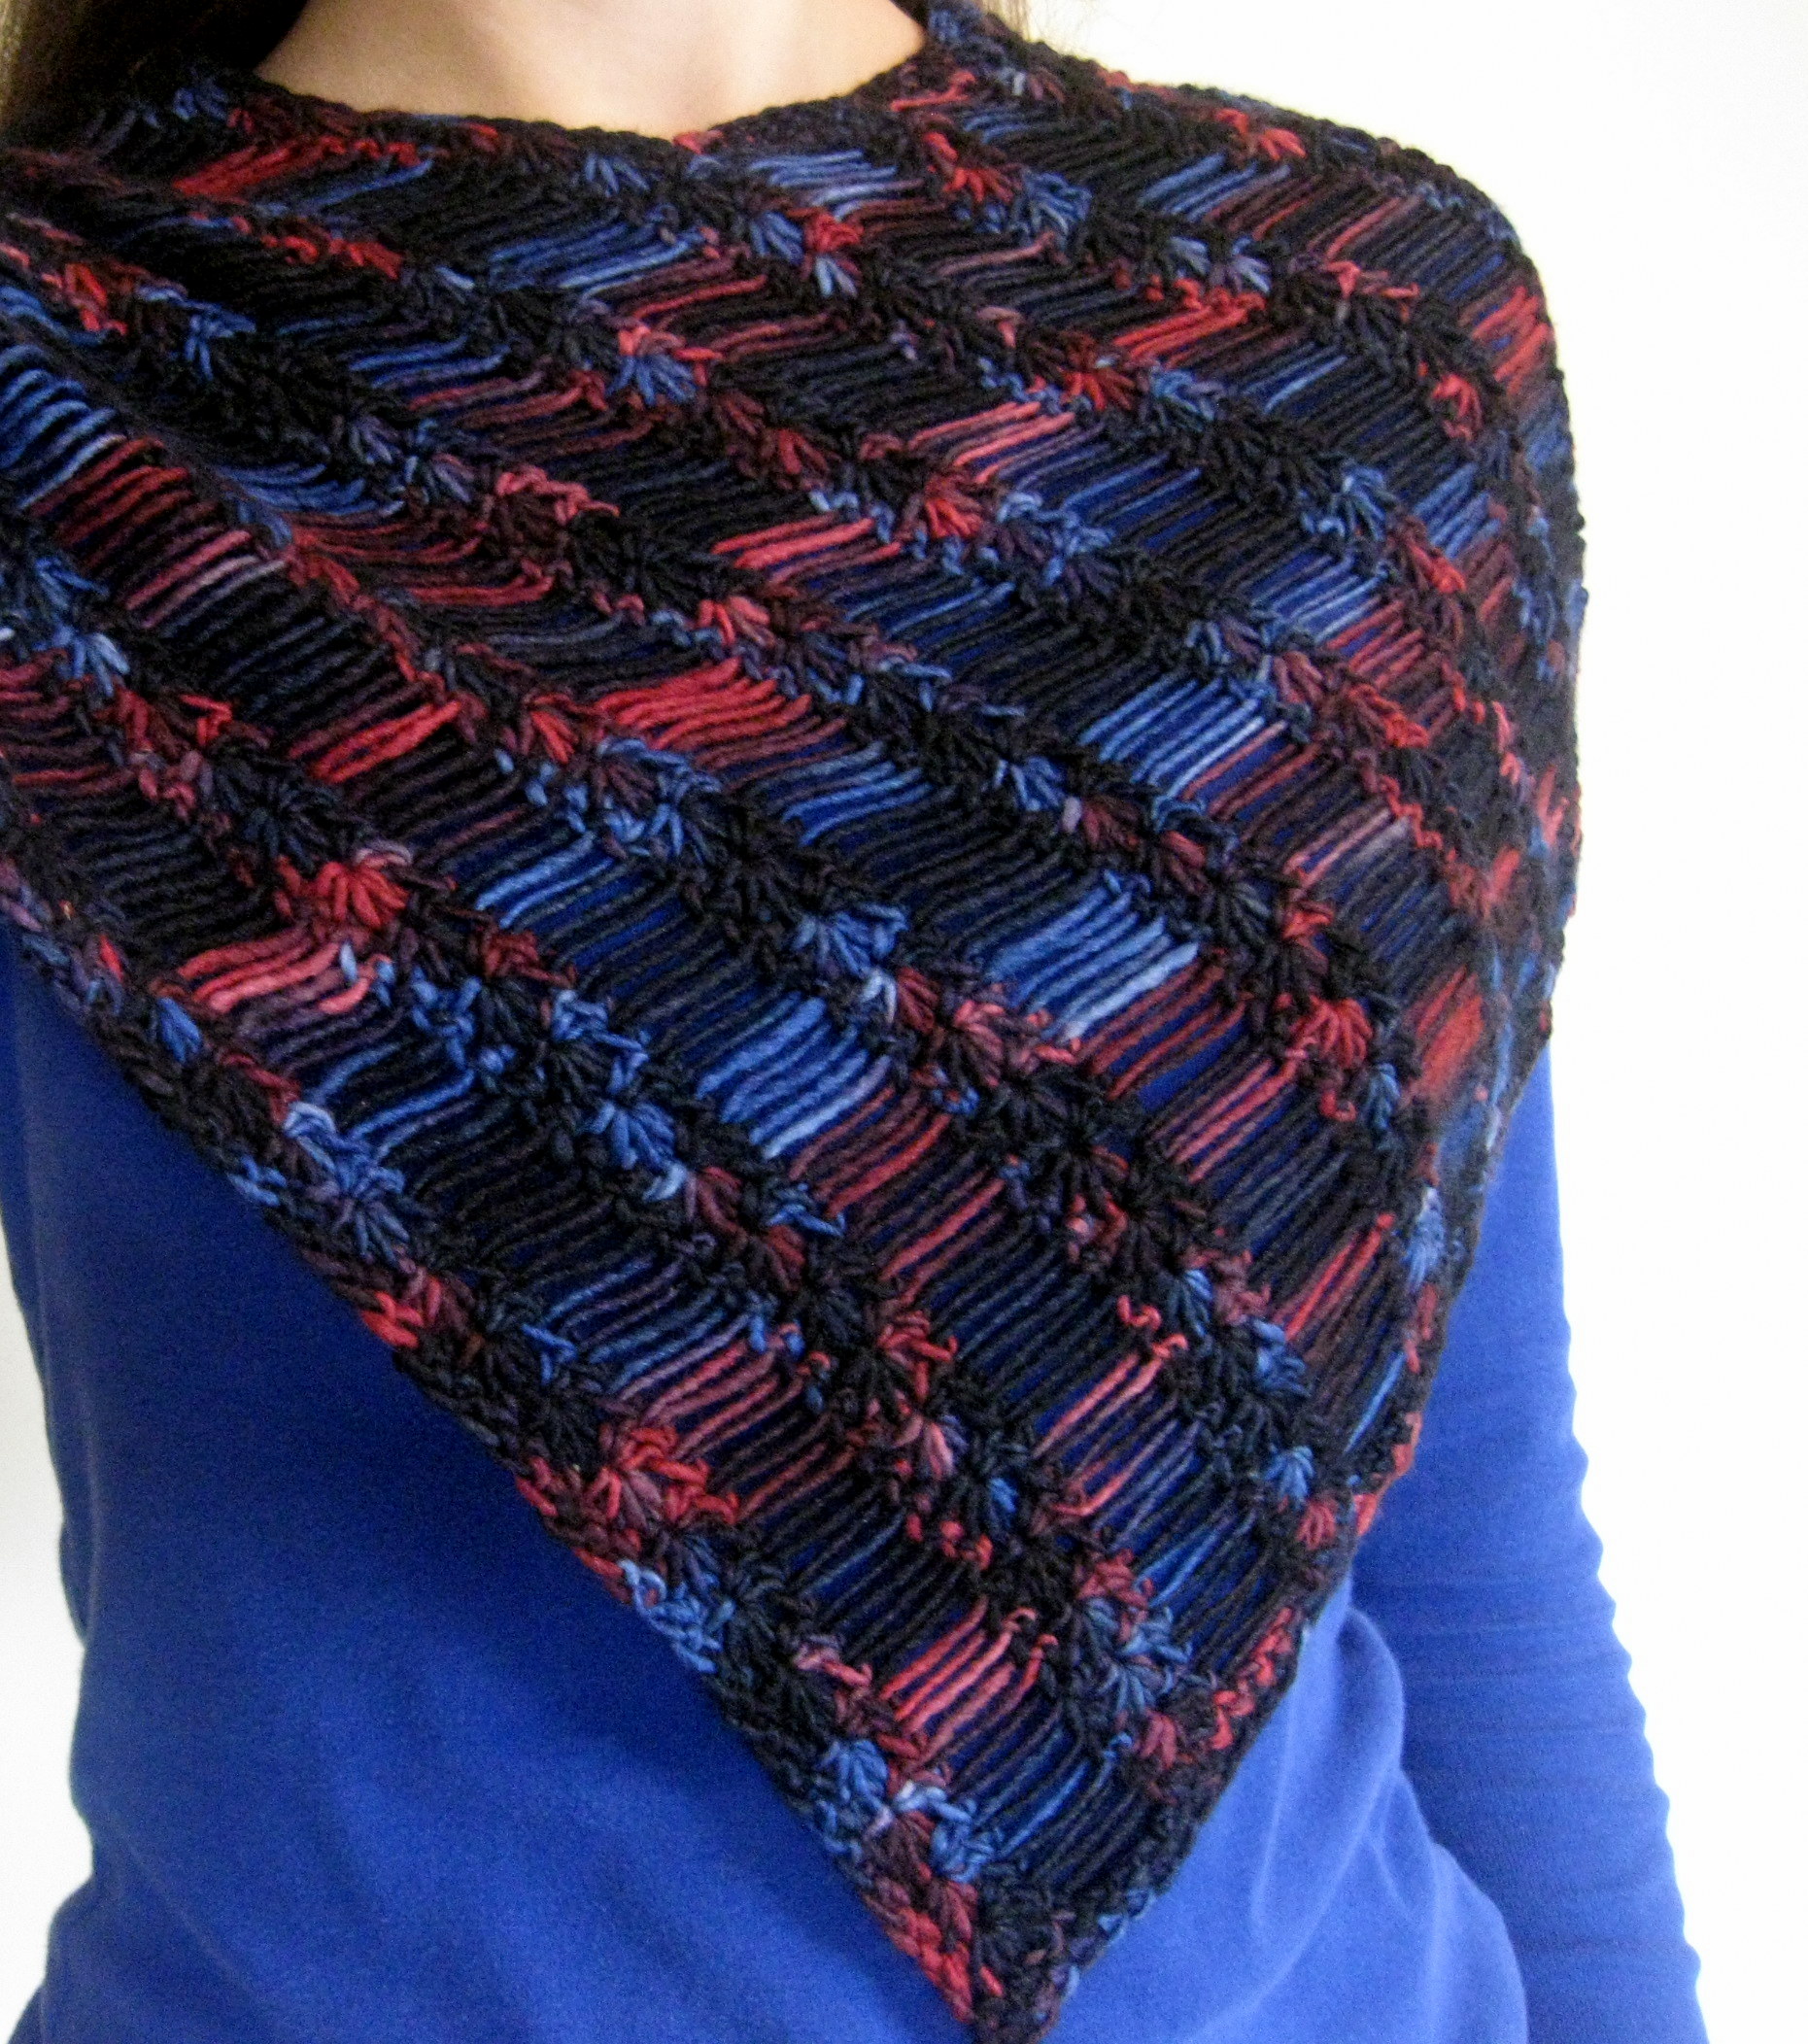
Shooting stars cowl covers the shoulders too :)
Scroll down for both the US and UK pdfs of this pattern!
Materials:
- 270m light worsted (aran) yarn – I used less than a 100g skein of Manos del Uruguay in Luisa (7104)
- Size 6mm hook
- Ruler/broomstick/knitting needle or other smooth item measuring around 7cm around (eg 20-25mm knitting needle)

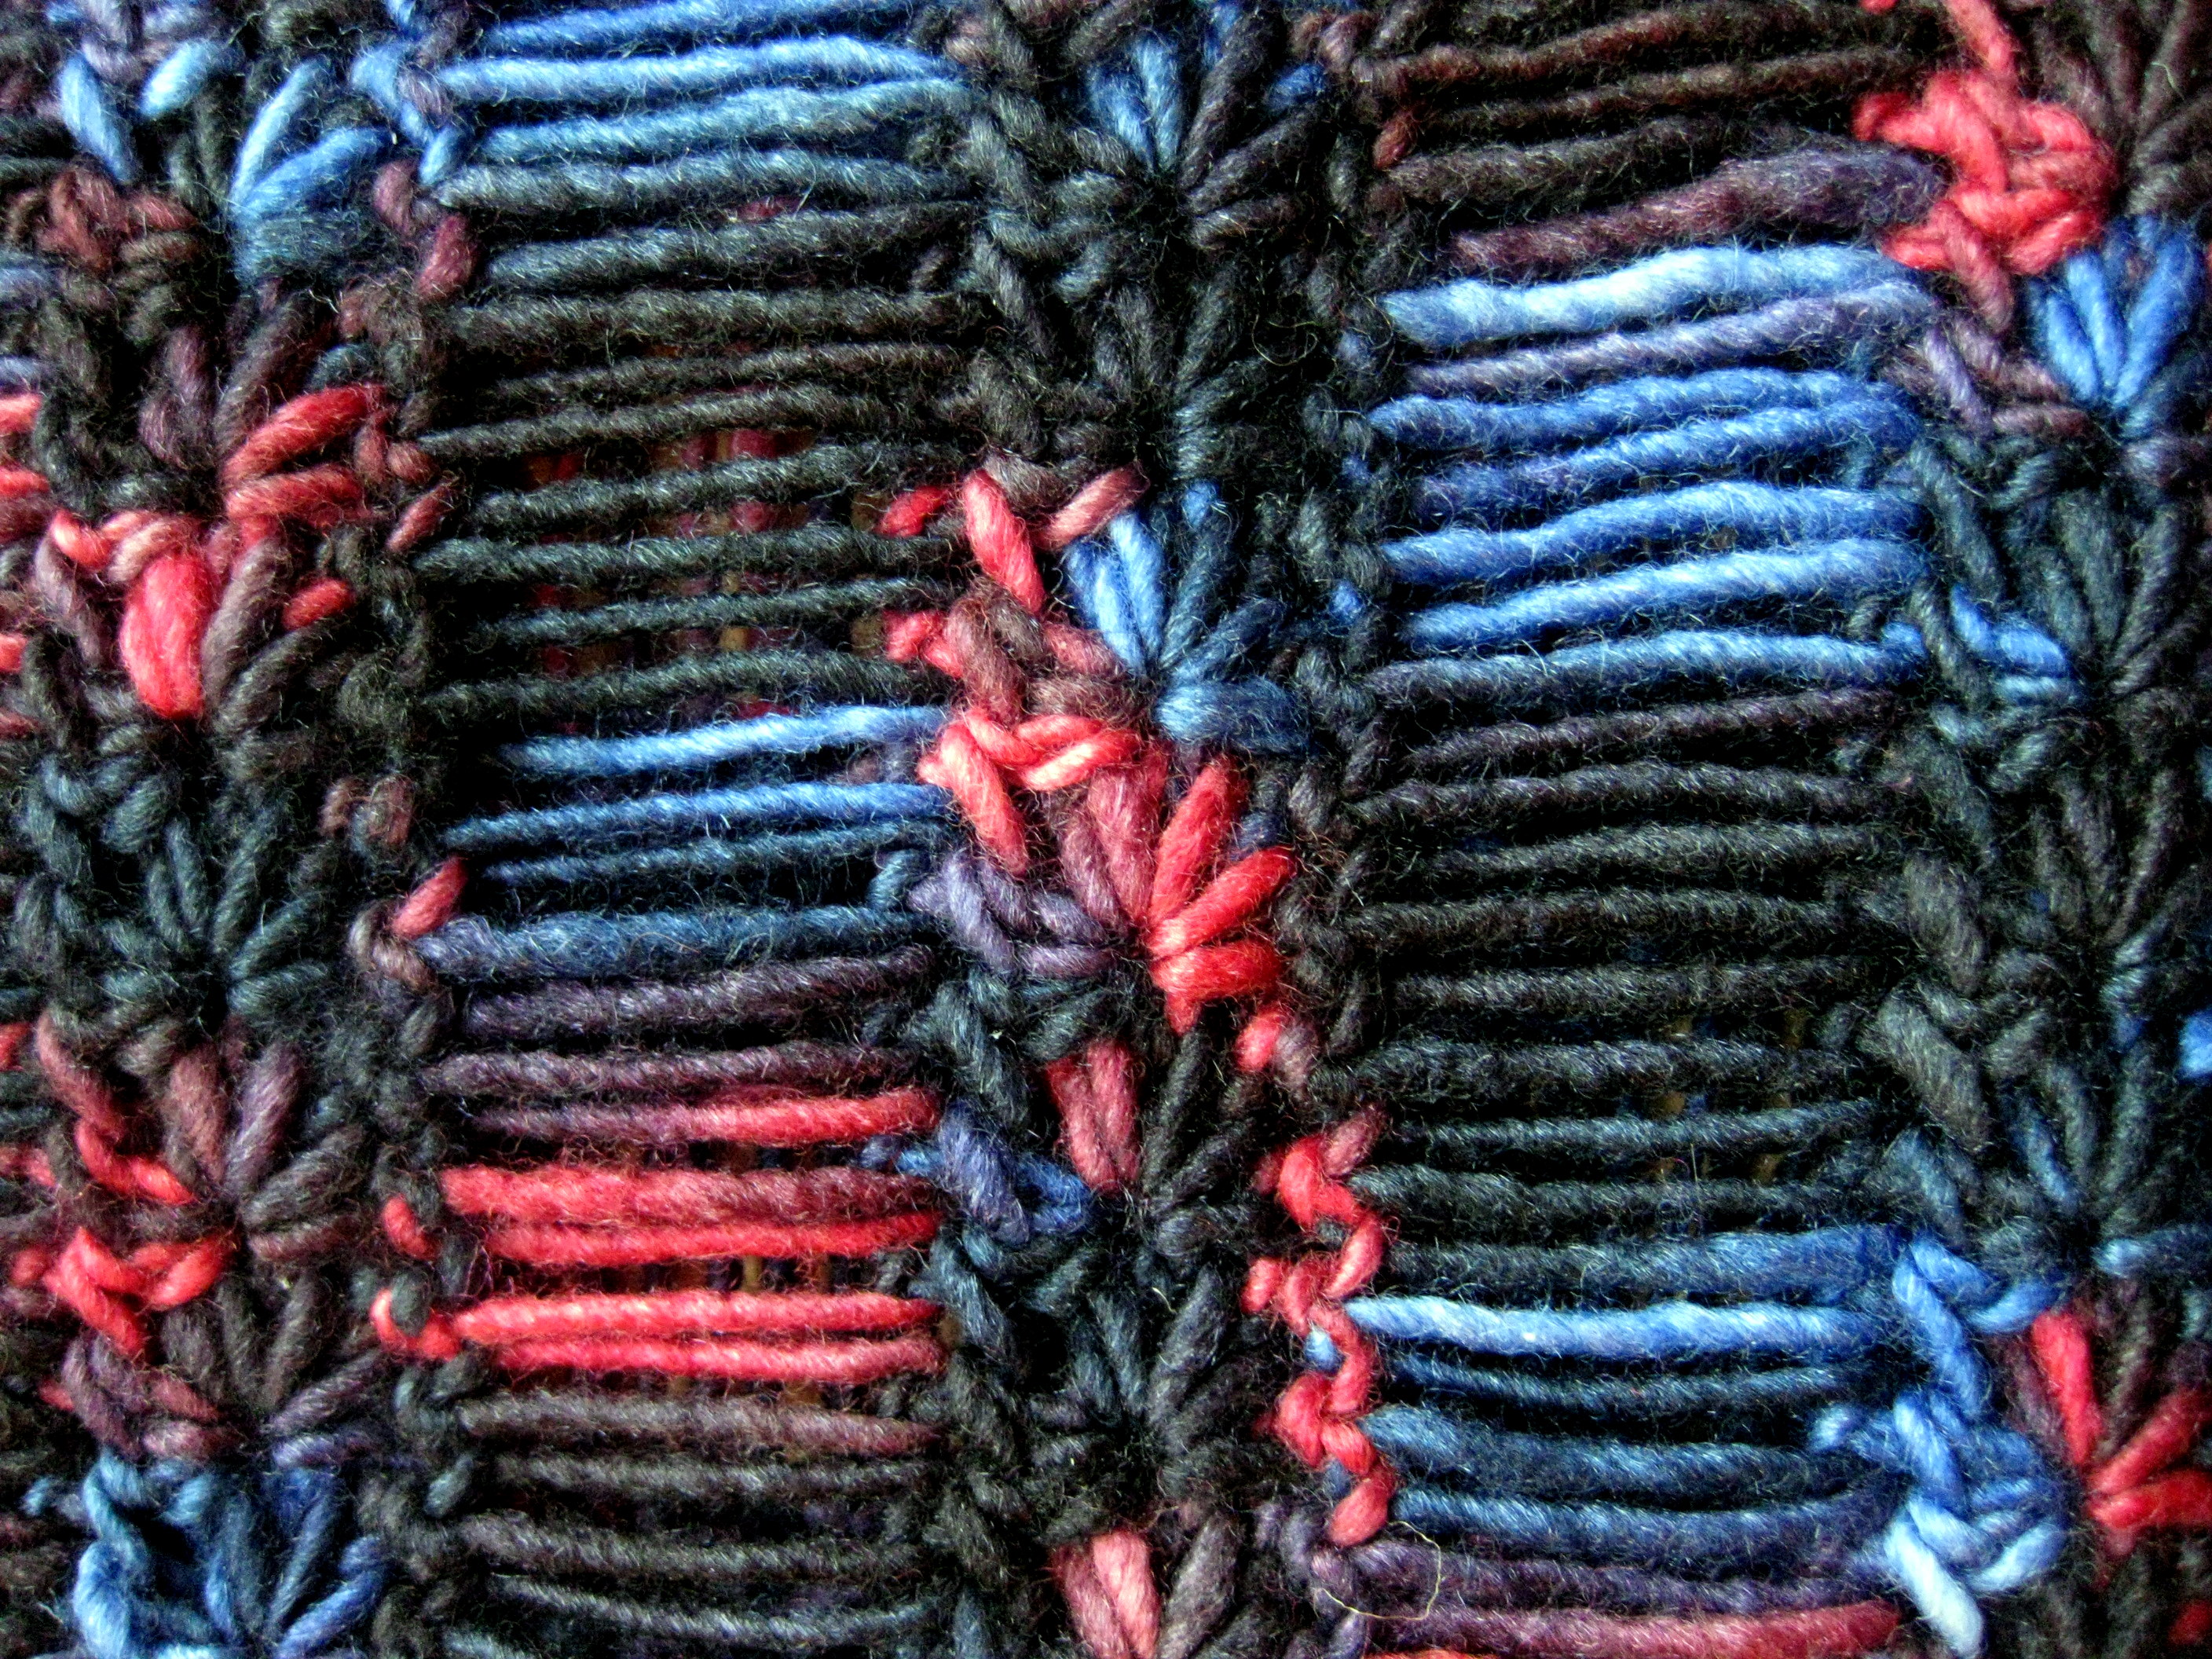
Close up of star stitch with trails

Special Stitches
Star Stitch
There are a couple of different variations on star (or daisy) stitch. The difference is in where you put the hooks. This scarf works the stitch as follows:
First Star Stitch: (after making a ch3 at the end of the previous row)
- Insert hook in 2nd ch from hook and draw up a loop (2 loops on hook)
- Insert hook in next chain and draw up a loop (3 loops on hook)
- Insert hook in first st of row and draw up a loop (4 loops on hook)
- Insert hook in second st and draw up a loop (5 loops on hook)
- Insert hook in third st of row and draw up a loop (6 loops on hook)
- Yarn over, draw through all 6 loops on hook (1 loop on hook)
- Chain 1 to close the star (1 loop on hook). This forms the “eye” of the star.
Star Stitch:
- Insert hook in the eye of the star just completed and draw up a loop (2 loops on hook)
- Insert hook through the legs of the last loop of the star stitch and draw up a loop (3 loops on hook)
- Insert hook in the last st worked by the previous star and draw up a loop (4 loops on hook)
- Insert hook in next st and draw up a loop (5 loops on hook)
- Insert hook in next st and draw up a loop (6 loops on hook)
- Yarn over, draw through all 6 loops on hook (1 loop on hook)
- Chain 1 to close the star (1 loop on hook)
Broomstick Lace
Broomstick lace is a technique whereby loops are drawn up through each stitch along the row. Each loop is place onto a broomstick handle, or large knitting needle, or in my case, a ruler. This makes all the loops the same length.
In the most common type of broomstick lace groups of loops are taken off the ruler and then twisted together to make pretty patterns. There is a great video showing the technique here:
In this scarf, the loops are worked off one at a time and a single crochet worked in each one to make the “trails” of the stars.

This shooting stars cowl reminds me of fireworks
Pattern:
This piece is worked back and forth in rows to make an “L” shape. The ends of the “L” are then stitched together to make a cowl where the corner of the “L” makes the downward triangular point of the cowl.
Chain2 at the end of a row counts as an hdc throughout. Ch3 is used to set up the star sts of the next row.
R1: Fsc 87, ch3, turn
R2: Make 43 star sts, hdc in final st, ch2, turn
R3: 2hdc into each “eye” of each star st along, sl-st into turning ch of first star st (counts as st) (88sts)
Broomstick lace rows:
R4: Draw up the loop and place onto ruler (or your own alternative item) and pull close. *Insert hook in next st and yarn over, draw through a loop and pull through. Draw the loop large enough to place onto the ruler and pull close. Repeat from * to end (88 loops on ruler)
R5: Slide the first loop off the ruler being careful to keep it the same size. Insert hook and yarn over, draw up a loop and ch1. *Slide the next loop off, insert hook through loop and make an sc. Repeat from * to end (88sts) and ch3, turn.
Repeat rows 2-5 four more times, then repeat row 2-3. This is the end of the first section.
TIP: Depending on your gauge you may want to work more or less repeats of the first section, or you may need to work more or less loops at the start of the 2nd section to make sure that each side of the “L” mirrors the other – work an even number of loops.
The long length of the “L” shape is now finished, now work the upright (second) section by continuing in pattern, but only work about half of the next row 4:
R4*: Draw up the loop and place onto ruler (or your own alternative item) and pull close. *Insert hook in next st and yarn over, draw through a loop and pull through. Draw the loop large enough to place onto the ruler and pull close. Repeat from * 38 more times (40 loops on ruler)
R5*: As per R5 – (40sts plus a ch3)
R2*: Make 19 star sts, hdc in final st ch2, turn
R3*: As per R3 – (40sts)
Repeat these rows until the length of this side measures the same as the first side. You should end up with an “L” shaped piece which resembles a square with a square cut out of one corner.
End on a row 3. Do not fasten off!

Finished shooting stars cowl
Finishing:
Ch1 and turn to work a row of sc down the side of the work (this adds structure to the edge of the broomstick lace rows). I worked 3sc into each pair of star rows and 4sc into each edge strand of broomstick lace. Ch1, turn, and work a second row of sc back along this work.
Fasten off and join to the opposite corner and work a row of sc down the other side (towards the inner corner of the work). At the inner corner sl-st into the 1st unwork st and turn to work back a second row of sc.
Fasten off and attach to the corner of the other end and work a row of sc so that you have the same number of sc as the other side (40 plus 4 sts if you stuck with this exact pattern).
Now block out your work. Blocking makes the rows of lace super straight and gives drape so I really recommend it!
To finish, sc the ends together (or whip stitch if you prefer) on the inside of the cowl. Weave in any ends.


Looks amazing! Great job!
Thanks! It may be my favourite thing I’ve crocheted so far. :)
very nice, and it does look like shooting stars!
Thank you! :)
Absolutely lovely, this gorgeous yarn will keep you snug and warm in the winter chills.
Yes it already is! Wore this into town today. :)
It’s gorgeous! The design decisions you made really do show off the yarn!
Thanks Kerry! :)
That is gorgeous! Loving on the yarn!!!
Thank you! I think this may be my favourite project so far! :)
Pingback: Multiplicity Buttoned Shawl | Make My Day Creative
Pingback: Scarf and Cowl Patterns | Make My Day Creative
This is stunning and I’m trying to figure our how you started this. There doesn’t seem to be any # of chains to start, just ‘Fsc 87’ . Is this ‘single crotchet in the front loop 87 stitches’, then how many chains to start? I didn’t see this. I’ve been crocheting for 35 years all kinds of various things so I am fairly experienced. Also-I don’t have that brand or kind of yarn where I live. Is there any brand that would be similar or maybe I can find something similar if I knew the length of each color before it changes?
Hi Laurie! “fsc” is foundation single crochet. I suggest you look at youtube for a tutorial if you haven’t come accross this before as there are plenty of good ones out there! Alternatively you can chain 88 and then work 87 single crochet into it, but then your edge won’t be as nice and stretchy. I’ve no idea what yarns are available to your locality I’m afraid but this seems to be working well with most kinds of variegated yarn (see the projects page on Ravelry to see what others have made!).