
Super Quick Joining Method
Everybody loves granny squares. But seaming that big pile of squares together is, let’s face it, a little bit of a chore.
Most of the methods I have seen use either single crochet, slip stitches, or whip stitch to join each stitch to its neighbour.

Joined using slip stitches – not quick!
Recently I spotted a pinterest post on joining squares as you go – this method is so simple, I’m a bit cross I didn’t think of it myself! Anyway, it was such an “aha moment” for me that I thought I’d share it here, in case you have been put off making a blanket for the same reason as me (all that seaming)!
I’m using a traditional granny square (pattern below, if you are unfamiliar with this), but you can use this joining method for any squares where the last row is made using the pattern (3dc, ch1) around the edges. Here’s how it works:
Super Quick Joining Method:
Joining a square on one side:

Last sts were 3dc, ch1
After completing 2 sides of the last round of your square (and you have done 3dc only into the corner ch sp) do a ch1. Now slip st into the corner ch sp of the square you are joining to.
Do 3 more dc into the corner ch sp of the original square. Now instead of a ch 1, sl-st into the ch space of the square you are joining to, and repeat along the side.
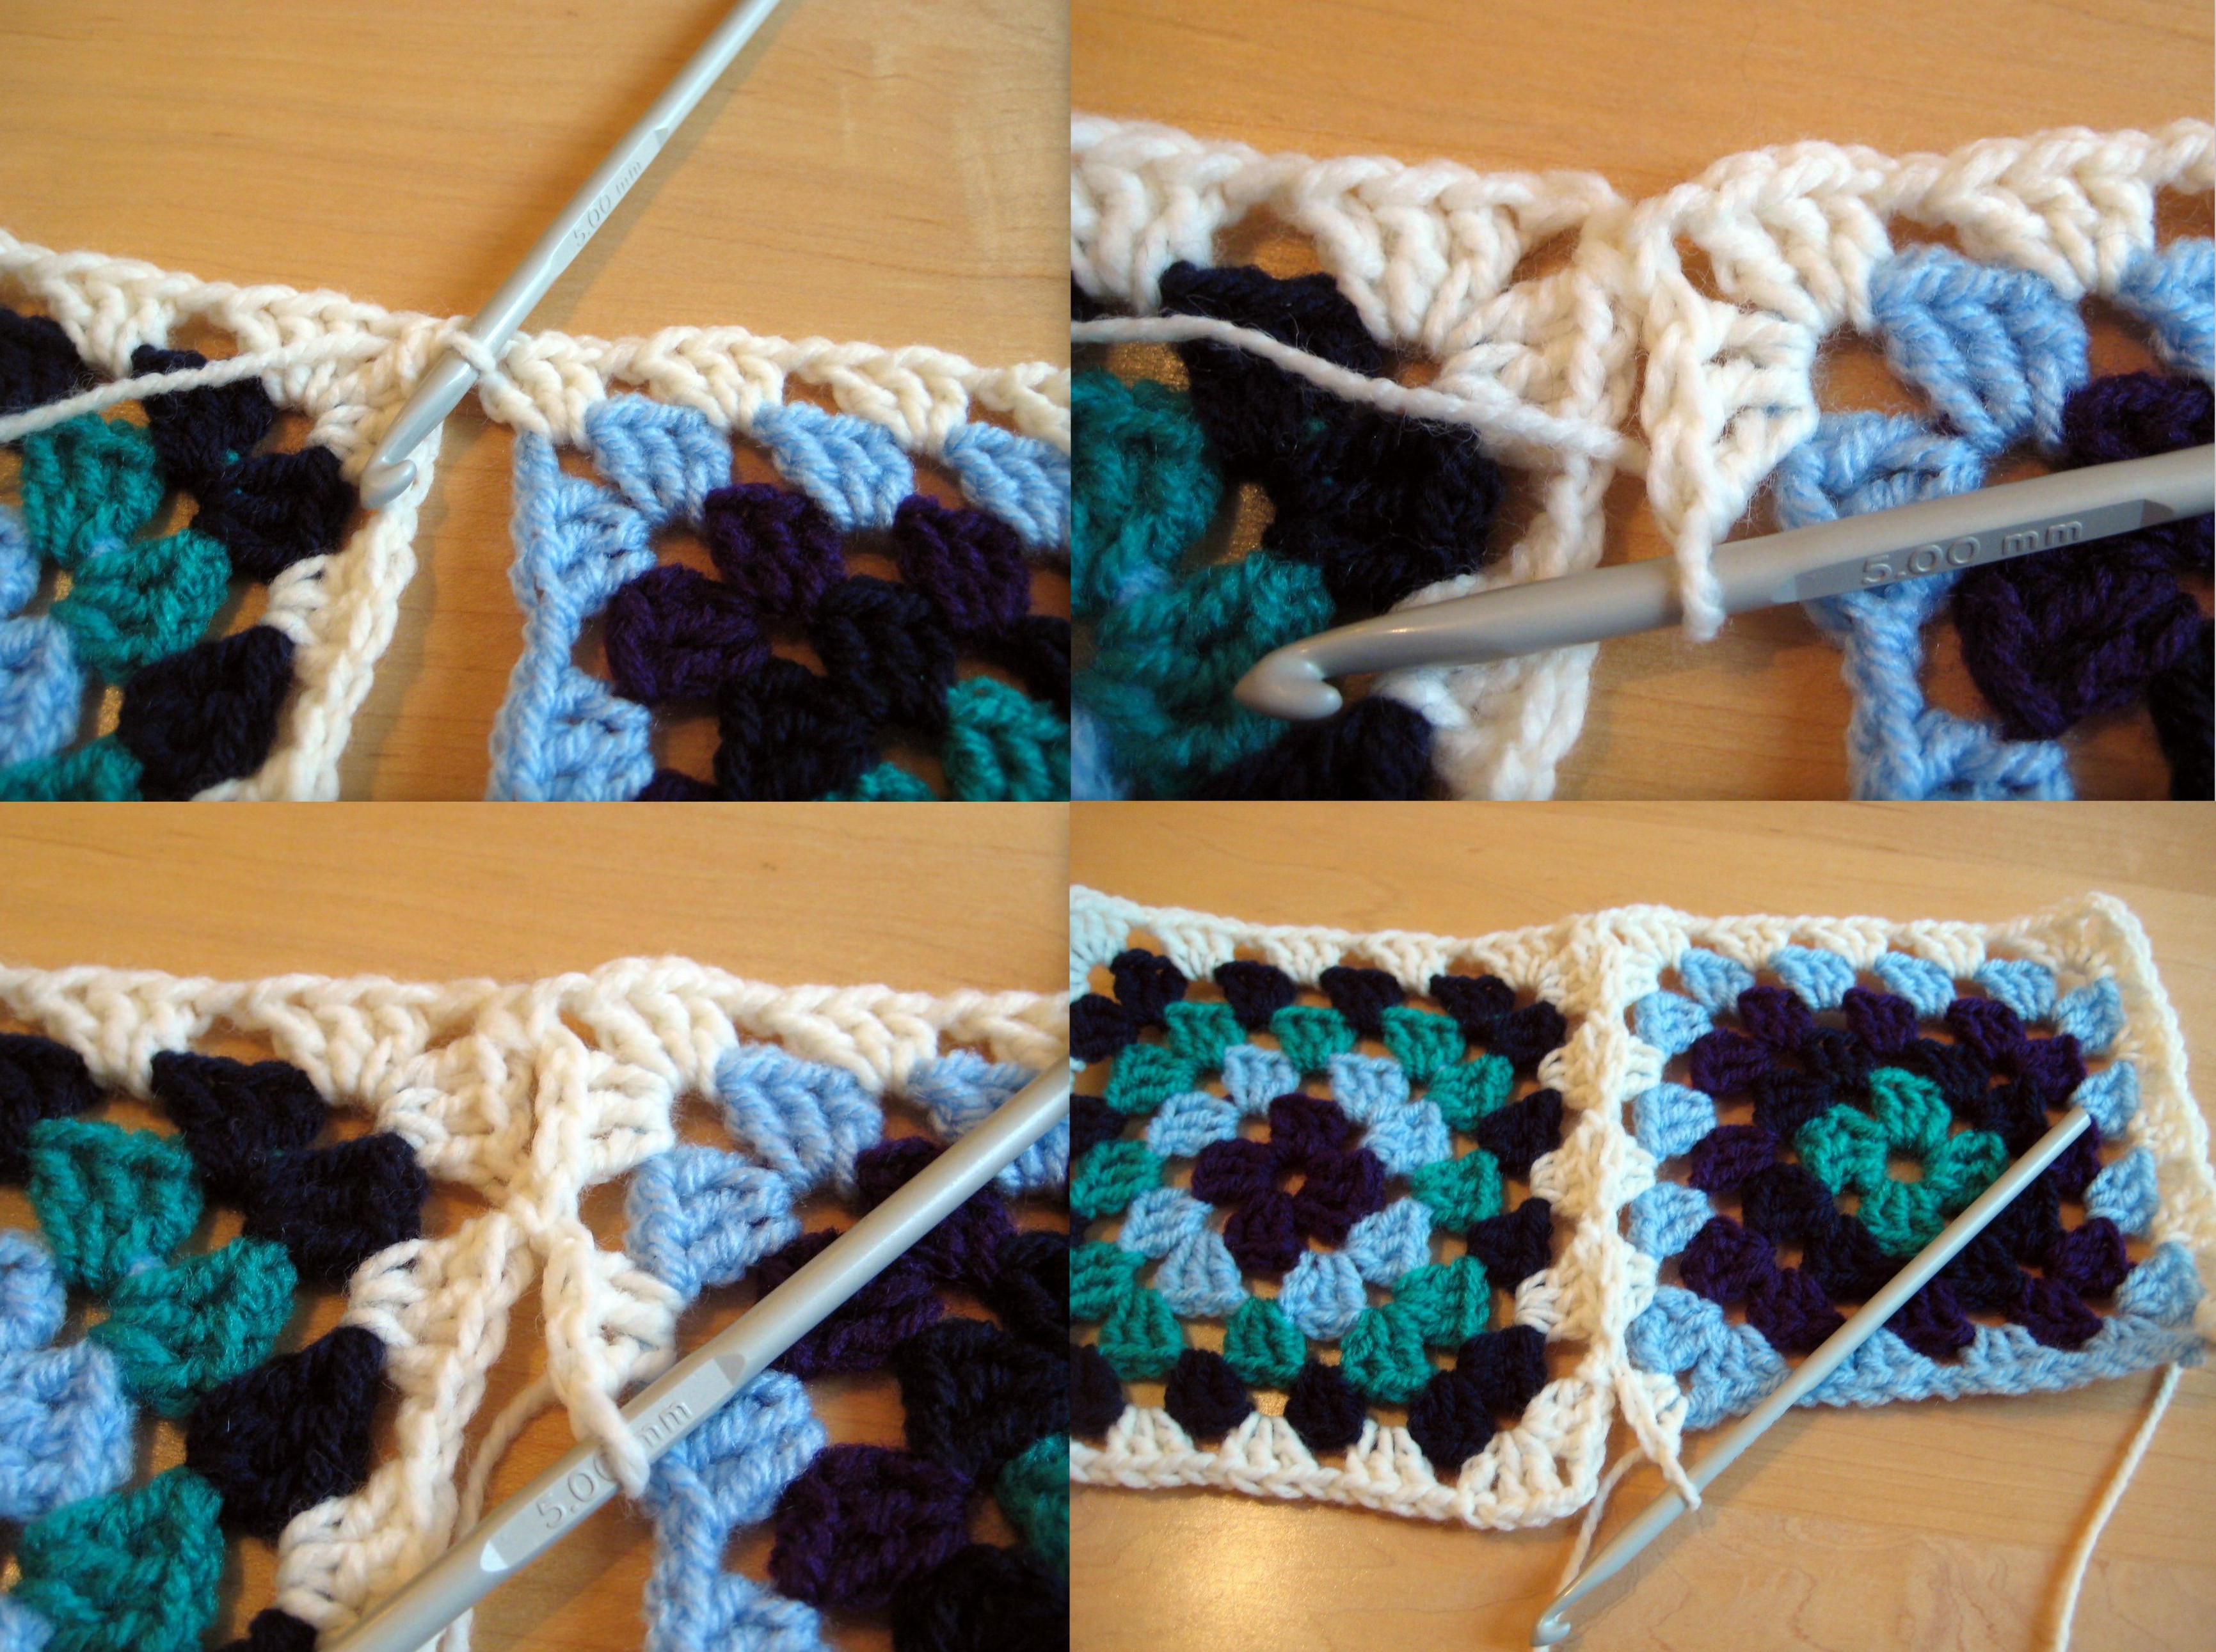
1: sl st into joining sq: 2: 3dc; 3: sl st into joining sq, 3dc; 4: joining the corner
At the next corner ch sp, do 3dc into the ch sp, sl st into the corner ch sp of the square you are joining to and ch1. Now 3dc into the ch sp of the original square corner, and complete the final side of the square as usual.

2 squares joined!
Joining a square on two sides:

Joining to 2 sides
After completing 1 side of the last round of your square, and you have done 3dc only into the corner ch sp, ch1. Now slip st into the corner ch sp of the square you are joining to.
Do 3 more dc into the corner ch sp of the original square. Now instead of a ch 1, sl-st into the ch space of the square you are joining to, and repeat along the side.

Joining the corner on 2 sides (click to enlarge)
At the next corner ch sp, do 3dc into the ch sp, sl st into the corner ch sp of the square you are joining to. Now do a 2nd sl st into the corner ch sp of the second square you are joining to. Do 3dc into the ch sp of the original square corner, sl st into the next ch space of the second square you are joining to, 3dc into the original square, and repeat along the side.
At the next corner ch sp, do 3dc into the ch sp, sl st into the corner ch sp of the second square you are joining to and ch1. Now 3dc into the ch sp of the original square corner, and complete the final side of the square as usual.

All joined up :)
Concerns: At first I was worried that the joins would not be strong enough compared with a more conventional method, but once each square was fully attached I felt the join was secure enough.
Positives: I have tried sc and sl st methods before, and both were much more time consuming than this way, and of course used more yarn. This method also results in less of a ridge on the seams – you may prefer this!
Drawbacks: It is worth bearing in mind that this quick method does leave gaps in your work when the fabric is stretched. For me this is not a big deal, the gaps are smaller than the granny holes, but if you don’t like this then this may not be the joining method for you!
Tip: If you like to crochet all your squares first, just crochet up to the penultimate row, and when you have enough squares add the last row and join as you go.

Seam gaps when stretched. Excuse my fingers!
How to make a Traditional Granny Square:
- Suggested yarn: dk or larger
- Suggested hook: 5mm (or as appropriate for yarn)
Chain 6, join with a sl st.
R1: Ch 3, (now work into the ring) 2dc, *ch2, 3dc, repeat from * 2 times, ch2, join into start chain with a sl st (4 chain spaces). Fasten off and join new yarn in any chain space.
R2: ch3 (counts as dc), 2dc, ch2, 3dc, ch1, *(Now work in next ch sp) 3dc, ch2, 3dc, ch1, repeat from * two more times, join into start chain with a sl st (8 chain spaces). Fasten off and join new yarn in any corner (ch2) chain space.
R3: ch3 (counts as dc), 2dc, ch2, 3dc, ch1, *(Now work in next ch sp) 3dc, ch1, (Now work in next corner ch sp) 3dc, ch2, 3dc, ch1, repeat from * two more times, 3dc in next ch sp, ch1, join into start chain with a sl st (12 chain spaces). Fasten off and join new yarn in any corner (ch2) chain space.
Work the next series of rounds the same way, putting 2 groups of 3dc’s into each corner, separated by 2ch, and 1 group of 3dc’s into the ch sps of the sides, separated by a ch1. You can work your square until it is the desired size, or even keep going making one giant granny square blanket!


I like this method, all I need are the squares to try it on!
Yes, making enough for a blanket can take a while! I haven’t finished this one yet, but I’m working on it whist watching tennis as granny squares don’t need loads of concentration. :)
Oooooooooooh! This is JUST what I needed…I’m picking up my hooks after about 3 years collecting dust. Gotta start off strong and simple, so I’m going with granny squares! Thanks for this…looks really simple! Yippee!
Great! :)
Reblogged this on Knit It Up and commented:
Just what I needed to get motivated to renew my adventure in crocheting! Enjoy!
it looks simple to do and maybe if I try it that way my squares well stay together thank you for sharing.
I say go for it! :)
Hi, I’ve just linked to this tutorial from my Granny Square Scarf post as I used your tutorial to make it. Please check you are happy with the link back. http://sumoftheirstories.blogspot.co.uk/2013/11/granny-square-scarf-tutorial.html
Thank you so much, I use this method all the time now.
Thanks! Glad you like the method. :)
I love thing like this very nice , thank you
You’re welcome! :)
Pingback: Easy Granny Square Joining – Crochet Tip | Do It And How
Thank you for this reminder. I haven’t seen this done since my grandmother taught me to crochet 40 some years ago. Brings back wonderful memories.♡♥♡
No problem Deb! :)
Pingback: 14 ways to Join your Crochet |